メインコンテンツにスキップ

Alienware Alpha R2 Solid State Drive Replacement

必要な工具と部品

  1. Alienware Alpha R2 Solid State Drive Replacement, Solid State Drive: 手順 1、 2の画像 1 Alienware Alpha R2 Solid State Drive Replacement, Solid State Drive: 手順 1、 2の画像 2
    • Unplug the device.

    • Press the power button and hold it for approximately 10 seconds to discharge any power stored in the device.

  2. Alienware Alpha R2 Solid State Drive Replacement: 手順 2、 3の画像 1 Alienware Alpha R2 Solid State Drive Replacement: 手順 2、 3の画像 2 Alienware Alpha R2 Solid State Drive Replacement: 手順 2、 3の画像 3
    • Flip the PC upside down.

    • Unscrew the case screws from each corner of the bottom of the case using a Phillips #2 screwdriver.

  3. Alienware Alpha R2 Solid State Drive Replacement: 手順 3、 3の画像 1 Alienware Alpha R2 Solid State Drive Replacement: 手順 3、 3の画像 2 Alienware Alpha R2 Solid State Drive Replacement: 手順 3、 3の画像 3
    • Pry open the case by splitting the seam at the bottom edge of the PC.

    • Lift the top half of the case to seperate the cover from the rest of the PC.

  4. Alienware Alpha R2 Solid State Drive Replacement: 手順 4、 3の画像 1 Alienware Alpha R2 Solid State Drive Replacement: 手順 4、 3の画像 2 Alienware Alpha R2 Solid State Drive Replacement: 手順 4、 3の画像 3
    • Press the two tabs located on each side of the CPU fan cover.

    • Lift the fan upwards and out to remove it.

    • (Optional) Pull the CPU's fan cable from its socket on the motherboard.

  5. Alienware Alpha R2 Solid State Drive Replacement: 手順 5、 3の画像 1 Alienware Alpha R2 Solid State Drive Replacement: 手順 5、 3の画像 2 Alienware Alpha R2 Solid State Drive Replacement: 手順 5、 3の画像 3
    • Disconnect the GPU fan cable from its socket on the motherboard.

    • Press the side tabs of the GPU fan case.

    • Simultaneously lift the fan cover up and forward to remove.

  6. Alienware Alpha R2 Solid State Drive Replacement: 手順 6、 3の画像 1 Alienware Alpha R2 Solid State Drive Replacement: 手順 6、 3の画像 2 Alienware Alpha R2 Solid State Drive Replacement: 手順 6、 3の画像 3
    • Installing the SSD card without removing the RAM could cause grinding of the edges between the RAM and SSD, resulting in damaged components. However, it is possible to skip this step and move straight to the SSD installation.

    • Pry the tabs on either side of the RAM holder away from each other with your fingers.

    • The RAM should pop upwards to rest at an angle to the motherboard.

    • Lift forwards and upwards to remove RAM from its slot on the motherboard.

  7. Alienware Alpha R2 Solid State Drive Replacement: 手順 7、 3の画像 1 Alienware Alpha R2 Solid State Drive Replacement: 手順 7、 3の画像 2 Alienware Alpha R2 Solid State Drive Replacement: 手順 7、 3の画像 3
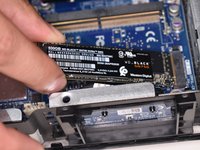
    • Face the SSD upwards.

    • Line up the pins on the SSD with the M2 slot on the motherboard.

    • Gently push the SSD into the slot where the pins line up.

    • Gently press the SSD towards the motherboard.

    • Screw in the retaining screw for the SSD using a Phillips #1 screwdriver.

    • While possible to install the SSD card without removing the RAM, it is recommended to remove the RAM card in order to prevent damage to either component.

終わりに

Congratulations, You have now successfully upgraded your Hard Drive Disk to a Solid State Drive. To reassemble, follow the steps in reverse order.

ある他の人がこのガイドを完成しました。

作成者

2人の作成者と共同で作成されました。

Andrew Pham Garcia

メンバー登録日: 10/02/20

169 ポイント

1ガイドが承認済み

チーム

University of North Texas, Team S1-G10, Raign Fall 2020 University of North Texas, Team S1-G10, Raign Fall 2020人のメンバー

UNT-RAIGN-F20S1G10

2 メンバー

2のガイドは作成済み

0 件のコメント

コメントを追加

統計データ:

過去 24時間: 1

過去 7 日: 13

過去 30 日: 44

今までの合計 2,563