メインコンテンツにスキップ

Alcatel One Touch Evolve 2 Rear-Facing Camera Replacement

必要な工具と部品

  1. Alcatel One Touch Evolve 2 Rear-Facing Camera Replacement, Rear-Facing Camera: 手順 1、 2の画像 1 Alcatel One Touch Evolve 2 Rear-Facing Camera Replacement, Rear-Facing Camera: 手順 1、 2の画像 2
    • Before disassembling your Alcatel One Touch Evolve 2, be sure it is powered off.

    • Make sure your nylon spudger is pressed thin at the tip. Nylon spudgers tend to dull after use, and a dull spudger will be more difficult to use in this repair.

    • Take a nylon spudger and pry apart the back plastic casing of the phone. Begin with the gap in the bottom right hand corner, and pry the spudger around the outside of the phone until it dislodges from the body.

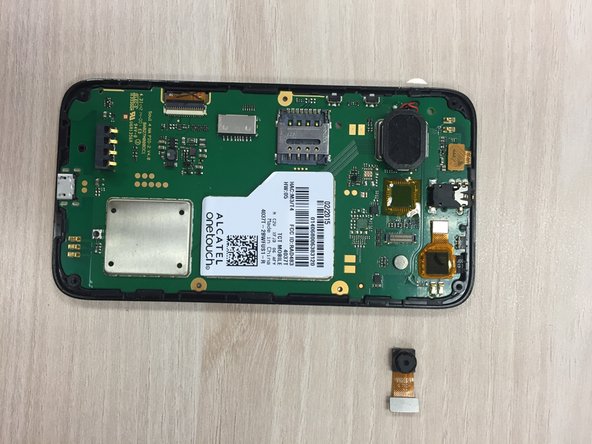
    • Once separated, remove the plastic backing from the phone and set it aside.

  2. Alcatel One Touch Evolve 2 Rear-Facing Camera Replacement: 手順 2、 3の画像 1 Alcatel One Touch Evolve 2 Rear-Facing Camera Replacement: 手順 2、 3の画像 2 Alcatel One Touch Evolve 2 Rear-Facing Camera Replacement: 手順 2、 3の画像 3
    • Remove battery from the back of device by prying the spudger underneath the battery, via the semicircular indentation at the top of the battery pack

  3. Alcatel One Touch Evolve 2 Rear-Facing Camera Replacement: 手順 3、 1の画像 1
    • Using a J000 screwdriver, remove the four screws from the four corners of the back of the phone body. Keep the screws together and set aside.

  4. Alcatel One Touch Evolve 2 Rear-Facing Camera Replacement: 手順 4、 2の画像 1 Alcatel One Touch Evolve 2 Rear-Facing Camera Replacement: 手順 4、 2の画像 2
    • This step may prove difficult as there are many pressure points holding the plastic backing in place. Use moderate force to pry them apart, but be careful not to snap the plastic or scratch the inside of the phone.

    • Use the nylon spudger to pry the plastic backing from the rest of the phone. Begin by using the indentation at the top left side of the of the phone as an access point. Work counter clockwise around the outside of the phone until the backing is dislodged.

    • There are plastic latches that secure the cover to the rest of the phone. These points prove difficult to dislodge. Use the gaps between them to create leverage.

  5. Alcatel One Touch Evolve 2 Rear-Facing Camera Replacement: 手順 5、 2の画像 1 Alcatel One Touch Evolve 2 Rear-Facing Camera Replacement: 手順 5、 2の画像 2
    • The camera should detach easily. If you are experiencing difficulty detaching it, stop and make sure the correct piece is being worked on.

    • Use the nylon spudger to gently dislodge the broken camera from the inside of the phone. Insert the spudger underneath the corner of the metal plug, and pry upwards.

終わりに

Follow the above steps in reverse to reassemble the device.

2 の人々がこのガイドを完成させました。

作成者

8人の作成者と共同で作成されました。

Emma Crane

メンバー登録日: 02/11/16

21 ポイント

1ガイドが承認済み

チーム

Ohio State, Team 1-2, Burgess Spring 2016 Ohio State, Team 1-2, Burgess Spring 2016人のメンバー

OSU-BURGESS-S16S1G2

4 メンバー

2のガイドは作成済み

コメント 1 件

Wow! what a great guide!

Colan Callahan - 返信

コメントを追加

統計データ:

過去 24時間: 0

過去 7 日: 1

過去 30 日: 5

今までの合計 571