はじめに
今や“AirPods”と言えば、小さなe-waste大惨事、あるいは高音響のオーバーイヤーヘッドフォンの代名詞となりました。AirPodsという名前が付いているだけに、知っておかなければならないことがあります。それはAirPods Maxは修理可能なヘッドフォンなのか?もしくは6万円以上もする最高級でありながら、修理不可能なヘッドフォンに最先端のエンジニアリングが閉じ込められているのか?ということです。
私たちは、このPodsを解体してDigital Crownや奇妙なLightning ポート、ミクロンスケールのネジ以外にも、さらに深層まで入りこんだ分析はできないか考えました。いつものように内部を隅々まで点検して、Creative Electron提供のX線画像を重ね合わせて確認をしています。それだけに留まらず、SonyとBoseのヘッドセットも同時に分解を行いました。プレミアム級ヘッドフォン市場に新登場した、Appleの最新モデル(Beatsは対象外)との違いを比較しています。
ご参考に、前モデルAirPodsの分解も公開しています。最新ガジェットや修理にまつわるニュースを入手したい方は、YouTube チャンネルを登録いただいたり、 Twitter(英語)、 Twitter(日本語)をフォローください。いち早い最新ガジェットの分解ニュースをメールボックスに届けて欲しい方は、ニュースレターを登録ください。(英語配信)
必要な工具と部品
-
-
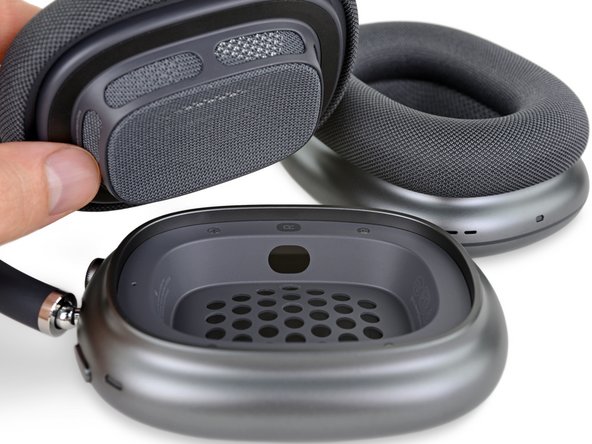
AirPods Maxは6万円以上もする大きなお買い物です。それだけの大金をはたけば、何が手に入るのでしょうか?
-
Appleが設計した2つの40mm ダイナミックドライバ
-
カラーマッチしたマグネットイヤークッション
-
Apple H1ヘッドフォンチップ(各イヤーカップ)
-
アクティブノイズキャンセリングのための8つのマイク
-
Appleモデルに採用されるAACコーデック対応のBluetooth 5.0
-
ソフトタッチなSmart Caseと充電用Lightning -USB-C ケーブル
-
-
-
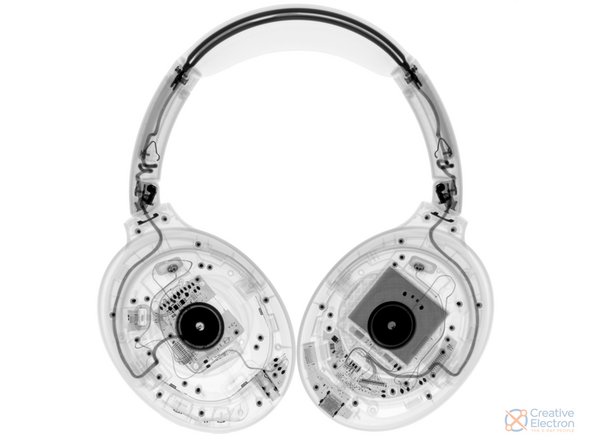
分解を始める前に、このヘッドフォンをX線に当ててみましょう。(Cretive Electron提供)
-
通常のX線画像以上に、このヘッドフォンの画像は透明度が高く、詳細な点まで確認できます。私たちが発見したのは、
-
合計2つのバッテリーセル。片側(画像左側のカップ)のイヤーカップに搭載。
-
X線画像から、バッテリーと反対側(右側)のイヤーカップ内には、バッテリーの重量に相当するものが見当たらず、空洞のようです。どこか別の場所に仕込まれているのでしょうか?これは分解時の確認事項です。
-
大型デュアルリングスピーカードライブのマグネットとスピーカーユニットがネジで固定されていますーこれはグッドサインです!
-
小さなマイクロフォン用マグネットやブラケットが並列して、ネジも沢山確認できます。
Would love to see an x-ray of the Smart Case too - I’d like to see if there are any magnets within that trigger the Low Power Mode when the ear cups are placed within (similar to how the iPad Smart Covers use magnets to trigger screen sleep/wake). Thanks!
Same here! I would very much like to try to fake out the case to allow me to store the headphones in more than one place
-
-
-
落ち着いて考えましょう。これはApple Watchの分解でしたか?それともAirPodsの分解?
-
クリスマスの日に大きくなったグリンチの心臓のように、Digital Crownはオリジナルサイズの3倍まで大きくなりました。しかし、このDigital CrownはAirPods Maxの音量調節や選曲ができます。
-
AirPodsの下部端に沿って、幾つかホールがあります。しかしどれも3.5mmではありません。
-
ワイヤでサウンドを聴くには、オーディオと充電という二重の役割があるLightningポートでのみ可能です。しかしながらサウンドを聴くには、専用のケーブルを購入しなければなりません。これはまさに…思い切った決断ですよね、Apple。
-
分解最初の作業として、マグネットのイヤークッションはすぐに外せます。AirPods製品に簡単に交換できるパーツがあるなんて。2020年の私たちの行いが良かったから、これは報いに違いありません。
-
Appleロゴを探してみたい方は、少し隠れた所に付いています。
-
-
-
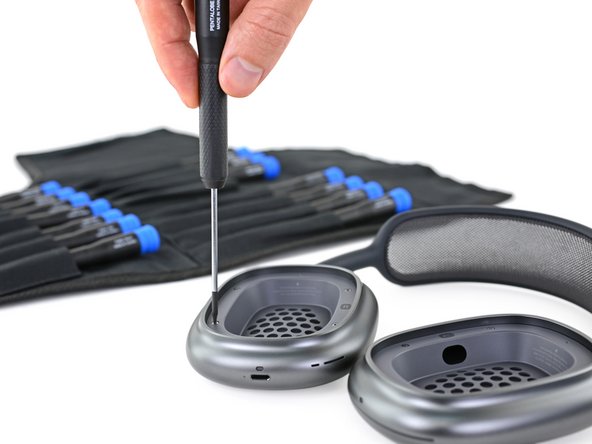
イヤークッションの下には、ホールがあります!ちょっと待ってください。ここにあるのはネジでしょうか?画面をズームインしましょう!
-
グッドニュースは、今のところ接着剤との格闘がありません。前AirPodsモデルの分解の経験と比べて順調に進んでいます。前回のAirPodsのオープニング作業は、メスのようなナイフを使用して破壊しながら切開しました。
-
少し残念なニュースは、ペンタローブネジが使用されています。でも私たちにはお手のもので、15種類のネジに対応できるMarlinドライバーセットがあればたじろぐことがありません。
-
-
-
ここから真剣勝負の始まりです。
-
ネジが使用されているので希望が湧いてきますが、このネジは少し…回転させたときの動きが奇妙です。左右に回転するものの、少し回すと行き止まりです。
-
ネジを無理やり外そうとすれば、カップの内側で破損してしまったパーツが落下するでしょう。それでもカップを外すことはできません。一体どういうことでしょうか?
-
判明した事は、ネジを外してはいけないということです。ネジを半回転させれば内側のロックが外れます。私たちの仲間であるSnazzy LabsのQuinnがその様子をビデオに公開しています。AirPors Maxのサウンドクオリティについてもレビューしています。こちらからご覧ください!(英語のみ)
-
次に待っている厄介な問題は接着剤です。つまり、ロックを外したりネジを取り外すだけでは次へ進めません。ヒートガンを準備して、プラスチックが溶解しないように細心の注意を払いながら、接着剤を柔らかくします。
-
このイヤーカップの端をこじ開けれる決定的な隙間はありません。試してみれば、どこかが破損するでしょう。既にネジは外れているので、便利な精密プローブを使ってネジ穴の下のフックを引っ張ると、ついに…内部侵入成功です!
Was it really adhesive? It sort of looks like there are 4 neo magnets around the perimeter of the ear cup that may have been holding it in… The silvery arc things in the corners?
The silvery arcs are magnets as you noted, but they are there to hold the magnetic ear cushions. There is definitely adhesive holding the plastic ear cup grilles in place. Since there are four nifty twist-lock tabs already holding the grilles, maybe the adhesive helps dampen vibrations or buzzing?
By adding a few drops of isopropyl alcohol in the gap and massaging it all the way around the edge by gently pressing it will loosen up tot the point where you can lift the cups out without the use of any tools. This will only take a minute or so. Then it is also easy to remove the remaining adhesive. No heat, force or tools required.
-
-
-
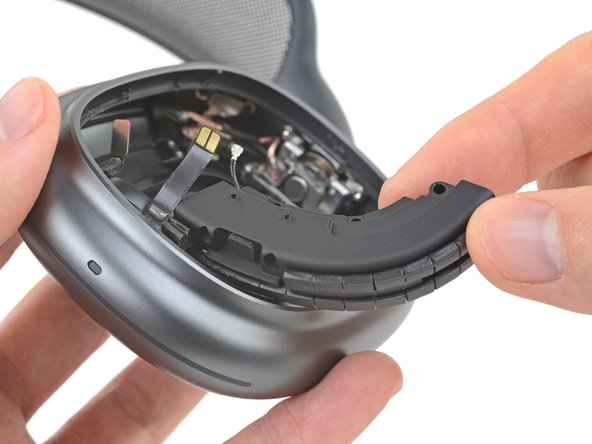
イヤーカップのグリルが外れました!各グリルにマイクロフォンが1つずつ付いています。ここから耳に届くサウンドが流れて、EQ調節のためにH1チップに情報が伝送されるのでしょう。もしくは、Tim Cookのイヤフォンに直接繋がるかもしれません。
-
各40mmドライバーは数本のネジで固定されています。このうち1本は、非常に固く締められたスタンドオフネジです。一瞬ドキッとしますが、Mahiドライバーキットを取り出して、トルクセットの#6ビットを使えば…完全にフィットしなくても、なんとかネジは外れます。
-
-
-
ネジを外してドライバーを裏返すと、修理しやすいバネコンタクトが確認できます。素晴らしい!
-
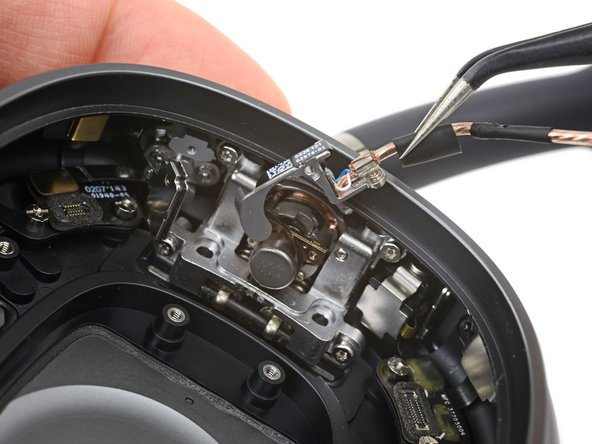
つまり、次のターゲットも簡単に外せるということです。バッテリーです。X線画像で確認したように、2つのバッテリーセルは右側のイヤーカップに搭載されて、1本のケーブルで繋がっています。
-
さらに良いことは、バッテリーセルは接着剤ではなく、ネジで固定されています。その上、iPhoneで使用されているタイプのコネクタ1本でパワーを供給します。半田付けはされていません。
-
このデザインはAirPods製品の中で、驚くほどシンプルです。接着剤だらけのオープニング作業もなく、いたって簡単です。考えてみてください。消耗品パーツを簡単に交換できれば、デバイス全体を廃棄する必要はなくなります。
-
平行に配線されている、Sunwoda製バッテリーセルの総容量は、4.35 Vで総エネルギーは644mAh、2.53Whです。バッテリーサイズは約5.7 x 20 x 28 mmです。
-
このバッテリー容量は、連続使用時間が約20時間のBose NC 700ワイヤレスヘッドフォンの容量と肩を並べています。Sony WH-1000XM4sの連続使用時間は30時間とより長く、それに対応してバッテリーの容量は4.1 Whもあります。
-
-
-
-
ここからはチップID情報です。
-
STMicroelectronics STM32L496QG 32ビットArmマイクロコントローラー
-
Apple 343S00404 Bluetooth SoC
-
Winbond W25Q256JW 256 Mbシリアルフラッシュメモリ
-
Cirrus Logic CS46L10A0 、おそらく1chのオーディオコディック
-
Cirrus Logic CS44L22 1-Ch、おそらく1chのオーディオコディック
-
Texas Instruments SN2501、おそらく バッテリーチャージャーIC
Huh, only a 32MB Flash chip? I suppose for wireless headphone firmware, that’s all you really need.
-
-
-
Side AのチップIDはまだまだ続きます。
-
Bosch Sensortec、おそらく慣性計測ユニット
-
Bosch Sensortec BMA456 3軸加速度センサー
-
NXP Semiconductor CBTL610A38、おそらくディスプレイポートマルチプレクサ
-
Lattice Semiconductor LCMXO2-2000ZE MachX02 フィールドプログラマブルゲートアレイ
-
Diodes Incorporated PI3USB102E 480 Mbps USB 2.0スイッチ
-
Texas Instruments TMUX136 2-Ch. 2:1 アナログスイッチ
-
Texas Instruments SN74AVC4T7744ビット2電源バストランシーバー
Wait, what? Display Port Multiplexer? What is that doing here?
-
-
-
次はボードのSide Bです。何が搭載されているでしょうか?
-
Apple 338S00517、おそらくパワーマネージメントIC
-
NXP Semiconductor CBTL610A38、おそらくディスプレイポートマルチプレクサ
-
Texas Instruments TLV341 オペレーショナルアンプ
-
Texas Instruments TLV3691 コンパレーター
-
Texas Instruments TPS62743 300mAステップダウンDC-DCコンバータ
-
Diodes IncorporatedPI3USB102E 480 Mbps USB 2.0 スイッチ
-
Maxim Integrated MAXM17552 100mAステップダウンパワーモジュール
What would be the purpose of a Displayport Multiplexer on a device that has no display output? Are they using it strictly for audio purposes?
-
-
-
Lightningポートはトルクスネジ4本で固定されています。うち2本は非常にアクセスが難しく、4mmナットドライバーにT2トルクスビットを数珠つなぎにしてようやく対応できます。それ以外、この小さなスペースに入りません。
-
ポートの取り出しは難しい作業ですが、モジュールは修理を考えると重要な利点です。ポートが破損しても交換できなければ、AirPodsの充電ができません。
-
次に取り掛かるのは、各カップのエクステリア下側端にある2つの切り欠きです。(画像3番目) この裏側には、プラスチックのエアチャネル(空気孔)があります。このエアチャネルはドライバ裏側の空洞に直接繋がっていて、空気を流します。これに名前を付けるとしたらair port(エアポート)と言えるかもしれません。
-
これは大音量でも歪みのない、最高レベルのサウンドをドライバに伝える通気システムではないかと想定します。
-
-
-
左側イヤーカップ内部のアンテナライン下に隠れているのは…大型のアンテナです。バッテリーが搭載されたイヤーカップとの重量バランスを保つものではないかと想定しましたが、重量と言えるほどの重さはありません。
-
より詳細に確認したい方は、X線画像をご覧ください。
-
上部マイクロフォンは小さなメタルブラケットにネジとプラスチック製リベットで固定されています。
-
半田ごてがあれば、リベットを外せます。しかし半田ごてが必要ならば、修理向きとは言えません。
-
次に調査するのは、メカニカルボタンハードウェアです。ボタンとリボンケーブルは簡単に外れますが、それ以外は小さな六角ナットで固定されているため、私たちのツールキットでは対応できません。
-
-
-
どんなヘッドホンヘッドバンドも装着位置を傾けたり、回転させたり、イヤーカップを繋げる必要がありますが、このように作動するヘッドバンドはAirPods Max以外、見たことがありません。
-
Appleのエレクトロメカニカルなヒンジハードウェア構造は複雑でありながら、想像を超える秀逸品です。このデザインを考慮すれば、AirPods Maxの目を見張る価格を見ても驚きはしません。
-
このヒンジは耐久性が必要であると同時に、バッテリーからの電力供給を確実に受けながら装着感の高いヘッドバンドでなければなりません。
-
Appleはジョイント部分の回転パーツに巻きつけ式のフレックスケーブルを使用しています。これは賢明な配線方法で、ケーブルを保護するためのストレインリリーフ(ケーブルクランプ)が組み込まれています。そしてヘッドバンドと繋がるるためのバネコンタクトに切り替わります。
-
トルクスネジが外れると、ジョイント部分が詳細に確認できます。
-
-
-
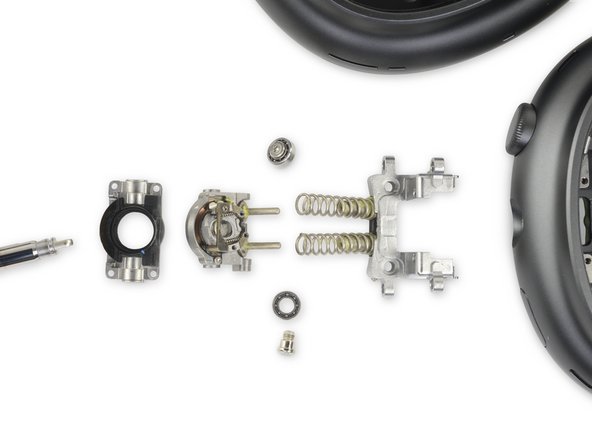
T4、T3、T2に加えて、最後に極小T1トルクスネジを数本外せば、ジョイント部分が取り出せます。そしてスプリング、極小ベアリングと精密機械加工されたマイクロハウジングが出現します。
-
2つの大型スプリングは、頭部に柔らかい密着性を与えてくれます。一方、小型スプリングは、これからこの秘密を暴いていく素晴らしい仕掛けに無くてはならないものです。
-
なぜAppleはこのパーツにエンジニアリングの総力を注いだのでしょうか?その要因は次の通りです。
-
イヤーカップとヘッドバンドを繋ぐ2箇所のジョイント部分は、ヘッドフォンの装着感を決める重要なパーツです。装着時の頭部に快適にフィットするために、ジョイントはどんなアングルでも自由に動かせなければなりません。装着や取り外し、位置の微調整などに幾度となく動かされ、揺すられ、引っ張られると強度が重要になります。
-
さらに、ヘッドフォンは重音振動のポケットです。各イヤカップ内部のドライバは耳に届くサウンドを生成するために、長時間にわたって高速で振動します。そのため、イヤーカップ内部のジョイントハードウェアは相当な強度が必要です。
-
ある噂によると、Appleはマグネットイヤークリップのように、AirPods Maxのヘッドバンドを簡単に交換できるデザインを考えていたようです。しかし、この機能は最終デザインに入らないと考えられていました。しかしながら、このジョイントはとても複雑な構造で、さらに別つのポイントがあるようです…それは。
Hey do you know what material that little U shaped guy is made of? It looks kinda like aluminum but my gut tells me that would be too weak!
Hey, I know I’m late to the party, but those parts are clearly Metal Injection Molded not “precision machined”. The marks are not the uniform round sweeps you’d expect from a CNC.
-
-
-
ここに仕掛けがあります。これは最高のトリックです。ジョイントは複雑な構造でありながら、SIMカードを取り出すようにAirPods Maxからヘッドバンド全体を取り外すことができます。わざわざイヤーカップを開く必要もありません。
-
皆さんと同じように、これには私たちも驚きました。こんな小さな所にもAppleは修理しやすいデザインを配慮したのでしょうか?それとも持ち運びしやすい機能性を考えて?両方?6万円もするヘッドフォンが…お買い得に見えてきませんか?
Incredible! Apple engineering and thoughtfulness aren’t given enough credit!
They are given credit when it’s truly innovative — such as this headband. But other times, they aren’t as impressive.
But wow, toolless removal of headbands (without tangling wires!) is very very impressive.
___
Look like it had some inspiration from the knob of a watch.
Ok, I removed the magnetic cups and detached both sides from the headband, and the release was fluid.
Re-attaching the headphone to the headband is proving to be not nearly as simple as removing them…
The engagement mechanism to re-attach each unit to the headband is simple. Almost no force is required, as I learned before breaking mine.
~~- Insert the connector at the end of the headband into the cylinder in the headphone casing
- Push it in until it hits the bottom of the cylinder in the casing
- rotate the headphone casing L/R by 50 or 60 or 90 degrees around the axis of the metal arm, until the connector engages further - you’ll feel the engagement
- it will click into place pretty much by itself, no need to grip hard and push
~~As soon as you reconnect both sides, can fire it up and listen normally. I’m listening with NC on as I write this. No warnings or notifications etc popped up.
~~NB:
You do not need to use a SIM slot pin tool during re-attachment, do not need to use this to push in and actuate the lever like you did to remove them. I wasted time trying this, so don’t break your set by pinning it to death.
You do not need to rotate about the other (gimballed) axis during re-attachment.
I got a pair of these in the middle of march this year and they stopped working. i can connect to my IPad and can charge the Air Pods max but no sound. i’ve only used them a few times.so i sent them of to apple to be repaired, but today Apple told me i would need to pay for the repair because the fault was due to water damage. i haven’t taken them out side since im house bound after a serious brain injury. i latter found out the condensation is a common complaint. but apple would not even let me talk to some one in a ‘higher department’ because they only use the phone to talk to customers and since i cant used the phone correctly i cant talk to anyone about this. the operator even conceded that apple do discriminate against some customers who cant use a telephone.
what do i do now?. i cant afford to pay£271 for a repair, which seems to be a design fault. Not accidental damage. i am screwed. can i take apple to court?
Vraagje. Zit er een warranty sticker in de pinhole? Online vind ik maar 1 iemand die beweert dat dit het geval is, dit is dan zonder bewijs/foto of enig ander bewijs.
-
-
-
AirPods Maxの分解はこれで終了です。このヘッドフォン内部は驚嘆するほど複雑な構造です。
-
接着剤による厄介なオープニング作業もあります。修理は簡単ではありませんが、可能です。
-
そしてAppleが選ぶネジとは、私たちは常に愛憎の関係にあります。ネジを使用しているのは(接着剤に比べて)喜ばしい一方で、Appleが選ぶネジは好みではありません。
-
このヘッドホンのリペアビリティスコアを付けて分解を終える前に、最後にもう1つ…2つ…片付けることがあります。
Great teardown, thanks! But, not complete! What about the headband? I’d love a look at how Apple achieved that silky smooth yet secure headband adjustment. I’d also love a look at their attachment and spring or damping geometry for the headband support that rests on your head.
-
-
-
大型で高額なヘッドフォンをデザインしたAppleの取り組みを詳細に評価するため、デジタルクラウンやLightningポートが付いていない、他ブランドのヘッドフォン2モデルも併せて分解しました。
-
まず最初に、人気のSony WH-1000XM4sです。(価格; 約35000円)
-
このハンドセットはプラスチック素材で、Creative ElectronのX線画像で見るとより透明度が高いです。
-
-
-
Sonyのイヤークッションはクリップで内側に固定されています。マグネットは使用されていません。クリップは脆く、破損することがあるので、マグネットの方が理想的です。
-
クッションの下には、内部パーツを固定するフォームが入っています。フォームライナー下のプラスチックカップに、ドライバーが入っているます。
-
エクステリアのパネルを先に取り出して、各イヤーカップ内側のネジを外します。(マークを入れているので、すぐに確認できます!) その後でドライバを取り出せます。さらに分解を進める前に、裏側を確認しましょう。
Could you make a full teardown of this?
Could you make a full teardown of this ones?
It’s ugly inside!
Who would really look inside these headsets anyways, certainly not an organization like iFixit.
SGpro -
-
-
-
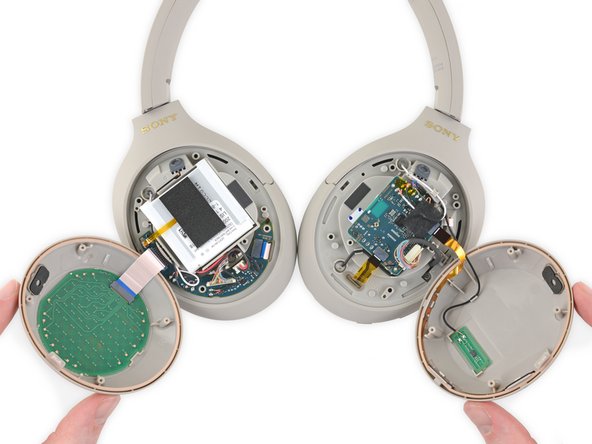
左側イヤーカップ裏側の正方形をしたボードに、SonyのQN1プロセッサとMediatek bluetooth SoCチップ、その他チップが搭載されています。ご興味のある方は、こちらから両側のボードの画像をご覧いただけます。
-
右側イヤーカップの裏側にはバッテリーが搭載されています!コネクタは簡単にアクセスできますが、4.1Whセルは接着パッドの上に固められています。イソプロピルアルコールを数滴注入して、バッテリーを外します。
-
両側のイヤーカップでは、筐体に配線されている全てのワイヤがホール内にホットグルーで固められています。このために、コンポーネントを動かすのは難しく、ドライバーの下に搭載されているUSB-Cポートもしくは3.5mmジャックにアクセスするのは大変な作業です。
-
全体的に、解体はそれほど難しくありません。幾つか難点もありますが、長く止めどない作業が続いたAirPodsの分解と比べると、シンプルです。
-
使用されている全てのネジは、#00プラスネジです。イヤークッション、ヘッドバンド、ボタンやポートは全てモジュールで交換が可能です。
-
バッテリーは接着剤で固定されており、解体作業は難易度の高い箇所があります。
-
ホットグルーが使用されており、3.5mm auxジャックやドライバー用のコネクタは修理向きでないタイプです。
-
-
-
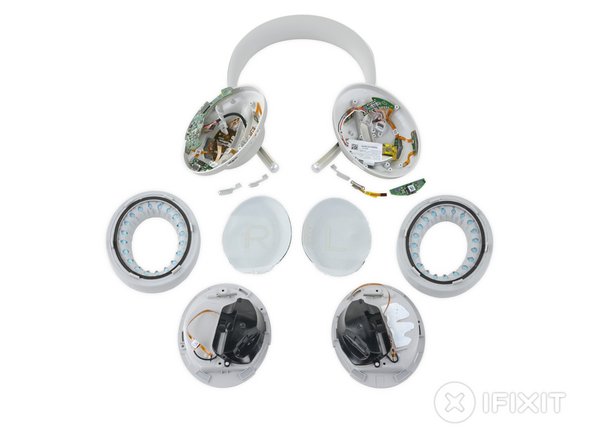
Sonyのヘッドフォンと同様、このイヤークッションはカップのハウジングにクリップで留められています。スパッジャーを使えば、クリップは外れます。AirPodsほどエレガントではありませんが、上手く外れます。
-
SonyやAirPodsモデルとは違い、スピーカーグリルを覆っているクロスライナーに、イヤークッションが付けられていません。LとRの表記されているライナーは接着剤で固められています。そのため、ライナーを裂かずに剥がすのは至難の業です。
-
ライナー下のイヤーカップの入り口には、トルクスセキュリティネジが使用されています。
-
各カップの内部にワイヤが詰まっています。メインの回路基板が搭載されている右側のカップ内部は、ワイヤが絡まっています。
-
回路基板にはQualcomm CSRA68105 Bluetooth audio SoCが搭載されています。基板のフロントと裏側を詳細に見たい方向けに、全解像度の画像を公開しています。
It’s almost a tradition for overhead headphones to feature clip-on cushions and (optional) stick-on liners.
Usually if one end up in need of removing it they will likely need to replace it in the first place.
Again, not as elegant as some magnetic snap-on, but this make them less complicated.
-
-
-
裏面のドライバの隣りに、2.39Whバッテリーが搭載されています。長いワイヤがコントロールボードと繋がっています。しかし、接続部分は半田付けされています。
-
お知らせ: ヘッドバンドはネジで固定されています。しかし、半田除去をしなければ完全に取り出せません。良いお知らせ: 2.5mm auxジャックはモジュールで、ネジで固定されています。
-
悪いお知らせ:マイクロフォンは接着剤で固定されています。さらに悪いお知らせ:USB-Cコントロールのボードはモジュールですが、どういう訳かプラスチックのリベットで固定されています。
-
分解のまとめ:
-
イヤークッション、ドライバ、2.5mm auxジャックとボタンは簡単にアクセスができ、パーツの交換が可能です。
-
バッテリーは簡単にアクセスできますが、接着剤を剥がさなければなりません。左側イヤーカップの回路基板とバッテリーの接続は、半田付けされています。
-
多量のホットグルーによってマイクロフォンとその周辺の回路基板が取り出せません。そしてUSB-Cポートは1回限り使用できるリベットで固定されています。ヘッドバンドの接続を外す作業は少し手こずります。そして(広範囲な)半田付けをしなければ外すことができません。
-
-
-
AirPods Maxの内部は細部に至るまで精巧で、ヘッドフォンというよりもまるで腕時計のようです。
-
イヤーカップのオープニング作業では、奇妙なネジや接着剤に戸惑いますが、複雑な構造にも関わらず、Appleの初代オーバーイヤーヘッドフォンは実際に修理しやすいものです。ー適切なツールと努力があればの話ですが。
-
簡単に取り外せるイヤークッションとヘッドバンドがApple製品にあるように、DIY修理向きなのは喜ばしい事でしょう。
-
競合モデルとの分解をした結果、AirPods Maxが6万円以上する理由が分かりました。SonyとBoseはそこまで高額ではないものの、比類のないほど高度な技術が加えられたAirPords Maxと内部比較をしてみると、2つのモデルはまるでオモチャのように見えてきます。
-
ついに、AirPodsの中でリペアビリティスコア0以外のモデルが登場します…
-
- イヤークッションはマグネットのように装着したり、取り外しができます。(ツールは不要です)
- ヘッドバンドをイヤーカップから取り外すには、紙クリップの先端もしくはSIMカード用のイジェクトツールで押し出します。作業は簡単です。
- ドライバとバッテリーはネジで固定されており、修理しやすいボード接続です。
- ネジは接着剤よりも絶対的に好ましい一方で、このモデルに使用されている多くのネジの種類は特殊です。スタンダードなツールキットでは足りず、広範囲な特殊ツールセットが必要です。
- ペンタローブネジと接着剤がイヤーカップの入り口をガードしています。内部パーツの修理は複雑です。


まとめ
リペアビリティのスコア


(10点が最も修理しやすい指標です)
以下の翻訳者の皆さんにお礼を申し上げます:
100%

Midori Doiさんは世界中で修理する私たちを助けてくれています! あなたも貢献してみませんか?
翻訳を始める ›
45 件のコメント
Perhaps less aluminum is removed from the headphone that doesn’t have the batteries. That would offset the weight.
I have to say that is some gorgeous construction for a consume headphone. I realize these headphones are in the upper end of consumer head phone prices. But they do remind me of what the original iphone felt like compared to all the plastic phones of the day. I’m really curious if all those chips and mics really do create “better” sound. I really think apple should have included 32gb of flash for onboard music storage. Especially at this price point. It would allow even lossless music to be enjoyed on these.
I agree, on board storage is a brilliant idea. Unless these have a very balanced frequency response and not a hyped consumer sound then that kinda defeats the purpose of lossless.
DMN -
The frequency response has been tested (search Crinacle). It’s definitely a consumer oriented frequency response with some bass and treble boost, but they do the bass boost better than the other 350 dollar noise cancelling twins with a ramp up that only starts below 100Hz. Of course, these aren’t studio monitors, and most consumers will prefer this FR. If that’s worth over double the price of the frequently on sale Sony’s is another question.
tipoo -
Crinacle’s review is really flawed imo, he completely ignores the fact that the headphones should be measured against a harmon curve, and not whatever hybrid he’s using there with completely flat bass (wtf). Measured against a harmon curve the APMs do amazing.
Nate -
But crinacle did plot his measurements against the Harman target in his review.
9458 -
Not sure what you’re saying Nate, he did base it off the Harman curve.
tipoo -
I came to this article to see if there were any hidden internal storage (& wifi?) with the hopes that these could secretly support Apple’s new lossless offerings with a software update - use bluetooth / (missing) wifi to transfer the entire file to the headphones rather than stream over bluetooth, which doesn’t have sufficient bandwidth for lossless audio (IINM).
I’m not even sure these can resolve lossless audio compared to AAC, but for 550 USD, they should. I’m disappointed they only have one driver per can, should at least be bi-polar.
The tear-down reveals 256 memory… is that enough? Maybe it’s only enough for its OS/FW & maybe store a compressed song or podcast… I could have sworn I read somewhere that AirPods transferred the file rather than just stream via Bluetooth… IDK.
Honestly, at this price point, 83% more than the OG HomePod which has an A8 & 16GB, they should at least have AirPlay & a few GB built in to support higher fidelity audio.
They are super comfortable & don’t creak like my plastic Sony’s.
This would be cool if it were clear colored plastic, but it would change the sound profile a bit as well as making then FEEL considerably cheaper, which isn’t something you want at this price point.
I would bet the weight is in the boards; the heavier boards are on the side without the batteries.
Richard B. - 返信
Would you mind doing some sort of cross-section of the top of the headband? I’m curious as to how the mesh is held inside of the two rails, like is it clamped down on the mesh, or…?
I hope you can switch the control side to the other side by switching the cups so I can use my left hand to control vs the right.
My Beats headphones were like these. I just used my other hand to control them.
Not sure what you mean by “Cups”, but if it is the removable padding - no. They are made for one side only. The controls are on the right.
is there really only one Bosch IMU sensor for the whole unit? That would be a shame that there isnt one per ear…
kindly get closer to the hinge mechanism with this brush contraction. thanks
Why does iFixit call double sided sticky tape glue? Isn’t glue generally a liquid? Technically speaking for example, the iPad battery and logic board are held together with some industrial strength adhesive tape. They don’t take a bottle of glue and squirt it around to secure the battery or logic board. The battery in an iPhone is held in place with the same double stick adhesive, but it has a pull release tab. The battery cells on a MacBook Pro top case aren’t “glued” in place, but rather they are secured with the adhesive strips. These AirPods Max appear (from the photos) to use the same black gasketing adhesive tape that is used to secure iPhone displays. (Adhesive tape securing the plastic ear cup part to the aluminum housing)
glue is not necessarily a liquid. a glue stick is not liquid, and adhesive tape is also commonly called glue tape. glue simply means to adhere and so can be used interchangeably with adhesive.
I love these tear-downs, but is there any chance you could make them more color-blind friendly? Add numbers to the colored rectangles, or highlight the description when you hover over one. About 10% of men are color blind, so this is as important as supporting Firefox users.
I really hope these headphones will have aftermarket parts to make them 3/8” longer on both sides!!! My ear lobes stick out like 1/4” when I wear a baseball cap. Also in a mirror, it seems my ear is off center at the lower 1/3 mark of the driver. My ear lobes are resting right on the cushions. I need a longer sliding rod thingy!!!
Did you guys abandon this tear down project? It’s been a while…
What happened to the tear-down? It seems they just stopped and everyone moved on.
Hey folks, thanks for your patience—We expanded the scope of the teardown and have some nice surprises in store. Steps have been updated and more teaser content has been added—check back on Monday or Tuesday for the full teardown treatment. It’s coming!
Finally! It’s been a while…
One thing could be mentioned here: after extense use of the Max, you encounter some condensed water in the inside of the ear cups. It looks like that is normal, since the head and the ears of the user are sweating. As far as I noticed, no problem seems to be caused by this. I leave it as it is and it vaporizes relatively quickly.
How is the power distributed from the lightning port side of the cup to the other cup?
Look closely at the X-ray—you’ll see an internal power cable running the entire length, with little coils for strain relief. Pretty cool!
That’s IS very cool, thanks! I can’t see the power cables when the headband is disconnected, wondering how they are concealing it.
chrisfoh -
Hey there. What do you think…..?
To lift the inner bezel, after using a heatgun, possible to use the little hole, normally to eject the headband??
mkoslowski - 返信
I had to send mine back to Apple for a repair as they wouldn’t connect to my iPhone or any other Bluetooth device. I also couldn’t reset them. Received and email from Apple saying they’d been repaired however no information provided on what was wrong with them. I called Apple to try and find out but the call handler checked and 5 minutes later said there was no information available. Worrying they’ve broke after 3 weeks.
Exquisite exquisite craftsmanship! The difference between Airpods and Sony and the Bose’s of this world is STARK!
I’ve read a few articles about condensation buildup on the earcups. In your expert opinion, do you feel it’s unlikely the condensation will cause an early demise to the headphones under normal use?
I bought mine 6 weeks ago and then they stopped working. I sent them back to apple, thinking it would be sorted under warranty. But instead they told me it was misuse and wanted to charge me over £230 . Or they could send them back unrepaired. So I got them back but they had sent a different pair back. Any way it looks, from the three blurry photos that there has been some corrosion inside one of the ear cups. But none of the photos match any of your photos. Expensive paperweight.
Mine failed after 11 months but because I’d bought them from a third party reseller, the guarantee had been activated three months prior to purchase. Apple told me to take it up with the seller who won’t respond and I’m taking to small claims court.
I’m loathe to try and repair them prior to sorting small claims court out in case I need them for the case.
They refuse to charge now.
The digital crown of my airpods max is damaged, it does not click. Do you think replacing the right earcup as a whole will fix the issue? if not, is the crown mechanism removable?
Peace be upon you, whoever has the left board
My autistic son, 13, he needs high quality headphones and these have been great, but he’s a heavy user, 13 hours every day…! Anyway, these have had moisture issues at the ends of the head bands which I have cleaned up and greased with electrical grease to avoid further issues, but it’s come to light that he has not been drying his hands after using the toilet and has been using then crown button…. Now there’s all sorts of problems. I need ideas to resolve this issue please? Is it possible to replace or repair the crown bttn? Or maybe WD40? If I open it up I could spray some conformal coating on the pcb to protect it.
No mention of the Digital Crown removal? I fear my autistic sons pair has failed due to wet finger on the crown.