メインコンテンツにスキップ

AcuRite 02032 Wind Cup Assembly Replacement

必要な工具と部品

  1. AcuRite 02032 Wind Cup Assembly Replacement, Battery: 手順 1、 3の画像 1 AcuRite 02032 Wind Cup Assembly Replacement, Battery: 手順 1、 3の画像 2 AcuRite 02032 Wind Cup Assembly Replacement, Battery: 手順 1、 3の画像 3
    • Remove the battery compartment lid by lifting upward.

  2. AcuRite 02032 Wind Cup Assembly Replacement: 手順 2、 1の画像 1
    • Pull the ribbon to eject the 2 X AA alkaline batteries.

  3. AcuRite 02032 Wind Cup Assembly Replacement: 手順 3、 3の画像 1 AcuRite 02032 Wind Cup Assembly Replacement: 手順 3、 3の画像 2 AcuRite 02032 Wind Cup Assembly Replacement: 手順 3、 3の画像 3
    • Once the batteries are removed, it is safe to proceed.

  4. AcuRite 02032 Wind Cup Assembly Replacement, Base: 手順 4、 1の画像 1
    • Remove the four 0.8cm screws that attach the bottom panel to the device

    • An extended driver is needed to reach 3 of these screws. If you are using the 64 - bit driver kit you can extend the driver by inserting the driver PH1, (Phillips size 1) into the size 4 hexagonal adapter.

  5. AcuRite 02032 Wind Cup Assembly Replacement: 手順 5、 2の画像 1 AcuRite 02032 Wind Cup Assembly Replacement: 手順 5、 2の画像 2
    • Gently lift the top section of the weather center away from the base. With all the screws removed it should lift off easily.

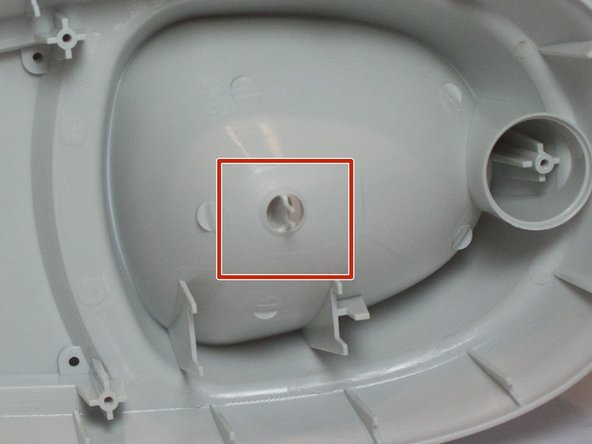
  6. AcuRite 02032 Wind Cup Assembly Replacement, Wind Cup Assembly: 手順 6、 1の画像 1
    • Remove the four 0.8cm screws inside the case located near the fan using the J1 screw bit.

  7. AcuRite 02032 Wind Cup Assembly Replacement: 手順 7、 2の画像 1 AcuRite 02032 Wind Cup Assembly Replacement: 手順 7、 2の画像 2
    • With all four screws removed, the wind cup assembly should lift straight up off the middle section.

    • Set down the bottom half of the weather center careful. There are two small pegs that will break with the slightest amount of pressure.

  8. AcuRite 02032 Wind Cup Assembly Replacement: 手順 8、 1の画像 1
    • Replace the old wind cup assembly with the new assembly that was purchased.

終わりに

To reassemble your device, follow these instructions in reverse order.

作成者

1人の作成者と共同作成されました。

Ben Kegel

メンバー登録日: 09/15/16

350 ポイント

3のガイドは作成済み

チーム

CSU Fullerton, Team 1-4, Bruce Fall 2016 CSU Fullerton, Team 1-4, Bruce Fall 2016人のメンバー

CSUF-BRUCE-F16S1G4

5 メンバー

7のガイドは作成済み

3 件のコメント

Do you have to replace the whole top, wind cups,top plate with solar panel, just for the wind cups?

Tom Halverson - 返信

For a broken wind cups do you have to replace the top section with the solar panel?

Tom Halverson - 返信

No. After you take it apart hold the shaft turn broken cup assy off. Install new cups in reverse order.

Larry Lindsay - 返信

コメントを追加

統計データ:

過去 24時間: 0

過去 7 日: 3

過去 30 日: 8

今までの合計 1,579