メインコンテンツにスキップ

Acer Nitro 5 AN515-53-55G9 Battery Replacement

必要な工具と部品

  1. Acer Nitro 5 AN515-53-55G9 Battery Replacement, Battery: 手順 1、 3の画像 1 Acer Nitro 5 AN515-53-55G9 Battery Replacement, Battery: 手順 1、 3の画像 2 Acer Nitro 5 AN515-53-55G9 Battery Replacement, Battery: 手順 1、 3の画像 3
    • Make sure laptop is off and unplugged before beginning replacement.

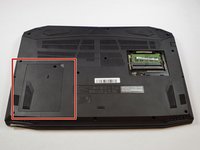
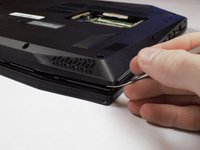
    • Flip the laptop upside down so that the bottom is facing up.

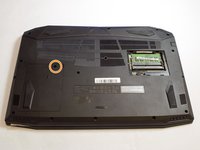
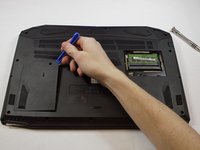
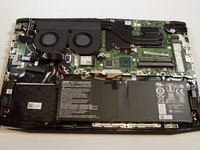
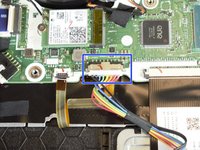
    • Identify the RAM tray on the bottom of the laptop.

  2. Acer Nitro 5 AN515-53-55G9 Battery Replacement: 手順 2、 3の画像 1 Acer Nitro 5 AN515-53-55G9 Battery Replacement: 手順 2、 3の画像 2 Acer Nitro 5 AN515-53-55G9 Battery Replacement: 手順 2、 3の画像 3
    • Use the Phillips #0 screwdriver to remove the 9mm screw in the bottom left corner of the RAM tray covering.

    • Remove the RAM tray cover by prying up with a spudger.

  3. Acer Nitro 5 AN515-53-55G9 Battery Replacement: 手順 3、 3の画像 1 Acer Nitro 5 AN515-53-55G9 Battery Replacement: 手順 3、 3の画像 2 Acer Nitro 5 AN515-53-55G9 Battery Replacement: 手順 3、 3の画像 3
    • Identify the Hard Drive tray to the left side of the laptop.

    • Remove screw with a #0 Philips screwdriver.

    • Lift up the Slot covering using a spunger.

  4. Acer Nitro 5 AN515-53-55G9 Battery Replacement: 手順 4、 1の画像 1
    • Use the Phillips #0 screwdriver to remove the 9mm screws holding the back cover in place.

    • Remove the screws from the hard drive and remove it from the device.

  5. Acer Nitro 5 AN515-53-55G9 Battery Replacement: 手順 5、 3の画像 1 Acer Nitro 5 AN515-53-55G9 Battery Replacement: 手順 5、 3の画像 2 Acer Nitro 5 AN515-53-55G9 Battery Replacement: 手順 5、 3の画像 3
    • Be sure you removed the hard drive. when you open the back shell and hard drive is built in this may cause damage to cable and other components.

    • Carefully remove the back shell from the device working your way around all the edges.

    • Do not forcefully try to separate the shell as you may cause harm to the shell.

  6. Acer Nitro 5 AN515-53-55G9 Battery Replacement: 手順 6、 2の画像 1 Acer Nitro 5 AN515-53-55G9 Battery Replacement: 手順 6、 2の画像 2
    • Removing the back shell of the computer and it will look like this.

    • The battery for the device is located at the bottom middle of the laptop at this orientation.

  7. Acer Nitro 5 AN515-53-55G9 Battery Replacement: 手順 7、 3の画像 1 Acer Nitro 5 AN515-53-55G9 Battery Replacement: 手順 7、 3の画像 2 Acer Nitro 5 AN515-53-55G9 Battery Replacement: 手順 7、 3の画像 3
    • Locate the connector of the battery to the motherboard.

    • Using your fingers, slide out the connector.

  8. Acer Nitro 5 AN515-53-55G9 Battery Replacement: 手順 8、 1の画像 1
    • Remove battery from device.

終わりに

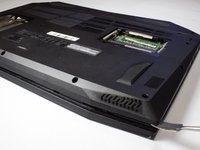
To reassemble your device, follow these instructions in reverse order.

11 の人々がこのガイドを完成させました。

作成者

5人の作成者と共同で作成されました。

Gary Ellison

メンバー登録日: 02/05/19

546 ポイント

1ガイドが承認済み

チーム

2 件のコメント

For future articles, you might consider adding a section describing how to “initialize” the replacement battery pack to maximize life.

Either that, or at least mention initialization plays a part in maximizing battery life and point to another article that provides reliable information.

Thanks for the article.

jmagecko - 返信

And how do you put it back in? Cause it’s a pain in the ass to put back in easy to take out pain in the &&^&^$^ ass to put back in

Mally02 - 返信

コメントを追加

統計データ:

過去 24時間: 13

過去 7 日: 80

過去 30 日: 317

今までの合計 37,551