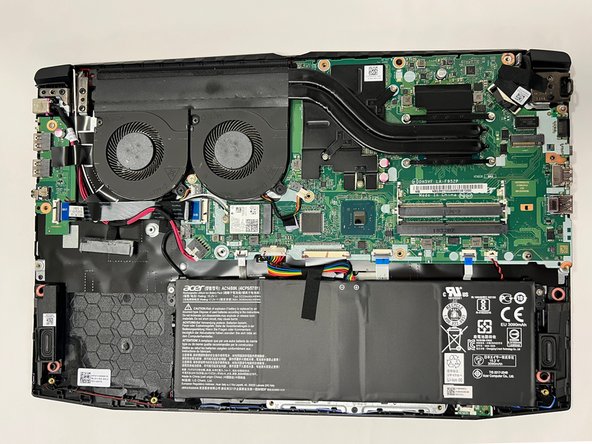
メインコンテンツにスキップ

Acer Nitro 5 AN515-53-52FA Fan Replacement

必要な工具と部品

  1. Acer Nitro 5 AN515-53-52FA Fan Replacement, Fan: 手順 1、 1の画像 1
    • Before starting the replacement, make sure the laptop is turned off and unplugged.

    • Flip the laptop upside down so that the bottom is facing up

  2. Acer Nitro 5 AN515-53-52FA Fan Replacement: 手順 2、 2の画像 1 Acer Nitro 5 AN515-53-52FA Fan Replacement: 手順 2、 2の画像 2
    • Use the Phillips #0 screwdriver to unscrew the sixteen 9 mm screws holding the back cover in place.

  3. Acer Nitro 5 AN515-53-52FA Fan Replacement: 手順 3、 2の画像 1 Acer Nitro 5 AN515-53-52FA Fan Replacement: 手順 3、 2の画像 2
    • Use a plastic opening pick to work your way around the edges to remove the bottom case carefully.

    • Do not try to put too much force on the shell off as you may damage it.

    • Removing the backshell of the laptop will reveal the inside of it.

    • The fan of the laptop is located on the top left of the laptop.

  4. Acer Nitro 5 AN515-53-52FA Fan Replacement: 手順 4、 2の画像 1 Acer Nitro 5 AN515-53-52FA Fan Replacement: 手順 4、 2の画像 2
    • Use the Phillips #0 screwdriver to remove the four 9 mm screws securing the fans.

  5. Acer Nitro 5 AN515-53-52FA Fan Replacement: 手順 5、 3の画像 1 Acer Nitro 5 AN515-53-52FA Fan Replacement: 手順 5、 3の画像 2 Acer Nitro 5 AN515-53-52FA Fan Replacement: 手順 5、 3の画像 3
    • Unplug the connectors before taking the fan out.

  6. Acer Nitro 5 AN515-53-52FA Fan Replacement: 手順 6、 2の画像 1 Acer Nitro 5 AN515-53-52FA Fan Replacement: 手順 6、 2の画像 2
    • Gently remove the fans from the adhesive strip.

終わりに

To reassemble your device, follow these instructions in reverse order.

3 の人々がこのガイドを完成させました。

作成者

4人の作成者と共同で作成されました。

Alfredo Prieto

メンバー登録日: 09/01/22

827 ポイント

5のガイドは作成済み

チーム

Gateway, Team 1-3, Pee Fall 2022 Gateway, Team 1-3, Pee Fall 2022人のメンバー

GCC-PEE-F22S1G3

4 メンバー

5のガイドは作成済み

コメント 1 件

コメントを追加

統計データ:

過去 24時間: 2

過去 7 日: 15

過去 30 日: 47

今までの合計 893