メインコンテンツにスキップ

Acer Iconia Tab A200 Motherboard Replacement

必要な工具と部品

  1. Acer Iconia Tab A200 Motherboard Replacement, Battery: 手順 1、 2の画像 1 Acer Iconia Tab A200 Motherboard Replacement, Battery: 手順 1、 2の画像 2
    • With the plastic opening tool pry open the grey plastic siding on both sides of the tablet.

  2. Acer Iconia Tab A200 Motherboard Replacement: 手順 2、 2の画像 1 Acer Iconia Tab A200 Motherboard Replacement: 手順 2、 2の画像 2
    • Using a Phillips #00 screwdriver remove the 4.0 mm screws on the sides of the tablet.

    • There are two screws on each side of the tablet that need to be removed before the back casing can be removed.

  3. Acer Iconia Tab A200 Motherboard Replacement: 手順 3、 2の画像 1 Acer Iconia Tab A200 Motherboard Replacement: 手順 3、 2の画像 2
    • Once the 4 screws have been removed use the plastic opening tool to pry open the device on the side of the device.

    • Be careful prying on the sides where you removed the screw as the plastic casing is not very strong and may break.

    • After prying open the case with the plastic opening tool carefully remove the case from the device and place the device face down on its screen.

  4. Acer Iconia Tab A200 Motherboard Replacement: 手順 4、 2の画像 1 Acer Iconia Tab A200 Motherboard Replacement: 手順 4、 2の画像 2
    • Using a Phillips #00 screwdriver remove the 4.0 mm screws holding the battery in place.

  5. Acer Iconia Tab A200 Motherboard Replacement: 手順 5、 2の画像 1 Acer Iconia Tab A200 Motherboard Replacement: 手順 5、 2の画像 2
    • Lift the battery out of the device, and disconnect the cable attached to the motherboard by pulling it out to the side not lifting it up.

  6. Acer Iconia Tab A200 Motherboard Replacement, DC Power Jack Component: 手順 6、 1の画像 1
    • Using the plastic opening tool gently lift up the charging component out of its slot in the case.

  7. Acer Iconia Tab A200 Motherboard Replacement: 手順 7、 1の画像 1
    • Continue to lift up the cord until it is free from the case and only attached to the motherboard.

    • You may need to continue using the plastic opening tool to lift the cord out of the case due to limited hand space.

  8. Acer Iconia Tab A200 Motherboard Replacement: 手順 8、 1の画像 1
    • Disconnect the power component from the motherboard by pulling it out horizontally. Do not pull up on the cord only pull out

  9. Acer Iconia Tab A200 Motherboard Replacement, Speaker: 手順 9、 2の画像 1 Acer Iconia Tab A200 Motherboard Replacement, Speaker: 手順 9、 2の画像 2
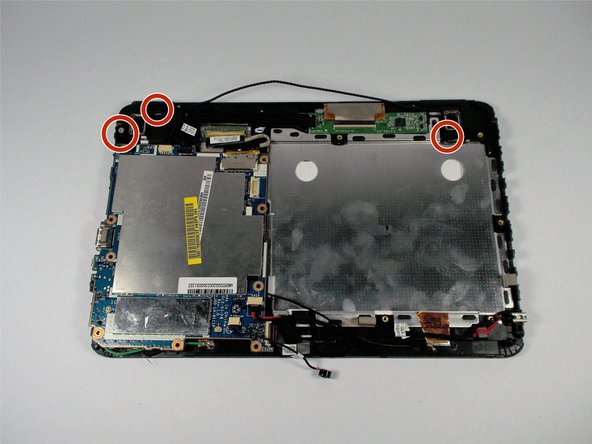
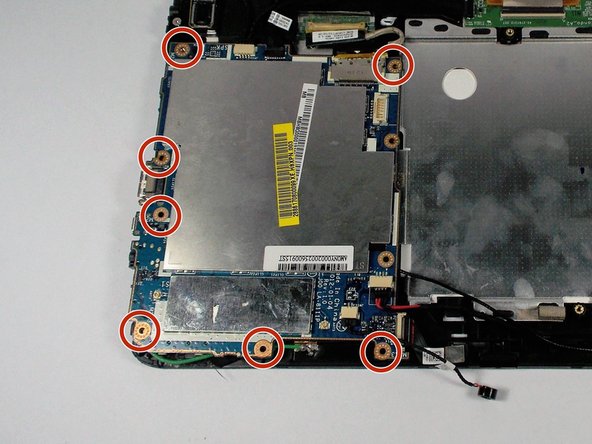
    • After removing the battery use a Phillips head #00 screwdriver to remove the 3.0 mm screws holding the dual speakers in place.

  10. Acer Iconia Tab A200 Motherboard Replacement: 手順 10、 1の画像 1
    • Once the screws are removed, lift up on the speakers to remove them from the case.

  11. Acer Iconia Tab A200 Motherboard Replacement: 手順 11、 1の画像 1
    • Once you have removed the speakers from the case, disconnect the speakers from the motherboard by pulling the cable out horizontally. Do not pull up on the cable.

  12. Acer Iconia Tab A200 Motherboard Replacement, Microphone: 手順 12、 2の画像 1 Acer Iconia Tab A200 Motherboard Replacement, Microphone: 手順 12、 2の画像 2
    • Lift up on the microphone cable to lift the microphone component away from the case.

  13. Acer Iconia Tab A200 Motherboard Replacement: 手順 13、 1の画像 1
    • Once the microphone has been lifted away from the case, disconnect the microphone cable from the motherboard by pulling the cable out horizontally. Do not lift up to remove.

  14. Acer Iconia Tab A200 Motherboard Replacement, Motherboard: 手順 14、 1の画像 1
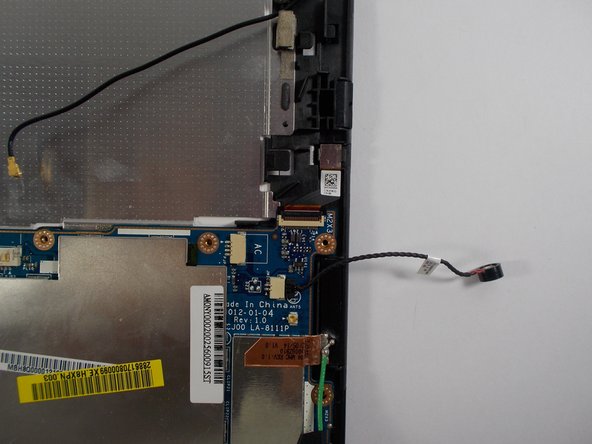
    • Using the plastic opening tool unplug the green cable by placing the tool under where the cable meets the plug and lifting up.

    • After unplugging the green cable remove the black tape that secures the green cable to motherboard.

    • Only unplug the end connected to the motherboard. Do not disconnect the soldered end of the cable.

  15. Acer Iconia Tab A200 Motherboard Replacement: 手順 15、 1の画像 1
    • Using the plastic opening tool unplug the black cable by placing the tool under where the cable meets the plug and lift up.

  16. Acer Iconia Tab A200 Motherboard Replacement: 手順 16、 2の画像 1 Acer Iconia Tab A200 Motherboard Replacement: 手順 16、 2の画像 2
    • Once all cables have been disconnected from the motherboard, remove the seven remaining 3.0 mm screws with a Phillips head screwdriver size #00.

    • After the screws have been removed lift up on the motherboard to remove it from the case.

    • If you feel any pull when removing the motherboard, check to see if you did not disconnect a cable connected to the board.

終わりに

To reassemble your device, follow these instructions in reverse order.

作成者

2人の作成者と共同で作成されました。

Matt O'Brien

メンバー登録日: 03/06/16

101 ポイント

1ガイドが承認済み

チーム

UMass Dartmouth, Team 5-5, Landers Spring 2016 UMass Dartmouth, Team 5-5, Landers Spring 2016人のメンバー

UMASSD-LANDERS-S16S5G5

3 メンバー

6のガイドは作成済み

0 件のコメント

コメントを追加

統計データ:

過去 24時間: 0

過去 7 日: 0

過去 30 日: 0

今までの合計 721