メインコンテンツにスキップ

Acer Chromebook R11 CB5-132T-C1LK Battery Replacement

必要な工具と部品

  1. Acer Chromebook R11 CB5-132T-C1LK Battery Replacement, Bottom Panel: 手順 1、 1の画像 1
    • Using a Phillips screwdriver, remove all eleven 7.0 mm screws from the bottom of the Chromebook.

  2. Acer Chromebook R11 CB5-132T-C1LK Battery Replacement: 手順 2、 1の画像 1
    • Find the seam along the edge of the device.

    • Wedge a finger into the groove and separate the panel from the device. If necessary, use a spudger.

    • The panel will still be connected to the device by internal wiring, so pull it off with some caution. It is best to flip the panel to the side once the seam has been broken.

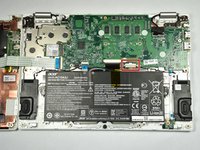
  3. Acer Chromebook R11 CB5-132T-C1LK Battery Replacement, Battery: 手順 3、 1の画像 1
    • Remove the two 4.5 mm Phillips screws located at the sides of the battery.

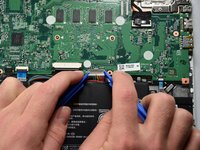
  4. Acer Chromebook R11 CB5-132T-C1LK Battery Replacement: 手順 4、 2の画像 1 Acer Chromebook R11 CB5-132T-C1LK Battery Replacement: 手順 4、 2の画像 2
    • Grip the battery connection using two plastic opening tools.

    • Carefully but firmly, pry the connector from its socket by pulling it towards the battery.

    • When reconnecting the battery to the motherboard, place the red wires closer to the edge of the device and the black wires towards the center.

  5. Acer Chromebook R11 CB5-132T-C1LK Battery Replacement: 手順 5、 1の画像 1
    • Lift the battery out by pulling upward.

終わりに

To reassemble your device, follow these instructions in reverse order.

3 の人々がこのガイドを完成させました。

作成者

4人の作成者と共同で作成されました。

Alan Shan

メンバー登録日: 04/26/17

382 ポイント

3のガイドは作成済み

チーム

Cal Poly, Team S23-G2, Livingston Spring 2017 Cal Poly, Team S23-G2, Livingston Spring 2017人のメンバー

CPSU-LIVINGSTON-S17S23G2

4 メンバー

12のガイドは作成済み

0 件のコメント

コメントを追加

統計データ:

過去 24時間: 0

過去 7 日: 0

過去 30 日: 10

今までの合計 4,585