メインコンテンツにスキップ

Acer Chromebook CB5-571-C5XU Speaker Replacement

必要な工具と部品

  1. Acer Chromebook CB5-571-C5XU Speaker Replacement, Bottom Case: 手順 1、 2の画像 1 Acer Chromebook CB5-571-C5XU Speaker Replacement, Bottom Case: 手順 1、 2の画像 2
    • Remove the following eighteen screws using a Phillips #0 screwdriver.

    • Make sure the Chromebook is unplugged and shut down, so no files are lost and there is no risk of electrocution.

  2. Acer Chromebook CB5-571-C5XU Speaker Replacement: 手順 2、 2の画像 1 Acer Chromebook CB5-571-C5XU Speaker Replacement: 手順 2、 2の画像 2
    • Using the flat side of the spudger, pry open the bottom case of the laptop.

    • Working from the front to the back, where it connects to the screen, proved to be the easiest way of popping the case off.

  3. Acer Chromebook CB5-571-C5XU Speaker Replacement, Battery: 手順 3、 1の画像 1
    • Using a Phillips #0 screwdriver, unscrew the screw on right side of the battery placement.

    • Be careful not to lose the screw and have a small container nearby to place it in.

  4. Acer Chromebook CB5-571-C5XU Speaker Replacement: 手順 4、 1の画像 1
    • Using a plastic opening tool, disconnect the wires connecting the battery to the motherboard.

  5. Acer Chromebook CB5-571-C5XU Speaker Replacement: 手順 5、 1の画像 1
    • Gently lift the battery out and remove it from the laptop casing.

  6. Acer Chromebook CB5-571-C5XU Speaker Replacement, Speakers: 手順 6、 2の画像 1 Acer Chromebook CB5-571-C5XU Speaker Replacement, Speakers: 手順 6、 2の画像 2
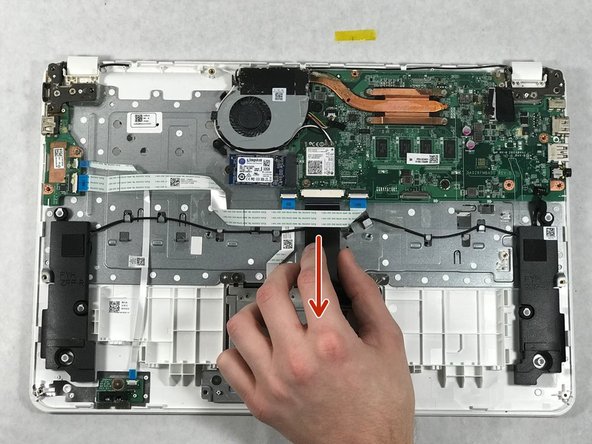
    • Use the plastic pry tool to unlatch the two tabs on either side of the black ribbon.

    • Gently slide the black ribbon out from its socket and under the white ribbon.

  7. Acer Chromebook CB5-571-C5XU Speaker Replacement: 手順 7、 1の画像 1
    • Carefully remove the smaller black ribbon from the motherboard using the opening tool.

    • Be careful when prying the connector loose, its small size can make it difficult to grasp a corner of the connector.

  8. Acer Chromebook CB5-571-C5XU Speaker Replacement: 手順 8、 1の画像 1
    • Weave the black wire connecting the two speakers out of the small metal hooks.

    • It might be helpful to take a picture of how the wire is wrapped around the hooks, as this layout is important when the wire is put back.

  9. Acer Chromebook CB5-571-C5XU Speaker Replacement: 手順 9、 1の画像 1
    • Simply lift upwards on both speakers, and they will remove from their position.

終わりに

To reassemble your device, follow these instructions in reverse order.

ある他の人がこのガイドを完成しました。

作成者

2人の作成者と共同で作成されました。

️Gaetan Charles

メンバー登録日: 10/26/17

119 ポイント

1ガイドが承認済み

チーム

UMass Dartmouth, Team S6-G1, Rockett Fall 2017 UMass Dartmouth, Team S6-G1, Rockett Fall 2017人のメンバー

UMASSD-ROCKETT-F17S6G1

3 メンバー

10のガイドは作成済み

0 件のコメント

コメントを追加

統計データ:

過去 24時間: 0

過去 7 日: 0

過去 30 日: 1

今までの合計 158