メインコンテンツにスキップ

Acer Chromebook CB5-312T-K 8Z9 Secondary Circuit Board Replacement

必要な工具と部品

  1. Acer Chromebook CB5-312T-K 8Z9 Secondary Circuit Board  Replacement, Acer Chromebook CB5-312T-K 8Z9 Back Cover: 手順 1、 2の画像 1 Acer Chromebook CB5-312T-K 8Z9 Secondary Circuit Board  Replacement, Acer Chromebook CB5-312T-K 8Z9 Back Cover: 手順 1、 2の画像 2
    • First begin by flipping the laptop on its back and having the back cover face you directly.

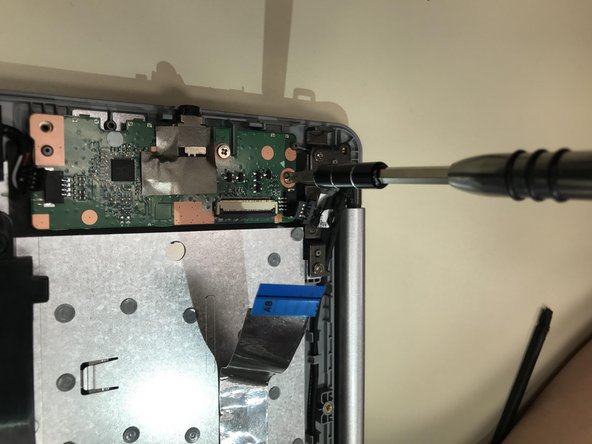
    • Then unscrew the ten Phillips head screws that hold down the back cover using a Phillips #0 Screw Driver.  

  2. Acer Chromebook CB5-312T-K 8Z9 Secondary Circuit Board  Replacement: 手順 2、 1の画像 1
    • Using a plastic spudger, open the back cover and remove it from the laptop.

  3. Acer Chromebook CB5-312T-K 8Z9 Secondary Circuit Board  Replacement, Secondary Circuit Board: 手順 3、 3の画像 1 Acer Chromebook CB5-312T-K 8Z9 Secondary Circuit Board  Replacement, Secondary Circuit Board: 手順 3、 3の画像 2 Acer Chromebook CB5-312T-K 8Z9 Secondary Circuit Board  Replacement, Secondary Circuit Board: 手順 3、 3の画像 3
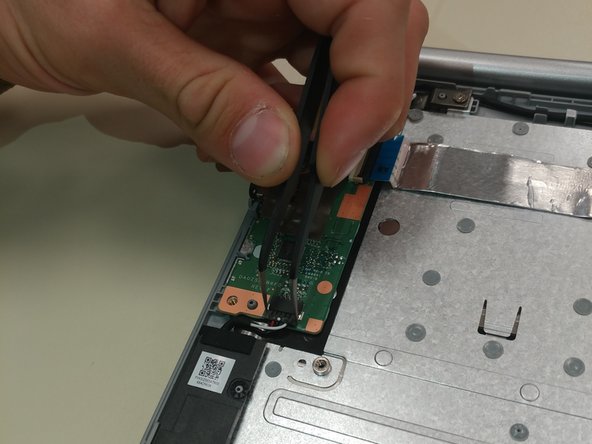
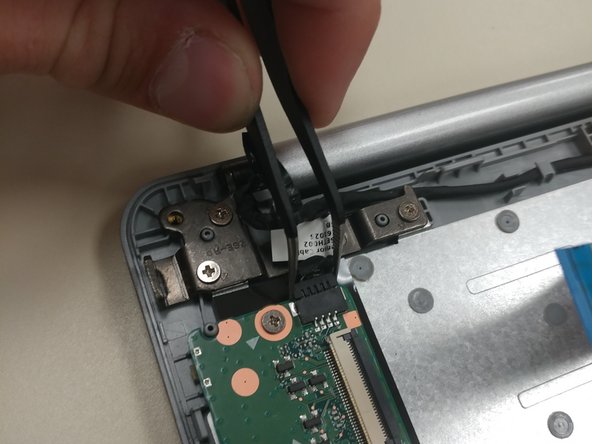
    • Identify the port that is connected to the speaker.

    • Using tweezers, separate the cable from the port.

  4. Acer Chromebook CB5-312T-K 8Z9 Secondary Circuit Board  Replacement: 手順 4、 2の画像 1 Acer Chromebook CB5-312T-K 8Z9 Secondary Circuit Board  Replacement: 手順 4、 2の画像 2
    • Find and remove the blue tape from the circuit board.

  5. Acer Chromebook CB5-312T-K 8Z9 Secondary Circuit Board  Replacement: 手順 5、 3の画像 1 Acer Chromebook CB5-312T-K 8Z9 Secondary Circuit Board  Replacement: 手順 5、 3の画像 2 Acer Chromebook CB5-312T-K 8Z9 Secondary Circuit Board  Replacement: 手順 5、 3の画像 3
    • Remove the black tape from the port.

    • Using tweezers, separate the cable from the port.

  6. Acer Chromebook CB5-312T-K 8Z9 Secondary Circuit Board  Replacement: 手順 6、 3の画像 1 Acer Chromebook CB5-312T-K 8Z9 Secondary Circuit Board  Replacement: 手順 6、 3の画像 2 Acer Chromebook CB5-312T-K 8Z9 Secondary Circuit Board  Replacement: 手順 6、 3の画像 3
    • Identify the two Phillips screws.

    • Remove the two screws holding down the board with a J1 Phillips screwdriver.

    • Gently lift the board from the Chromebook.

終わりに

To reassemble your device, follow these instructions in reverse order.

ある他の人がこのガイドを完成しました。

作成者

2人の作成者と共同で作成されました。

Cole O'Neal

メンバー登録日: 09/25/17

148 ポイント

1ガイドが承認済み

チーム

University of North Texas, Team S1-G4, Thompson Fall 2017 University of North Texas, Team S1-G4, Thompson Fall 2017人のメンバー

UNT-THOMPSON-F17S1G4

4 メンバー

10のガイドは作成済み

2 件のコメント

Any ideas about where to purchase this part? I am almost certain that it is the problem with my sound. Also, I can get to it no problem, but I am struggling finding a replacement part.

littlemas2 - 返信

I have looked on numerous pages on google, both with the part number and with the Chromebook model number and have yet to be able to find a supplier.

littlemas2 -

コメントを追加

統計データ:

過去 24時間: 0

過去 7 日: 1

過去 30 日: 3

今までの合計 655