メインコンテンツにスキップ

Acer Chromebook CB3-111-C8UB Touchpad Replacement

必要な工具と部品

  1. Acer Chromebook CB3-111-C8UB Touchpad Replacement, Back Panel Removal: 手順 1、 2の画像 1 Acer Chromebook CB3-111-C8UB Touchpad Replacement, Back Panel Removal: 手順 1、 2の画像 2
    • Position the laptop upside down with the hinges on the side furthest away from you.

    • Remove the eight 8mm screws with a phillips #1 screwdriver,

    • Remove the four 4.5mm screws with a phillips #1 screwdriver,

  2. Acer Chromebook CB3-111-C8UB Touchpad Replacement: 手順 2、 3の画像 1 Acer Chromebook CB3-111-C8UB Touchpad Replacement: 手順 2、 3の画像 2 Acer Chromebook CB3-111-C8UB Touchpad Replacement: 手順 2、 3の画像 3
    • There is a wire connecting the two pieces of the laptop, from the inside, on the left, be careful not to damage it.

    • Use the plastic opening tool to pry open then remove the plastic base from the rest of the laptop. Start from the right side and work towards the left.

    • Set the plastic base beside the laptop by opening it as if you were opening a book.

  3. Acer Chromebook CB3-111-C8UB Touchpad Replacement: 手順 3、 2の画像 1 Acer Chromebook CB3-111-C8UB Touchpad Replacement: 手順 3、 2の画像 2
    • Flip up the small white ZIF connector by using a fingernail or metal spudger.

    • Pull the blue tab to remove the ribbon cable.

    • The ribbon cable is adhered to the plastic so it will take a little bit of force to remove it.

  4. Acer Chromebook CB3-111-C8UB Touchpad Replacement, Battery: 手順 4、 1の画像 1
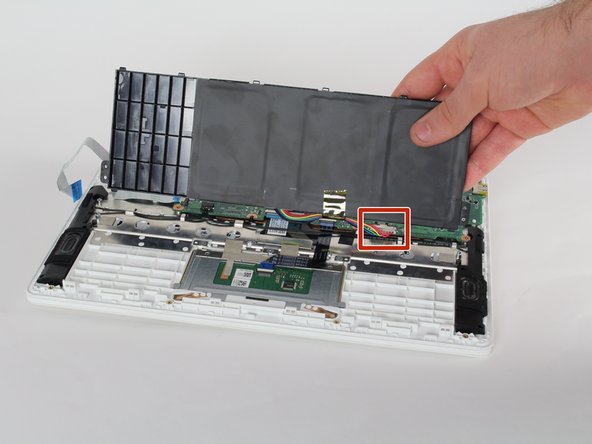
    • Locate and remove the two 6mm screws holding the battery in place with a Phillips #1 screwdriver.

  5. Acer Chromebook CB3-111-C8UB Touchpad Replacement: 手順 5、 3の画像 1 Acer Chromebook CB3-111-C8UB Touchpad Replacement: 手順 5、 3の画像 2 Acer Chromebook CB3-111-C8UB Touchpad Replacement: 手順 5、 3の画像 3
    • Pull the battery forward to clear the base from its clips.

    • Lift the battery up so that there is room to grab and unplug the bundled cable connector.

  6. Acer Chromebook CB3-111-C8UB Touchpad Replacement, Touchpad: 手順 6、 1の画像 1
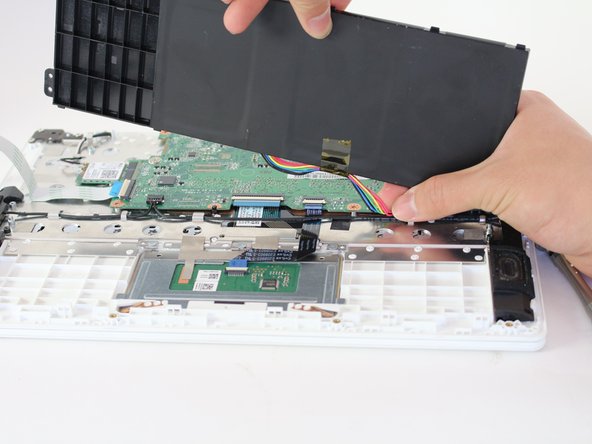
    • Use a metal spudger to flip up the white ZIF connector that holds the ribbon cable in place.

    • Unplug the black ribbon cable from the track pad assembly.

  7. Acer Chromebook CB3-111-C8UB Touchpad Replacement: 手順 7、 2の画像 1 Acer Chromebook CB3-111-C8UB Touchpad Replacement: 手順 7、 2の画像 2
    • Use a Phillips #000 screwdriver to remove the three 2.4mm screws located across the top of the track pad assembly.

  8. Acer Chromebook CB3-111-C8UB Touchpad Replacement: 手順 8、 1の画像 1
    • Use your finger to gently pull up on the assembly and slide a metal spudger under each of the two strips of tape and peel them off of the main metal plate.

  9. Acer Chromebook CB3-111-C8UB Touchpad Replacement: 手順 9、 1の画像 1
    • Slide the track pad assembly up towards the motherboard until it can be lifted up and out.

終わりに

To reassemble your device, follow these instructions in reverse order.

作成者

4人の作成者と共同で作成されました。

Travis Vo

メンバー登録日: 01/27/17

426 ポイント

4のガイドは作成済み

チーム

Cal Poly, Team 22-7, Maness Winter 2017 Cal Poly, Team 22-7, Maness Winter 2017人のメンバー

CPSU-MANESS-W17S22G7

4 メンバー

12のガイドは作成済み

0 件のコメント

コメントを追加

統計データ:

過去 24時間: 0

過去 7 日: 0

過去 30 日: 5

今までの合計 990