メインコンテンツにスキップ

Acer Aspire V5-571 Mother Board Replacement

必要な工具と部品

ビデオの概要

  1. Acer Aspire V5-571 Mother Board Replacement, Keyboard: 手順 1、 3の画像 1 Acer Aspire V5-571 Mother Board Replacement, Keyboard: 手順 1、 3の画像 2 Acer Aspire V5-571 Mother Board Replacement, Keyboard: 手順 1、 3の画像 3
    • Turn off the laptop and remove the battery.

    • Remove two screws securing the Keyboard.

    • The Keyboard is held by two locking clips, under the battery. Use the sharp tip of a plastic tool to release the keyboard.

  2. Acer Aspire V5-571 Mother Board Replacement: 手順 2、 3の画像 1 Acer Aspire V5-571 Mother Board Replacement: 手順 2、 3の画像 2 Acer Aspire V5-571 Mother Board Replacement: 手順 2、 3の画像 3
  3. Acer Aspire V5-571 Mother Board Replacement, Optical Drive: 手順 3、 3の画像 1 Acer Aspire V5-571 Mother Board Replacement, Optical Drive: 手順 3、 3の画像 2 Acer Aspire V5-571 Mother Board Replacement, Optical Drive: 手順 3、 3の画像 3
    • Remove the screw securing the Optical drive and gently press the drive to show slightly as at the second pic.

    • Slide the drive to the left and remove it.

  4. Acer Aspire V5-571 Mother Board Replacement, Upper  Cover: 手順 4、 3の画像 1 Acer Aspire V5-571 Mother Board Replacement, Upper  Cover: 手順 4、 3の画像 2 Acer Aspire V5-571 Mother Board Replacement, Upper  Cover: 手順 4、 3の画像 3
    • Remove 4x phillips screws and disconnect:

    • Power On button flex cable

    • Touch pad flex cable

    • Remove 18x Phillips screws from the bottom cover.

    • Remove any memory SD Card from the Card reader.

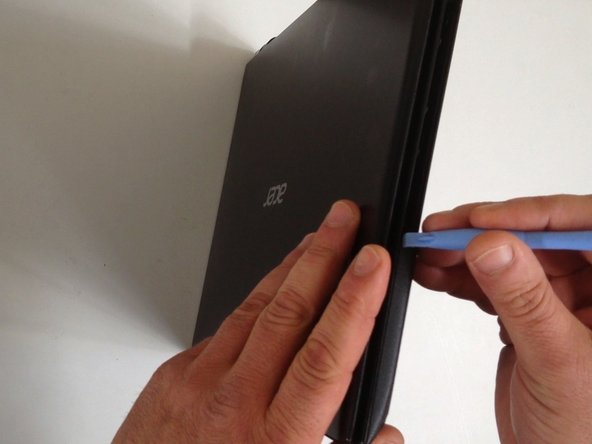
    • Start opening with a plastic opening tool.

  5. Acer Aspire V5-571 Mother Board Replacement: 手順 5、 3の画像 1 Acer Aspire V5-571 Mother Board Replacement: 手順 5、 3の画像 2 Acer Aspire V5-571 Mother Board Replacement: 手順 5、 3の画像 3
    • Carefully separate the upper cover and remove it.

  6. Acer Aspire V5-571 Mother Board Replacement, HDD (Hard Disk Drive): 手順 6、 3の画像 1 Acer Aspire V5-571 Mother Board Replacement, HDD (Hard Disk Drive): 手順 6、 3の画像 2 Acer Aspire V5-571 Mother Board Replacement, HDD (Hard Disk Drive): 手順 6、 3の画像 3
  7. Acer Aspire V5-571 Mother Board Replacement, Wi-Fi Half Mini PCIe card: 手順 7、 2の画像 1 Acer Aspire V5-571 Mother Board Replacement, Wi-Fi Half Mini PCIe card: 手順 7、 2の画像 2
    • Remove one Phillips screw, securing th WLan card and disconnect the two coaxial antenna cables.

    • Remove the Wi-Fi card.

  8. Acer Aspire V5-571 Mother Board Replacement, Mother Board: 手順 8、 3の画像 1 Acer Aspire V5-571 Mother Board Replacement, Mother Board: 手順 8、 3の画像 2 Acer Aspire V5-571 Mother Board Replacement, Mother Board: 手順 8、 3の画像 3
    • Remove the Memory Cover.

    • Disconnect the Loudspeaker cable connector.

  9. Acer Aspire V5-571 Mother Board Replacement: 手順 9、 3の画像 1 Acer Aspire V5-571 Mother Board Replacement: 手順 9、 3の画像 2 Acer Aspire V5-571 Mother Board Replacement: 手順 9、 3の画像 3
    • Remove two Phillips screw from the Mother board and from the Optical drive SATA adapter.

    • Disconnect the LCD Display flex cable.

    • Disconnect the DC Jack cable.

    • Carefully remove the Optical drive SATA adapter.

    • We will disconnect the battery cable when we pick up the board.

  10. Acer Aspire V5-571 Mother Board Replacement: 手順 10、 3の画像 1 Acer Aspire V5-571 Mother Board Replacement: 手順 10、 3の画像 2 Acer Aspire V5-571 Mother Board Replacement: 手順 10、 3の画像 3
    • Carefully pick up the Mother board and disconnect the Battery cable.

終わりに

To reassemble your device, follow these instructions in reverse order.

3 の人々がこのガイドを完成させました。

作成者

2人の作成者と共同で作成されました。

ZFix

メンバー登録日: 12/09/13

191,308 ポイント

330のガイドは作成済み

チーム

Master Techs Master Techs人のメンバー

Community

322 メンバー

2,535のガイドは作成済み

コメント 1 件

I can’t seem to get the system to reboot after replacing two motherboards. Is there a little trick about replacing or reseating the motherboard properly? Is the black cloth tape over the fan exhaust important?

fun.fong.jr - 返信

コメントを追加

統計データ:

過去 24時間: 1

過去 7 日: 1

過去 30 日: 15

今までの合計 4,314