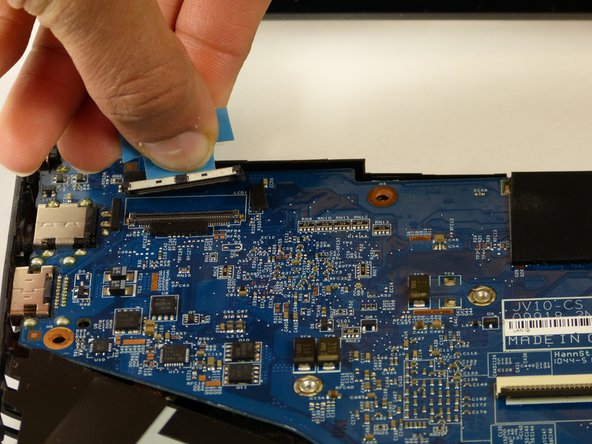
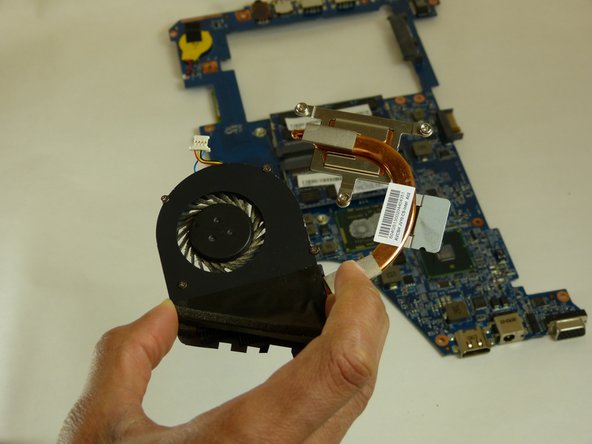
メインコンテンツにスキップ

Acer Aspire TimelineX 1830T-68U118 RAM Replacement

必要な工具と部品

  1. Acer Aspire TimelineX 1830T-68U118 RAM Replacement, Hard Drive: 手順 1、 3の画像 1 Acer Aspire TimelineX 1830T-68U118 RAM Replacement, Hard Drive: 手順 1、 3の画像 2 Acer Aspire TimelineX 1830T-68U118 RAM Replacement, Hard Drive: 手順 1、 3の画像 3
    • Remove the device's battery before beginning.

    • Turn laptop so under side is facing up.

    • Locate the hard drive door and unscrew the 5 screws using PH0 mm Phillips Head.

  2. Acer Aspire TimelineX 1830T-68U118 RAM Replacement: 手順 2、 1の画像 1
    • Pry open hard drive cover using the Spudger tool.

  3. Acer Aspire TimelineX 1830T-68U118 RAM Replacement: 手順 3、 3の画像 1 Acer Aspire TimelineX 1830T-68U118 RAM Replacement: 手順 3、 3の画像 2 Acer Aspire TimelineX 1830T-68U118 RAM Replacement: 手順 3、 3の画像 3
    • Remove screw attached to the hard drive using the PH0 mm Phillips Head.

    • The hard drive can now be removed from the device.

  4. Acer Aspire TimelineX 1830T-68U118 RAM Replacement, Fan: 手順 4、 3の画像 1 Acer Aspire TimelineX 1830T-68U118 RAM Replacement, Fan: 手順 4、 3の画像 2 Acer Aspire TimelineX 1830T-68U118 RAM Replacement, Fan: 手順 4、 3の画像 3
    • Remove battery before beginning.

    • Use a Phillips #0 screwdriver to remove the 5 screws from the bottom cover.

    • Pry open the cover using the Spudger tool.

  5. Acer Aspire TimelineX 1830T-68U118 RAM Replacement: 手順 5、 3の画像 1 Acer Aspire TimelineX 1830T-68U118 RAM Replacement: 手順 5、 3の画像 2 Acer Aspire TimelineX 1830T-68U118 RAM Replacement: 手順 5、 3の画像 3
    • Remove the keyboard with a plastic opening tool or spudger.

    • There is a plastic film that needs to be gently peeled from the laptop base.

    • Use caution when removing the keyboard as it is fragile.

  6. Acer Aspire TimelineX 1830T-68U118 RAM Replacement: 手順 6、 2の画像 1 Acer Aspire TimelineX 1830T-68U118 RAM Replacement: 手順 6、 2の画像 2
    • Use a Phillips #0 screwdriver to remove the 4 screws from the motherboard shield.

  7. Acer Aspire TimelineX 1830T-68U118 RAM Replacement: 手順 7、 2の画像 1 Acer Aspire TimelineX 1830T-68U118 RAM Replacement: 手順 7、 2の画像 2
    • Remove the motherboard from the base of the laptop by unscrew the screw drivers using PH0 mm Phillips Head.

    • Carefully remove the charger attachment in the top left.

  8. Acer Aspire TimelineX 1830T-68U118 RAM Replacement: 手順 8、 3の画像 1 Acer Aspire TimelineX 1830T-68U118 RAM Replacement: 手順 8、 3の画像 2 Acer Aspire TimelineX 1830T-68U118 RAM Replacement: 手順 8、 3の画像 3
    • Carefully remove the fan from the motherboard by detaching the plastic insert as seen in the pictures

  9. Acer Aspire TimelineX 1830T-68U118 RAM Replacement, RAM: 手順 9、 1の画像 1
    • After removing the motherboard, turn it over so that the back side is facing you.

  10. Acer Aspire TimelineX 1830T-68U118 RAM Replacement: 手順 10、 1の画像 1
    • To release the RAM from the motherboard, press both of the metal prongs on the sides of the RAM.

  11. Acer Aspire TimelineX 1830T-68U118 RAM Replacement: 手順 11、 1の画像 1
    • After RAM memory card is released from the motherboard, hold the RAM card on a 45 degree angle and remove the card.

  12. Acer Aspire TimelineX 1830T-68U118 RAM Replacement: 手順 12、 1の画像 1
    • Install your new RAM memory card following these steps in reverse.

終わりに

To reassemble your device, follow these instructions in reverse order.

作成者

4人の作成者と共同で作成されました。

Brenna Waterbury

メンバー登録日: 09/19/17

523 ポイント

5のガイドは作成済み

チーム

Idaho State University, Team S4-G6, Watkins Fall 2017 Idaho State University, Team S4-G6, Watkins Fall 2017人のメンバー

ISU-WATKINS-F17S4G6

4 メンバー

5のガイドは作成済み

コメント 1 件

Stupid! you can remove the ram after step 2!!!

Erlend - 返信

コメントを追加

統計データ:

過去 24時間: 0

過去 7 日: 1

過去 30 日: 6

今までの合計 522