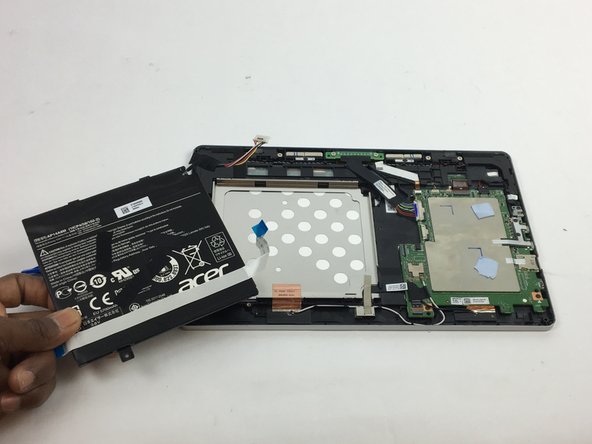
メインコンテンツにスキップ

Acer Aspire Switch 10 SW5-011-18R3 Battery Replacement

必要な工具と部品

  1. Acer Aspire Switch 10 SW5-011-18R3 Battery Replacement, Battery: 手順 1、 3の画像 1 Acer Aspire Switch 10 SW5-011-18R3 Battery Replacement, Battery: 手順 1、 3の画像 2 Acer Aspire Switch 10 SW5-011-18R3 Battery Replacement, Battery: 手順 1、 3の画像 3
    • Wedge your plastic opening tool into the crevice on the volume rocker and pull down like a lever to create space.

    • Slide the plastic opening tool along the crevice to separate the back plate.

  2. Acer Aspire Switch 10 SW5-011-18R3 Battery Replacement: 手順 2、 1の画像 1
    • Use your screwdriver with the Phillips PH000 attachment to unscrew the single 4mm screw that holds the battery to the base plate.

  3. Acer Aspire Switch 10 SW5-011-18R3 Battery Replacement: 手順 3、 2の画像 1 Acer Aspire Switch 10 SW5-011-18R3 Battery Replacement: 手順 3、 2の画像 2
    • Gently slide the plastic opening tool under the black clip that is attached to the audio ribbon cable.

    • Pull down on the plastic opening tool like a lever to flip the black clip and remove the ribbon cable.

    • The black clip doesn't take much force to lift, so be gentle to avoid breaking it.

  4. Acer Aspire Switch 10 SW5-011-18R3 Battery Replacement: 手順 4、 2の画像 1 Acer Aspire Switch 10 SW5-011-18R3 Battery Replacement: 手順 4、 2の画像 2
    • Remove the tape to expose the left side of the ZIF connector.

  5. Acer Aspire Switch 10 SW5-011-18R3 Battery Replacement: 手順 5、 2の画像 1 Acer Aspire Switch 10 SW5-011-18R3 Battery Replacement: 手順 5、 2の画像 2
    • Use a plastic opening tool to flip up the black clip on the ZIF connector.

    • Once the black clip is flipped up, it is safe to remove the audio ribbon cable.

  6. Acer Aspire Switch 10 SW5-011-18R3 Battery Replacement: 手順 6、 3の画像 1 Acer Aspire Switch 10 SW5-011-18R3 Battery Replacement: 手順 6、 3の画像 2 Acer Aspire Switch 10 SW5-011-18R3 Battery Replacement: 手順 6、 3の画像 3
    • Use a plastic opening tool to gently push the edge of the sliding bundle cable connector out.

    • The smaller bundle cable connector is the only one that needs to be removed.

    • Remove the battery.

終わりに

To reassemble your device, follow these instructions in reverse order.

9 の人々がこのガイドを完成させました。

作成者

3人の作成者と共同で作成されました。

Richard Colon

メンバー登録日: 09/28/16

480 ポイント

2のガイドは作成済み

チーム

USF Tampa, Team 3-4, Passmore Fall 2016 USF Tampa, Team 3-4, Passmore Fall 2016人のメンバー

USFT-PASSMORE-F16S3G4

4 メンバー

4のガイドは作成済み

3 件のコメント

But one major part is missing from this description!! The battery.

How much is that?

Marcus - 返信

How can i get a cmos battery off that pc

Kennedy Humphrey - 返信

How does the Switch 10 back removal process differ from the Switch Alpha 12 back removal process. You don’t have much in the stored “fixes” files for the Switch Alpha 12. Can anything here apply to the “12” too? THANKS

danpobrien - 返信

コメントを追加

統計データ:

過去 24時間: 2

過去 7 日: 10

過去 30 日: 28

今までの合計 15,662