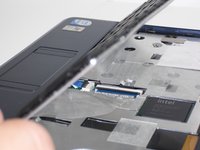
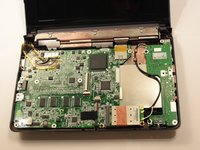
メインコンテンツにスキップ

Acer Aspire One ZG5 Motherboard Replacement

必要な工具と部品

  1. Acer Aspire One ZG5 Motherboard Replacement, Battery: 手順 1、 1の画像 1
    • Turn the netbook upside down with the battery at the top, facing away from you.

  2. Acer Aspire One ZG5 Motherboard Replacement: 手順 2、 1の画像 1
    • Unlock the battery by sliding the switch located near the left hinge to the left "unlocked" position.

  3. Acer Aspire One ZG5 Motherboard Replacement: 手順 3、 1の画像 1
    • Slide the latch located on the opposite hinge from the lock while pushing the battery up.

  4. Acer Aspire One ZG5 Motherboard Replacement, Wireless Card: 手順 4、 1の画像 1
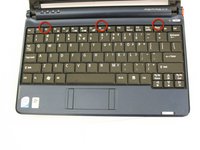
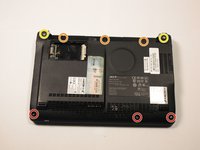
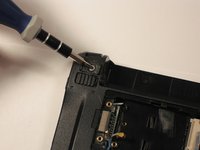
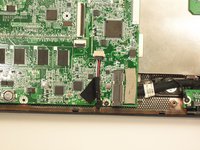
    • Gently loosen the two Phillips #0 screws in the small panel that covers the wireless card.

    • These screws are built into the panel and aren't meant to be completely removed.

  5. Acer Aspire One ZG5 Motherboard Replacement: 手順 5、 1の画像 1
    • Lift up the panel and remove it from the case.

  6. Acer Aspire One ZG5 Motherboard Replacement: 手順 6、 1の画像 1
    • Disconnect the two antenna cables from the left side of the wireless card.

  7. Acer Aspire One ZG5 Motherboard Replacement: 手順 7、 1の画像 1
    • Remove the single 3.9 mm Phillips #1 screw from the bottom left of the wireless card.

  8. Acer Aspire One ZG5 Motherboard Replacement: 手順 8、 1の画像 1
    • Gently lift up the left side of the wireless card and slide the card out of its socket.

  9. Acer Aspire One ZG5 Motherboard Replacement, Keyboard: 手順 9、 1の画像 1
    • Turn the netbook over and open the display so that the keyboard is facing you.

  10. Acer Aspire One ZG5 Motherboard Replacement: 手順 10、 3の画像 1 Acer Aspire One ZG5 Motherboard Replacement: 手順 10、 3の画像 2 Acer Aspire One ZG5 Motherboard Replacement: 手順 10、 3の画像 3
    • There are three tabs located on the top of the keyboard.

    • Start with the spudger pointing towards the display and pry up to push each tab off the keyboard.

    • As you move to the next tab, ensure the previous tab doesn't reset itself.

  11. Acer Aspire One ZG5 Motherboard Replacement: 手順 11、 2の画像 1 Acer Aspire One ZG5 Motherboard Replacement: 手順 11、 2の画像 2
    • Lift top of keyboard up. If it doesn't lift easily, there may be tabs on the sides - use the tool to ease them aside and/or shift the keyboard from side to side.

    • There is a short ribbon cable connecting the keyboard to the netbook.

  12. Acer Aspire One ZG5 Motherboard Replacement: 手順 12、 2の画像 1 Acer Aspire One ZG5 Motherboard Replacement: 手順 12、 2の画像 2
    • Disconnect the ribbon by lifting the black plastic hinge and removing the clear blue cable.

  13. Acer Aspire One ZG5 Motherboard Replacement, Top Case: 手順 13、 1の画像 1
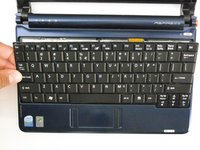
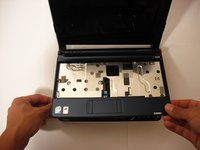
    • Close the display and turn the ZG5 over so that the battery compartment faces away from you.

  14. Acer Aspire One ZG5 Motherboard Replacement: 手順 14、 2の画像 1 Acer Aspire One ZG5 Motherboard Replacement: 手順 14、 2の画像 2
    • Remove three 5.8 mm Phillips #0 screws from the bottom of the case

    • Remove three 3.9 mm Phillips #1 screws from the battery compartment.

    • Remove two 5.8 mm Phillips #0 screws from underneath the feet near the hinges.

  15. Acer Aspire One ZG5 Motherboard Replacement: 手順 15、 1の画像 1
    • Turn the netbook back over and open the display with the keyboard cavity facing you.

  16. Acer Aspire One ZG5 Motherboard Replacement: 手順 16、 3の画像 1 Acer Aspire One ZG5 Motherboard Replacement: 手順 16、 3の画像 2 Acer Aspire One ZG5 Motherboard Replacement: 手順 16、 3の画像 3
    • Flip up the retaining flap on the trackpad ribbon cable ZIF connector.

    • Using the blue tab, pull the trackpad ribbon cable from its socket on the motherboard.

  17. Acer Aspire One ZG5 Motherboard Replacement: 手順 17、 2の画像 1 Acer Aspire One ZG5 Motherboard Replacement: 手順 17、 2の画像 2
    • Remove the five black 4.7 mm Phillips #0 screws from the metal casing.

    • Remove the single silver 4.3 mm Phillips #00 screw from the right side of the metal casing.

  18. Acer Aspire One ZG5 Motherboard Replacement: 手順 18、 2の画像 1 Acer Aspire One ZG5 Motherboard Replacement: 手順 18、 2の画像 2
    • Starting at the red rings along the hinge, insert a spudger or plastic opening tool into the seam between the two halves of the case.

    • Slide the spudger toward the front of the device, releasing the small clips that hold down the top case.

    • Gently lift off the top case.

  19. Acer Aspire One ZG5 Motherboard Replacement, Internal Wireless Card: 手順 19、 1の画像 1
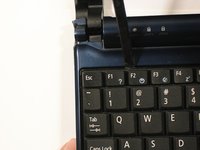
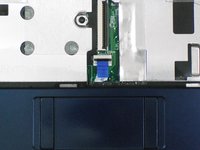
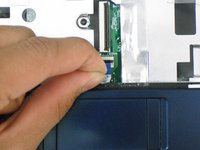
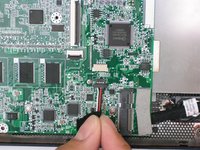
    • Disconnect the two antenna cables from the right side of the wireless card.

  20. Acer Aspire One ZG5 Motherboard Replacement: 手順 20、 1の画像 1
    • Remove the single 3.9 mm Phillips #1 screw from the wireless card.

  21. Acer Aspire One ZG5 Motherboard Replacement: 手順 21、 1の画像 1
    • Gently pull the wireless card to the right and slide it out of its socket.

  22. Acer Aspire One ZG5 Motherboard Replacement, Motherboard: 手順 22、 1の画像 1
    • Disconnect the display cable from the top left of the motherboard.

  23. Acer Aspire One ZG5 Motherboard Replacement: 手順 23、 2の画像 1 Acer Aspire One ZG5 Motherboard Replacement: 手順 23、 2の画像 2
    • Disconnect the speaker cable from its socket on the motherboard.

  24. Acer Aspire One ZG5 Motherboard Replacement: 手順 24、 1の画像 1
    • Remove three 3.9 mm Phillips #1 screws from the small I/O board.

    • Remove a single 3.9 mm Phillips #0 screw from the front of the motherboard.

    • Some laptops may instead have a single 4.7 mm Phillips #0 screw.

  25. Acer Aspire One ZG5 Motherboard Replacement: 手順 25、 1の画像 1
    • Remove the two 4.7 mm Phillips #1 screws that connect the display to the motherboard.

  26. Acer Aspire One ZG5 Motherboard Replacement: 手順 26、 1の画像 1
    • Gently lift the I/O board up from the right side of the case.

    • The I/O board is attached to the motherboard by a short cable.

  27. Acer Aspire One ZG5 Motherboard Replacement: 手順 27、 1の画像 1
    • Lift the entire motherboard assembly out the case.

終わりに

To reassemble your device, follow these instructions in reverse order.

24 の人々がこのガイドを完成させました。

作成者

9人の作成者と共同で作成されました。

Doug Gallatin

メンバー登録日: 10/05/10

6,337 ポイント

10のガイドは作成済み

チーム

Cal Poly, Team 7-49, Amido Fall 2010 Cal Poly, Team 7-49, Amido Fall 2010人のメンバー

CPSU-AMIDO-F10S7G49

5 メンバー

27のガイドは作成済み

2 件のコメント

Hi Doug,

I'm about to rebuild my old acer netbook ZG5 and discovered that there is nothing under the wireless card door. Does this mean that the wireless card is embedded? I ask because I am now doubting that the netbook was ever wifi (but it must have been.) Newegg doesn't seem to have any motherboards available for the ZG5 so I'm thinking I'll get one from ebay. Thanks for the guide.

Matt

mattearls - 返信

Bro, i got problem with this mobo...

The resistor is broke, its located on side of keyboard port...

I'm trying to de-solder but it wont move.

What should i do?

Peter Dorothy - 返信

コメントを追加

統計データ:

過去 24時間: 0

過去 7 日: 7

過去 30 日: 36

今までの合計 58,079