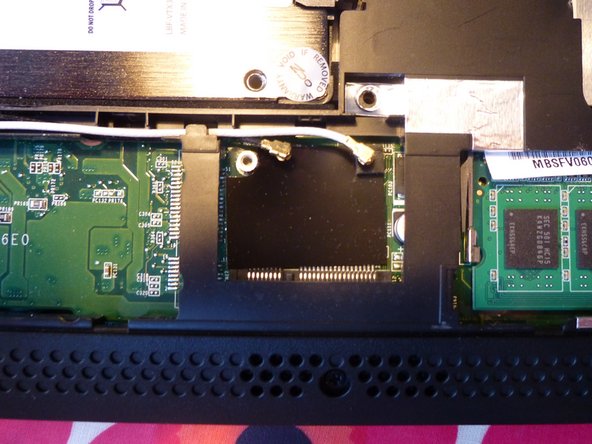
メインコンテンツにスキップ

Acer Aspire One D257 Wireless card Replacement

必要な工具と部品

  1. Acer Aspire One D257 Wireless card Replacement, Battery: 手順 1、 1の画像 1
    • Put the netbook, so the back side is upwards.

  2. Acer Aspire One D257 Wireless card Replacement: 手順 2、 1の画像 1
    • Push the right lock to the right so the red filed is visible on the left.

  3. Acer Aspire One D257 Wireless card Replacement: 手順 3、 1の画像 1
    • Now move the left lock which is spring loaded to the leftand keep it there. Then with the other hand remove the battery by pulling down.

    • When reassembeling the new battery push it up into the netbook and do lock the right by moving it to the left so the red field disappears.

  4. Acer Aspire One D257 Wireless card Replacement, Keyboard: 手順 4、 2の画像 1 Acer Aspire One D257 Wireless card Replacement, Keyboard: 手順 4、 2の画像 2
    • Open the lid othe the netbook. Use the Jimmy from the upper left corner of the keyboard. Put it between the keyboard and th casing and move it to the right. It might help to use a metal spudger to push in the pins holding the keyboard in place.

    • Then move down along the sides where there is one pin on each side. After that twist the keyboard towards you.

  5. Acer Aspire One D257 Wireless card Replacement: 手順 5、 1の画像 1
    • Now open the brown connector so the flat cable is loose. Then you can remove the keyboard.

  6. Acer Aspire One D257 Wireless card Replacement, Acer Aspire One D257 opening the hatch: 手順 6、 1の画像 1
    • Remove the 5 screws marked with "Door".

  7. Acer Aspire One D257 Wireless card Replacement: 手順 7、 2の画像 1 Acer Aspire One D257 Wireless card Replacement: 手順 7、 2の画像 2
    • Use a spudger or flat screwdriver to push down the hatch where it is marked "Door release".

    • Now you can carfully remove the hatch.

    • When reassembling the hatch look that the noses are aimed at the appropriate holes in the case, then you can press down the rest of the hatch onto the netbook.

  8. Acer Aspire One D257 Wireless card Replacement, Wireless card: 手順 8、 1の画像 1
    • Turn around the netbook so we look on the bottom.

  9. Acer Aspire One D257 Wireless card Replacement: 手順 9、 3の画像 1 Acer Aspire One D257 Wireless card Replacement: 手順 9、 3の画像 2 Acer Aspire One D257 Wireless card Replacement: 手順 9、 3の画像 3
    • With an anti static spudger carfully remove the antenna cables from the connection on the WiFi-card.

    • Remove the screw to then lift the card from the socket.

    • Now you can install a new or better WiFi-card. I have installed a Dualband AC card from Intel into my netbook, the AC 7260.

終わりに

To reassemble your device, follow these instructions in reverse order.

4 の人々がこのガイドを完成させました。

以下の翻訳者の皆さんにお礼を申し上げます:

de en

100%

これらの翻訳者の方々は世界を修理する私たちのサポートをしてくれています。 あなたも貢献してみませんか?
翻訳を始める ›

作成者

1人の作成者と共同作成されました。

Claes

メンバー登録日: 02/01/16

3,400 ポイント

6のガイドは作成済み

チーム

Master Techs Master Techs人のメンバー

Community

322 メンバー

2,521のガイドは作成済み

0 件のコメント

コメントを追加

統計データ:

過去 24時間: 0

過去 7 日: 3

過去 30 日: 22

今までの合計 3,212