メインコンテンツにスキップ

Acer Aspire One D255-1625 Fan Replacement

必要な工具と部品

  1. Acer Aspire One D255-1625 Fan Replacement, Battery: 手順 1、 3の画像 1 Acer Aspire One D255-1625 Fan Replacement, Battery: 手順 1、 3の画像 2 Acer Aspire One D255-1625 Fan Replacement, Battery: 手順 1、 3の画像 3
    • Before you replace the battery, ensure that the device is unplugged and powered off.

    • Pull the upper left switch on the back of the laptop to the left into the unlock position.

    • Pull the upper right switch to the left and hold it in place.

  2. Acer Aspire One D255-1625 Fan Replacement: 手順 2、 1の画像 1
    • Pull the battery straight out.

    • To properly dispose of battery, locate your nearest recycling plant to dispose of it there.

  3. Acer Aspire One D255-1625 Fan Replacement, Fan: 手順 3、 2の画像 1 Acer Aspire One D255-1625 Fan Replacement, Fan: 手順 3、 2の画像 2
    • Use iFixit’s Jimmy tool to remove bottom panel of device.

    • Wedge the tool into the top middle of the panel until the back gently pops off.

  4. Acer Aspire One D255-1625 Fan Replacement: 手順 4、 3の画像 1 Acer Aspire One D255-1625 Fan Replacement: 手順 4、 3の画像 2 Acer Aspire One D255-1625 Fan Replacement: 手順 4、 3の画像 3
    この手順で使用する道具:
    Tweezers
    $4.99
    購入する
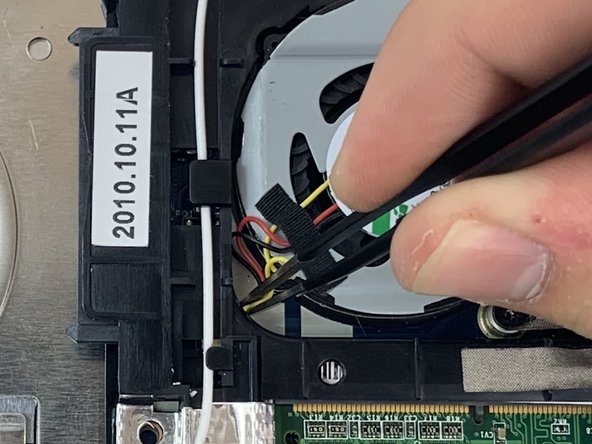
    • Use the tweezers to disconnect the fan's wires from laptop.

    • Use the Phillips #1 screwdriver to remove the three 4mm screws that hold the fan in place.

    • The 3rd screw on the bottom right is extremely difficult to remove as it requires you to bend the motherboard slightly in order to reach it.

  5. Acer Aspire One D255-1625 Fan Replacement: 手順 5、 1の画像 1
    • Pull the fan out of the housing unit.

    • You may need to use the iFixit Jimmy tool to help pull the fan out.

終わりに

To reassemble your device, follow these instructions in reverse order.

作成者

4人の作成者と共同で作成されました。

Zahria Martin

メンバー登録日: 01/30/20

196 ポイント

2のガイドは作成済み

0 件のコメント

コメントを追加

統計データ:

過去 24時間: 0

過去 7 日: 6

過去 30 日: 15

今までの合計 383