メインコンテンツにスキップ

Acer Aspire One AO756-2623 Fan Replacement

必要な工具と部品

  1. Acer Aspire One AO756-2623 Fan Replacement, Battery: 手順 1、 1の画像 1
    • Orient the ACER Aspire One to where the bottom of the laptop is facing upward as shown in the picture.

  2. Acer Aspire One AO756-2623 Fan Replacement: 手順 2、 1の画像 1
    • Locate the circular slot positioned at the bottom right of the battery.

  3. Acer Aspire One AO756-2623 Fan Replacement: 手順 3、 3の画像 1 Acer Aspire One AO756-2623 Fan Replacement: 手順 3、 3の画像 2 Acer Aspire One AO756-2623 Fan Replacement: 手順 3、 3の画像 3
    • Insert a spudger and slide the tab to the right.

    • When working with electronics, it's important to choose a tool that's ESD-safe to avoid accidental damage to the device. The regular black nylon spudger or a plastic opening tool should be used whenever possible.

    • Hold the tab in the right-hand position and firmly push or pull the battery upward to remove it from the laptop.

  4. Acer Aspire One AO756-2623 Fan Replacement, Back Cover: 手順 4、 1の画像 1
    • Locate the single 6 mm Phillips screw in the lower middle of the back plate.

    • Remove the screw using a Phillips #0 Screwdriver.

  5. Acer Aspire One AO756-2623 Fan Replacement: 手順 5、 2の画像 1 Acer Aspire One AO756-2623 Fan Replacement: 手順 5、 2の画像 2
    • Slide the back plate downward to remove it from the laptop.

  6. Acer Aspire One AO756-2623 Fan Replacement, Keyboard: 手順 6、 1の画像 1
    • Locate the eighteen 6 mm Phillips screws that are required to remove the keyboard.

    • Remove all screws using a Phillips #0 screwdriver.

  7. Acer Aspire One AO756-2623 Fan Replacement: 手順 7、 1の画像 1
    • Orient the laptop to where the open screen is facing towards you.

    • Slide the spuldger into the indicated crease.

    • Firmly slide spudger all the way around the laptop to pry the keyboard away from the bottom of the laptop.

    • Loud cracking noises will be heard during this step.

  8. Acer Aspire One AO756-2623 Fan Replacement: 手順 8、 3の画像 1 Acer Aspire One AO756-2623 Fan Replacement: 手順 8、 3の画像 2 Acer Aspire One AO756-2623 Fan Replacement: 手順 8、 3の画像 3
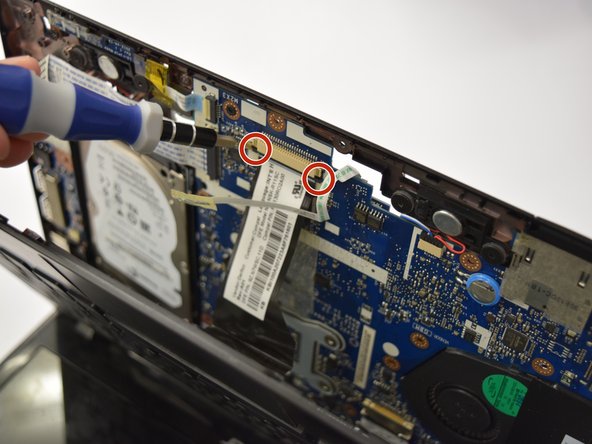
    • Remove the green dotted ribbon cable by sliding it straight out of the clamp holding it in using a plastic spudger.

    • Locate the two tabs that are holding the larger black ribbon cable in place.

    • Remove the larger black ribbon cable by pressing in the tabs and sliding it straight out of the clamp holding it in using a plastic spudger.

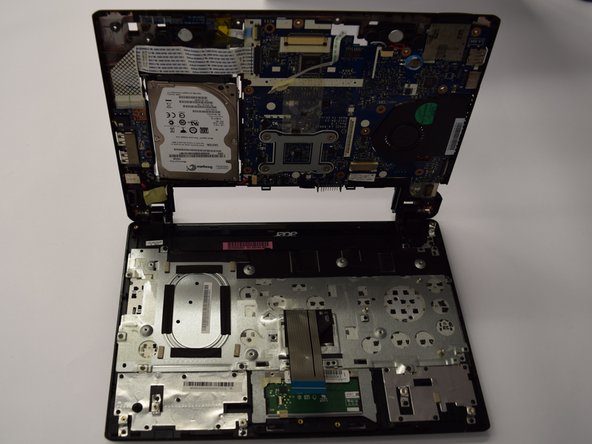
    • To remove the keyboard, lift the keyboard straight away from the rest of the laptop.

  9. Acer Aspire One AO756-2623 Fan Replacement: 手順 9、 3の画像 1 Acer Aspire One AO756-2623 Fan Replacement: 手順 9、 3の画像 2 Acer Aspire One AO756-2623 Fan Replacement: 手順 9、 3の画像 3
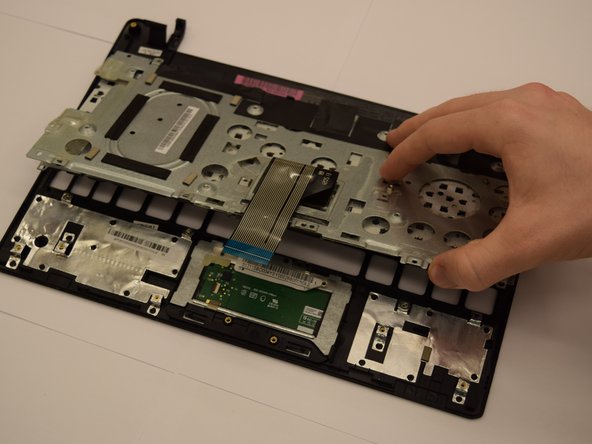
    • Locate the ten 6 mm Phillips screws that connect the keyboard to the rest of the laptop and remove them with a Phillips #0 Screwdriver.

    • Locate the four 6 mm Phillips screws hidden beneath black tape by lifting up the black tape and remove them with a Phillips #0 Screwdriver.

    • To remove keyboard from the rest of the laptop, pull keyboard straight up.

  10. Acer Aspire One AO756-2623 Fan Replacement, Fan: 手順 10、 1の画像 1
    • Orient laptop with open screen facing you.

    • Peel back black tape.

  11. Acer Aspire One AO756-2623 Fan Replacement: 手順 11、 2の画像 1 Acer Aspire One AO756-2623 Fan Replacement: 手順 11、 2の画像 2
    • Orient the laptop to where the bottom of the laptop is facing upwards.

    • Locate the port that connects the fan to the laptop.

    • Use a nylon spudger to firmly pull out the cable from the port.

    • Pull the fan straight out to remove it from the rest of the laptop.

終わりに

To reassemble your device, follow these instructions in reverse order.

ある他の人がこのガイドを完成しました。

作成者

3人の作成者と共同で作成されました。

Davis Adams

メンバー登録日: 03/20/16

465 ポイント

3のガイドは作成済み

チーム

Clemson, Team 7-1, Benson Spring 2016 Clemson, Team 7-1, Benson Spring 2016人のメンバー

CLEM-BENSON-S16S7G1

4 メンバー

14のガイドは作成済み

コメント 1 件

don’t know if i’ll tackle this. have had mine at least 5 yrs. heating up and shutting off now. maybe i’ll try it along with new heat sink paste and if that helps give it to my son, as i just bought a new Acer. thanks for the clear instructions.

misciagna - 返信

コメントを追加

統計データ:

過去 24時間: 0

過去 7 日: 5

過去 30 日: 13

今までの合計 2,325