メインコンテンツにスキップ

Acer Aspire ES1-512-C80E Fan Replacement

必要な工具と部品

  1. Acer Aspire ES1-512-C80E Fan Replacement, Back Cover: 手順 1、 1の画像 1
    • Place the device upside down on a flat surface.

    • Using a Phillips #00 screwdriver, remove all nineteen 1.2mm screws that secure the bottom cover of the device.

  2. Acer Aspire ES1-512-C80E Fan Replacement: 手順 2、 3の画像 1 Acer Aspire ES1-512-C80E Fan Replacement: 手順 2、 3の画像 2 Acer Aspire ES1-512-C80E Fan Replacement: 手順 2、 3の画像 3
    • Pry around the edges with a spudger to remove the back cover.

    • The two hinges on the back require additional force to be popped open.

  3. Acer Aspire ES1-512-C80E Fan Replacement, Keyboard: 手順 3、 3の画像 1 Acer Aspire ES1-512-C80E Fan Replacement, Keyboard: 手順 3、 3の画像 2 Acer Aspire ES1-512-C80E Fan Replacement, Keyboard: 手順 3、 3の画像 3
    • The keyboard is the silver piece located by itself on the upper half of the laptop.

    • Using a Phillips #00 screwdriver, remove the four 1.2mm screws from the keyboard.

    • Using a spudger, go around the edges and pry off the keyboard.

    • All black clips will have to be removed before the keyboard can be removed.

  4. Acer Aspire ES1-512-C80E Fan Replacement: 手順 4、 3の画像 1 Acer Aspire ES1-512-C80E Fan Replacement: 手順 4、 3の画像 2 Acer Aspire ES1-512-C80E Fan Replacement: 手順 4、 3の画像 3
    • Remove the ribbon cable connection from the keyboard.

    • Peel back the two pieces of tape to separate the keyboard.

    • Remove the keyboard from under the plastic covering.

    • Remove the silver plate back cover of the keyboard from the bottom base.

  5. Acer Aspire ES1-512-C80E Fan Replacement: 手順 5、 2の画像 1 Acer Aspire ES1-512-C80E Fan Replacement: 手順 5、 2の画像 2
    • Remove the large silver plate from the keyboard.

    • You can not remove the silver backing with the attached wire from the back of the keyboard.

  6. Acer Aspire ES1-512-C80E Fan Replacement: 手順 6、 1の画像 1
    • The keyboard is removed and ready to be replaced.

  7. Acer Aspire ES1-512-C80E Fan Replacement, Fan: 手順 7、 2の画像 1 Acer Aspire ES1-512-C80E Fan Replacement, Fan: 手順 7、 2の画像 2
    • Remove twelve 1.2mm Phillips #000 screws from the motherboard, wireless LAN card, and hard drive.

  8. Acer Aspire ES1-512-C80E Fan Replacement: 手順 8、 3の画像 1 Acer Aspire ES1-512-C80E Fan Replacement: 手順 8、 3の画像 2 Acer Aspire ES1-512-C80E Fan Replacement: 手順 8、 3の画像 3
    • Using a Phillips #000 screwdriver, remove both 1.2mm screws that hold the fan in place.

  9. Acer Aspire ES1-512-C80E Fan Replacement: 手順 9、 3の画像 1 Acer Aspire ES1-512-C80E Fan Replacement: 手順 9、 3の画像 2 Acer Aspire ES1-512-C80E Fan Replacement: 手順 9、 3の画像 3
    • Lift the fan, hard drive, motherboard, and wireless LAN card out of the device.

    • These components are still connected with wires. Remove all plugs that may be attached to other components in order to isolate the group of components.

  10. Acer Aspire ES1-512-C80E Fan Replacement: 手順 10、 1の画像 1
    • Flip over the motherboard.

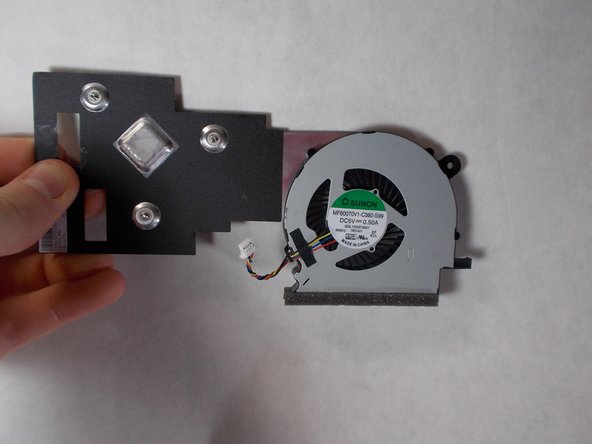
    • Remove all three 1.2mm Phillips #00 screws that attach the fan to the motherboard.

  11. Acer Aspire ES1-512-C80E Fan Replacement: 手順 11、 3の画像 1 Acer Aspire ES1-512-C80E Fan Replacement: 手順 11、 3の画像 2 Acer Aspire ES1-512-C80E Fan Replacement: 手順 11、 3の画像 3
    • The fan and motherboard are still connected with wires. Remove any plugs that may be attaching the components

    • Remove the fan from the motherboard.

終わりに

To reassemble your device, follow these instructions in reverse order.

2 の人々がこのガイドを完成させました。

作成者

3人の作成者と共同で作成されました。

Robert Creighton

メンバー登録日: 10/31/19

682 ポイント

6のガイドは作成済み

チーム

UMass Dartmouth, Team S2-G8, Barthe Fall 2019 UMass Dartmouth, Team S2-G8, Barthe Fall 2019人のメンバー

UMASSD-BARTHE-F19S2G8

3 メンバー

7のガイドは作成済み

0 件のコメント

コメントを追加

統計データ:

過去 24時間: 1

過去 7 日: 5

過去 30 日: 7

今までの合計 396