メインコンテンツにスキップ

Acer Aspire 5750-6667 Optical Drive Replacement

必要な工具と部品

  1. Acer Aspire 5750-6667 Optical Drive Replacement, Battery: 手順 1、 2の画像 1 Acer Aspire 5750-6667 Optical Drive Replacement, Battery: 手順 1、 2の画像 2
    • Unplug the charging cable from the laptop and the wall. Failure to disconnect the charging cable could result in electric shock.

    • Turn the laptop over.

    • Locate the orange switch next to the battery.

  2. Acer Aspire 5750-6667 Optical Drive Replacement: 手順 2、 3の画像 1 Acer Aspire 5750-6667 Optical Drive Replacement: 手順 2、 3の画像 2 Acer Aspire 5750-6667 Optical Drive Replacement: 手順 2、 3の画像 3
    この手順で使用する道具:
    Tweezers
    $4.99
    購入する
    • Using a small tool such as tweezers or a pen, slide the orange switch completely to the left to unlock the battery.

    • While holding the orange switch in place, lift the battery by the lip and pull it away from the laptop.

  3. Acer Aspire 5750-6667 Optical Drive Replacement, Optical Drive: 手順 3、 2の画像 1 Acer Aspire 5750-6667 Optical Drive Replacement, Optical Drive: 手順 3、 2の画像 2
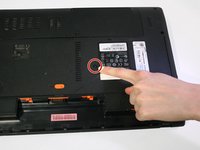
    • Locate the black screw just above the battery.

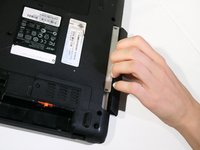
    • Remove the black screw holding the optical drive in place by using a Phillips #0 screwdriver.

  4. Acer Aspire 5750-6667 Optical Drive Replacement: 手順 4、 2の画像 1 Acer Aspire 5750-6667 Optical Drive Replacement: 手順 4、 2の画像 2
    • Pull the optical drive free from the laptop.

終わりに

To reassemble your device, follow these instructions in reverse order.

作成者

3人の作成者と共同で作成されました。

Chelsea Taylor

メンバー登録日: 01/18/17

380 ポイント

3のガイドは作成済み

チーム

Eastern Washington University, Team 2-5, Crane Winter 2017 Eastern Washington University, Team 2-5, Crane Winter 2017人のメンバー

EWU-CRANE-W17S2G5

4 メンバー

5のガイドは作成済み

0 件のコメント

コメントを追加

統計データ:

過去 24時間: 0

過去 7 日: 6

過去 30 日: 12

今までの合計 1,213