メインコンテンツにスキップ

このバージョンは誤った内容を含んでいる可能性があります。最新の承認済みスナップショットに切り替えてください。

必要な工具と部品

  1. この手順は未翻訳です。 翻訳を手伝う。

    : 手順 1、 3の画像 1 : 手順 1、 3の画像 2 : 手順 1、 3の画像 3
    • Move the battery catch to the "unlocked" position.

    • Pull back the second spring-loaded battery catch until the battery pops up.

    • Remove the battery.

  2. この手順は未翻訳です。 翻訳を手伝う。

    : 手順 2、 3の画像 1 : 手順 2、 3の画像 2 : 手順 2、 3の画像 3
    • Turn the notebook around to face you.

    • There are two Phillips #00 screws securing the cover panel to the rest of the notebook. Remove these screws.

  3. この手順は未翻訳です。 翻訳を手伝う。

    : 手順 3、 3の画像 1 : 手順 3、 3の画像 2 : 手順 3、 3の画像 3
    • Use a spudger to release the panel from the plastic retaining clips keeping it in place.

    • Do not apply too much force, or you may break the clips.

    • Remove the panel and set it aside.

  4. この手順は未翻訳です。 翻訳を手伝う。

    : 手順 4、 3の画像 1 : 手順 4、 3の画像 2 : 手順 4、 3の画像 3
    • The WLAN card is protected by a transparent cellophane cover.

    • Lift this cover away from the WLAN card. It will not come free from the WLAN card socket.

    • You may wish to use some Scotch tape to hold the cover in place while you work.

  5. この手順は未翻訳です。 翻訳を手伝う。

    : 手順 5、 2の画像 1 : 手順 5、 2の画像 2
    • Use the pointy end of a spudger to remove the antenna connectors from the WLAN card.

  6. この手順は未翻訳です。 翻訳を手伝う。

    : 手順 6、 2の画像 1 : 手順 6、 2の画像 2
    • You may find it useful to pull the antenna cables out from under the plastic retaining clip so you can move them out of the way while you work.

  7. この手順は未翻訳です。 翻訳を手伝う。

    : 手順 7、 3の画像 1 : 手順 7、 3の画像 2 : 手順 7、 3の画像 3
    • There is one Phillips #00 screw keeping the WLAN card attached to the notebook.

    • Remove this screw.

    • The WLAN card will spring up from the notebook at an angle.

  8. この手順は未翻訳です。 翻訳を手伝う。

    : 手順 8、 2の画像 1 : 手順 8、 2の画像 2
    • Just like RAM, hold the WLAN card by the edges and pull it out at an angle.

  9. この手順は未翻訳です。 翻訳を手伝う。

    : 手順 9、 2の画像 1 : 手順 9、 2の画像 2
    • When you're installing the new WLAN card, you might want to hold it down with one hand while you put the screw in with the other.

    • You might also want to put the antenna cables back in using the flat end of a spudger.

ゴール

13 の人々がこのガイドを完成させました。

作成者

2人の作成者と共同で作成されました。

Skylar MacDonald

メンバー登録日: 12/04/11

1,964 ポイント

5のガイドは作成済み

4 件のコメント

what if i am missing the white wire going to the WLAN card??

chip - 返信

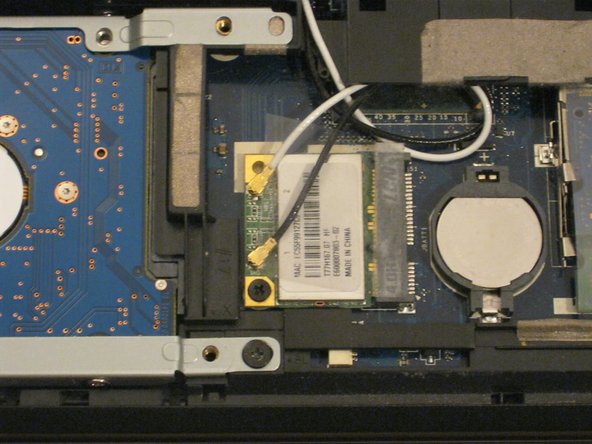
If your laptop only came with a black wire, it should be fine just to re-connect that. The white one looks like it's a second antenna, so that might not be present in the 5742G model of the laptop - mine was a 5742Z, and it's what I used to create the guide. As always, your mileage may vary - but let me know how it goes and I'll update the guide.

Skylar MacDonald -

Do you know how to determine if it the card or the antennae that is the culprit for dropping wireless connection?

Don Ens - 返信

Running Win7 Home on Acer 5749Z and windows seems to think it's the router, where the problem is. I disagree, since running 2 other computers from the router, one Win7 laptop and the other is an Acer 4720Z WinXP. The both show very strong signals.

Tried recovery, update driver, resetting router. All to no available.

Have USB Wireless adapter and connection is slower but strong.

Don Ens - 返信

コメントを追加

統計データ:

過去 24時間: 1

過去 7 日: 9

過去 30 日: 41

今までの合計 18,575