メインコンテンツにスキップ

Acer Aspire 5100 LCD Monitor Replacement

必要な工具と部品

  1. Acer Aspire 5100 LCD Monitor Replacement, Keyboard: 手順 1、 2の画像 1 Acer Aspire 5100 LCD Monitor Replacement, Keyboard: 手順 1、 2の画像 2
    • Open and push the screen back all the way until it is horizontal with the rest of the laptop.

    • Use an opening tool to remove the panel above the keyboard that has the power button on it.

    • After you have released the tabs, lift up the panel.

  2. Acer Aspire 5100 LCD Monitor Replacement: 手順 2、 3の画像 1 Acer Aspire 5100 LCD Monitor Replacement: 手順 2、 3の画像 2 Acer Aspire 5100 LCD Monitor Replacement: 手順 2、 3の画像 3
    • Under the panel, remove the two screws that connect the keyboard to the laptop.

    • One screw is located above the F5 button, and the other one is located above the F10 button.

    • Potential for device damage: Lift up the keyboard CAREFULLY because there is a ribbon that connects the keyboard to the motherboard.

  3. Acer Aspire 5100 LCD Monitor Replacement: 手順 3、 1の画像 1
    • Release the catch on the ribbon socket by sliding the two tabs toward the ribbon.

    • Pull the ribbon under the keyboard to detach it from the motherboard.

    • Remove the keyboard.

  4. Acer Aspire 5100 LCD Monitor Replacement, LCD Monitor: 手順 4、 1の画像 1
    • Remove the two screws from each corner beneath the LCD screen.

  5. Acer Aspire 5100 LCD Monitor Replacement: 手順 5、 2の画像 1 Acer Aspire 5100 LCD Monitor Replacement: 手順 5、 2の画像 2
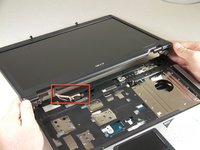
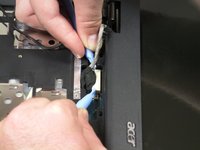
    • Detach the white rectangle located on the motherboard at the end of the wire connected to the LCD screen.

  6. Acer Aspire 5100 LCD Monitor Replacement: 手順 6、 2の画像 1 Acer Aspire 5100 LCD Monitor Replacement: 手順 6、 2の画像 2
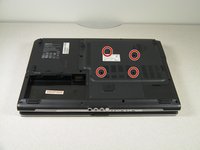
    • Flip the laptop upside down.

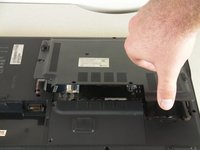
    • Remove the four screws from the back panel of the laptop.

    • Lift the panel up and set it aside.

  7. Acer Aspire 5100 LCD Monitor Replacement: 手順 7、 1の画像 1
    • Detach the black and white wire.

    • You do not need to remove the cooling fan.

  8. Acer Aspire 5100 LCD Monitor Replacement: 手順 8、 1の画像 1
    • Lift up the monitor to detach it.

終わりに

To reassemble your device, follow these instructions in reverse order.

8 の人々がこのガイドを完成させました。

作成者

8人の作成者と共同で作成されました。

Brad Rollinson

メンバー登録日: 09/29/10

1,113 ポイント

7のガイドは作成済み

チーム

Cal Poly, Team 14-39, Forte Fall 2010 Cal Poly, Team 14-39, Forte Fall 2010人のメンバー

CPSU-FORTE-F10S14G39

5 メンバー

10のガイドは作成済み

コメント 1 件

There are 2 screws at the back corners on the bottom cover that are holding the screen down. They need to be removed in order for the screen to be lifted.

Kar Wong - 返信

コメントを追加

統計データ:

過去 24時間: 0

過去 7 日: 1

過去 30 日: 10

今までの合計 15,431