はじめに
In this guide, you will be instructed on how to replace the RAM in your laptop. RAM acts as a short-term memory for your computer, and the greater your RAM’s capacity, the easier it is for your computer to multitask.
This replacement is not difficult, and will take you no more than ten minutes to complete. It requires very few tools, and can be completed in 5 steps.
A brief caution to those upgrading RAM rather than simply replacing it: the Acer Aspire 3003WLCi was sold with two sticks of 256 MB DDR SDRAM. The motherboard in an Acer Aspire 3003WLCi only contains two RAM slots, and only supports up to 2 GB of RAM. So, if your goal is to upgrade the RAM in your Acer Aspire 3003WLCi, do not exceed 2 GB between both sticks.
必要な工具と部品
-
-
Turn the Acer Aspire 3003WLCi so that the bottom of the laptop is facing up. Orient it so that the battery is on your left.
-
-
-
-
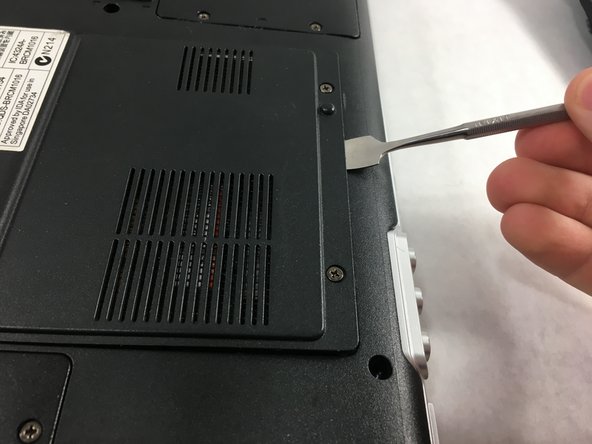
Stick the tip of a spudger into the seam between the panel and the laptop body, on the side of the panel with the screws.
-
Use the spudger to pry up this side of the panel.
-
Grab the lifted side of the panel with your remaining hand and lift. You should hear a popping sound as the panel comes off completely.
-
-
-
Orient the laptop so that the battery is closest to you. The RAM slots are at the top of the laptop, and each stick of RAM has two tabs to hold it in its slot.
-
Remove both sticks of RAM. To do this, use both thumbs to push the tabs away from the desired stick of RAM. The stick should pop up at an angle when the tabs are pushed far enough.
-


To reassemble your device, follow these instructions in reverse order.
To reassemble your device, follow these instructions in reverse order.
チーム

UMass Dartmouth, Team S2-G2, Bailey Spring 2019 UMass Dartmouth, Team S2-G2, Bailey Spring 2019人のメンバー
UMASSD-BAILEY-S19S2G2
4 メンバー
5のガイドは作成済み