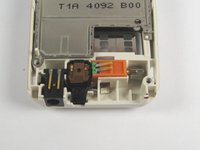
メインコンテンツにスキップ

Accessing Nokia 3100b DC Input

必要な工具と部品

  1. Accessing Nokia 3100b DC Input, Battery: 手順 1、 1の画像 1
    • Make sure your phone is turned off.

  2. Accessing Nokia 3100b DC Input: 手順 2、 1の画像 1
    • Press the button on the back of the phone and slide the back panel off.

    • Remove the battery by pulling it from the phone.

  3. Accessing Nokia 3100b DC Input, SIM Card: 手順 3、 1の画像 1
    • Gently pull back the small metal frame holding the SIM card into place, and lift open the frame.
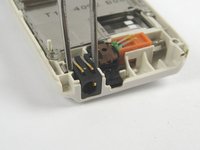
  4. Accessing Nokia 3100b DC Input: 手順 4、 1の画像 1
    • Retrieve your SIM card.

  5. Accessing Nokia 3100b DC Input, Accessing Nokia 3100b DC Input: 手順 5、 1の画像 1
    • Separate the front cover from the base.

  6. Accessing Nokia 3100b DC Input: 手順 6、 1の画像 1
    • Using a T6 Torx screwdriver, remove the screws from the screen assembly.

  7. Accessing Nokia 3100b DC Input: 手順 7、 1の画像 1
    • Separate the screen assembly from the base.

  8. Accessing Nokia 3100b DC Input: 手順 8、 3の画像 1 Accessing Nokia 3100b DC Input: 手順 8、 3の画像 2 Accessing Nokia 3100b DC Input: 手順 8、 3の画像 3
    この手順で使用する道具:
    Tweezers
    $4.99
    購入する
    • Use a pair of tweezers to remove the DC input from the base.

終わりに

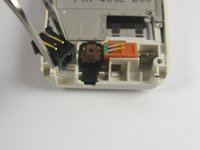
To reassemble your device, follow these instructions in reverse order.

ある他の人がこのガイドを完成しました。

作成者

5人の作成者と共同で作成されました。

Sterling Fuentes

メンバー登録日: 04/09/10

130 ポイント

8のガイドは作成済み

チーム

Cal Poly, Team 29-64, Johann Spring 2010 Cal Poly, Team 29-64, Johann Spring 2010人のメンバー

CPSU-JOHANN-S10S29G64

3 メンバー

8のガイドは作成済み

0 件のコメント

コメントを追加

統計データ:

過去 24時間: 0

過去 7 日: 7

過去 30 日: 17

今までの合計 1,046