メインコンテンツにスキップ

AT-LP60X Cam Gear Assembly Replacement

必要な工具と部品

  1. AT-LP60X Cam Gear Assembly Replacement, Remove Power From The Turntable: 手順 1、 1の画像 1
    • Unplug the power source located on the back of the turntable.

  2. AT-LP60X Cam Gear Assembly Replacement, Press The Stop Button: 手順 2、 1の画像 1
    • Press the stop button located at the front of the turntable one time.

    • During this step, remove your record (if one is on the turntable) and remove the black felt mat.

  3. AT-LP60X Cam Gear Assembly Replacement, Perform Mechanical Reset: 手順 3、 1の画像 1
    • With your right hand, hold the tone arm in the rest so that it does not move.

    • With your left hand, slowly rotate the platter clockwise until you hear a series of clicks.

    • After hearing the series of clicks, the cam gear assembly should not rotate while you continue to rotate the platter - if the cam gear is still rotating, press the stop button again and repeat step 3.

    • Cam gear assembly - white gear visible through holes of the platter.

    • Allowing the tone arm to move freely during this process can result in the stylus being broken.

  4. AT-LP60X Cam Gear Assembly Replacement, Detach Belt & Remove Platter: 手順 4、 2の画像 1 AT-LP60X Cam Gear Assembly Replacement, Detach Belt & Remove Platter: 手順 4、 2の画像 2
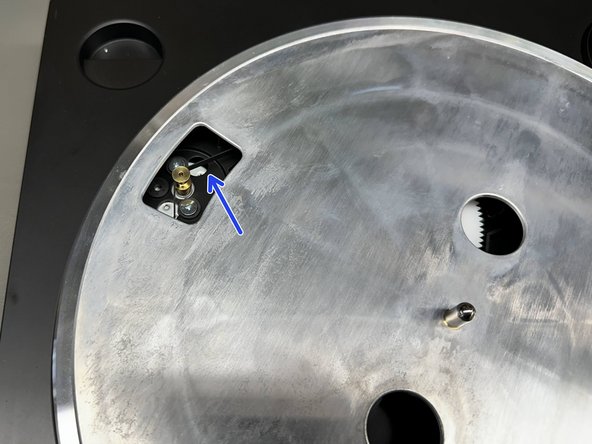
    • Gently pull the belt up and off of the gold pulley.

    • Remove the platter by grabbing the platter from the two circles, and pull straight up.

  5. AT-LP60X Cam Gear Assembly Replacement, Remove Screw: 手順 5、 1の画像 1
    • Remove the screw in the center of the cam gear assembly.

    • Keep screw for Step 9.

  6. AT-LP60X Cam Gear Assembly Replacement, Remove Cam Gear Assembly: 手順 6、 1の画像 1
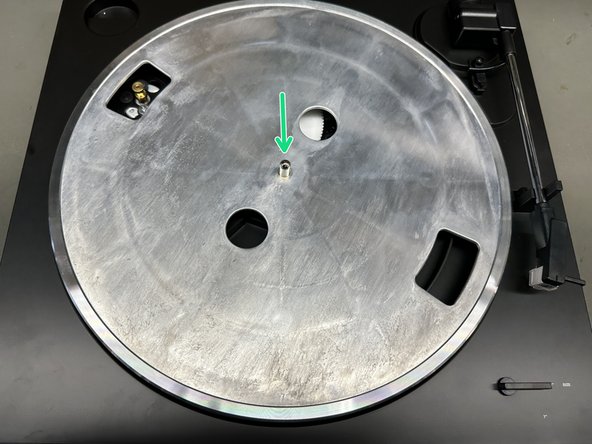
    • Once the screw is removed, pull the cam gear directly up to remove it.

  7. AT-LP60X Cam Gear Assembly Replacement, Adjust Shaft Assembly: 手順 7、 1の画像 1
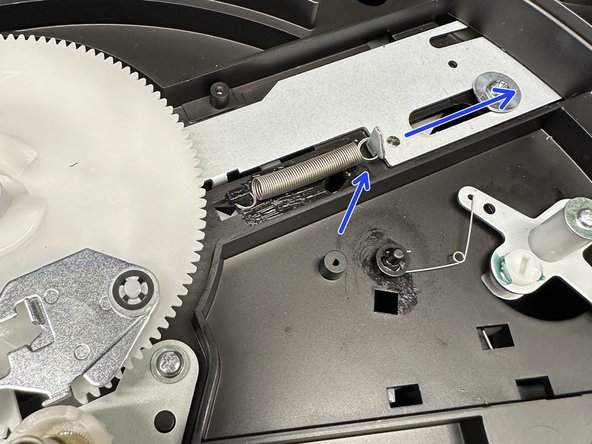
    • Position the metal shaft against the metal bar.

    • Ensure brass bushing is lying flat in between the grooves.

    • Position the white plastic part such that it is touching the hole closest to the center post.

  8. AT-LP60X Cam Gear Assembly Replacement, Position New Cam Gear Assembly: 手順 8、 2の画像 1 AT-LP60X Cam Gear Assembly Replacement, Position New Cam Gear Assembly: 手順 8、 2の画像 2
    • Place the new cam gear assembly on the center post, it will fall into place once the rest of this step is complete - DO NOT force the cam gear assembly down.

    • When the cam gear is placed, the open area of the cam gear should be facing the inner spindle as shown.

    • Locate the metal hook at the end of the spring, and gently slide it away from the cam gear until the cam gear drops into position.

  9. AT-LP60X Cam Gear Assembly Replacement, Mount New Cam Gear Assembly: 手順 9、 1の画像 1
    • Secure the cam gear assembly with the screw set aside from Step 5.

  10. AT-LP60X Cam Gear Assembly Replacement, Mount Platter And Belt: 手順 10、 3の画像 1 AT-LP60X Cam Gear Assembly Replacement, Mount Platter And Belt: 手順 10、 3の画像 2 AT-LP60X Cam Gear Assembly Replacement, Mount Platter And Belt: 手順 10、 3の画像 3
    • Flip the platter upside-down and ensure the belt is stretched around the inner ring.

    • Mount the platter back onto the center spindle.

    • Stretch the belt around the gold pulley.

    • If the belt is connected to anything except the silver platter and the gold pulley this will cause the platter to spin inconsistently.

  11. AT-LP60X Cam Gear Assembly Replacement, Reconnect Power: 手順 11、 1の画像 1
    • Reconnect the power source to the turntable.

  12. AT-LP60X Cam Gear Assembly Replacement, Place Slipmat And Record: 手順 12、 1の画像 1
    • Place the slipmat back onto the platter, and try a record.

    • If the automatic start/stop function still does not work properly, the turntable would likely need to be sent in for repair. Please follow the instructions found in the warranty/repair section at the bottom of www.audio-technica.com

    • If you are sending the turntable in for repair - DO NOT SHIP ANY ACCESSORIES (DUST COVER, HINGES, BELT, PLATTER, SLIPMAT, OR CABLES). IMPROPER SHIPPING CAN CAUSE NON-REPAIRABLE DAMAGE TO THE TURNTABLE.

ゴール

ある他の人がこのガイドを完成しました。

作成者

1人の作成者と共同作成されました。

Anthony @ ATUS

メンバー登録日: 02/28/19

1,045 ポイント

6のガイドは作成済み

0 件のコメント

コメントを追加

統計データ:

過去 24時間: 0

過去 7 日: 0

過去 30 日: 11

今までの合計 102