メインコンテンツにスキップ

ASUS U57A-BBL4 Optical Drive Replacement

必要な工具と部品

  1. ASUS U57A-BBL4 Optical Drive Replacement, Battery: 手順 1、 1の画像 1
    • Make sure the laptop is completely shut down to avoid data complications.

    • Hold the left lock switch towards the left to the unlock option.

  2. ASUS U57A-BBL4 Optical Drive Replacement: 手順 2、 1の画像 1
    • Toggle the right lock switch to the unlock option.

  3. ASUS U57A-BBL4 Optical Drive Replacement: 手順 3、 1の画像 1
    • Gently slide the battery out while still holding the left unlock switch.

  4. ASUS U57A-BBL4 Optical Drive Replacement, Front Panel Assembly: 手順 4、 2の画像 1 ASUS U57A-BBL4 Optical Drive Replacement, Front Panel Assembly: 手順 4、 2の画像 2
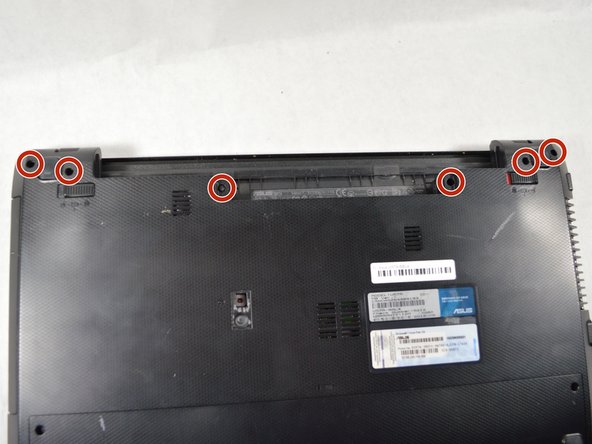
    • Remove the two 2 mm Phillips head screws on each side on the bottom using PH00 screw driver.

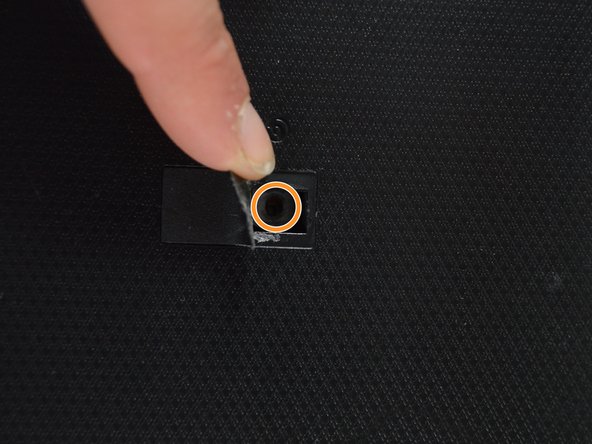
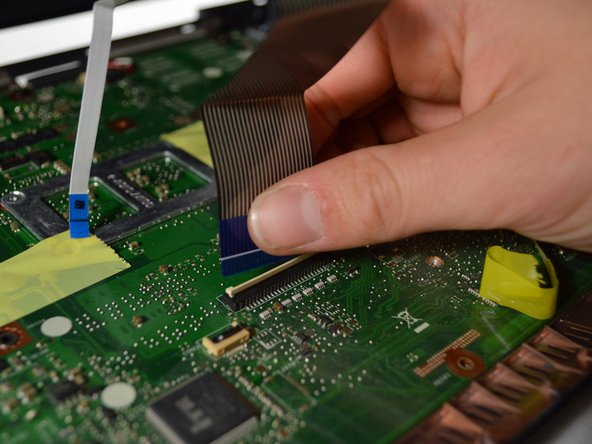
    • Remove the one 2 mm screw underneath the black cover in the middle using the same screw driver.

  5. ASUS U57A-BBL4 Optical Drive Replacement: 手順 5、 1の画像 1
    • Remove the RAM by lifting up with your fingers and sliding it out towards you.

  6. ASUS U57A-BBL4 Optical Drive Replacement: 手順 6、 1の画像 1
    • Remove the three 2 mm Phillips head screws on the hard drive using PH00 screw driver.

    • Remove the remaining seven 1.8 mm Phillips head screws using the same screw driver.

  7. ASUS U57A-BBL4 Optical Drive Replacement: 手順 7、 2の画像 1 ASUS U57A-BBL4 Optical Drive Replacement: 手順 7、 2の画像 2
    • Remove the hard drive by sliding it to the left and lifting up.

  8. ASUS U57A-BBL4 Optical Drive Replacement: 手順 8、 2の画像 1 ASUS U57A-BBL4 Optical Drive Replacement: 手順 8、 2の画像 2
    • Remove the six 2 mm Phillips head screws on the top edge of the laptop using PH00 screw driver.

    • Flip the laptop right-side up and open the screen.

  9. ASUS U57A-BBL4 Optical Drive Replacement: 手順 9、 3の画像 1 ASUS U57A-BBL4 Optical Drive Replacement: 手順 9、 3の画像 2 ASUS U57A-BBL4 Optical Drive Replacement: 手順 9、 3の画像 3
    • Starting in a corner of the keyboard, pry the keyboard from the laptop using a plastic opening tool.

    • Remove the ribbon cable on the bottom of the keyboard by lifting up on the tape and pulling up.

    • The front panel is now loose from the laptop.

  10. ASUS U57A-BBL4 Optical Drive Replacement, Optical Drive: 手順 10、 1の画像 1
    • Slide the optical drive out. It should easily come out.

終わりに

To reassemble your device, follow these instructions in reverse order.

作成者

2人の作成者と共同で作成されました。

Isabella Bernardi

メンバー登録日: 10/18/17

671 ポイント

6のガイドは作成済み

チーム

UMass Dartmouth, Team S2-G4, Julie Fall 2017 UMass Dartmouth, Team S2-G4, Julie Fall 2017人のメンバー

UMASSD-JULIE-F17S2G4

3 メンバー

6のガイドは作成済み

コメント 1 件

On my Asus U57A you only have to remove the one 2mm screw under the plastic cover on the bottom and the optical drive slides right out.  This seems like a considerable amount of overkill to me.

Steve Britten - 返信

コメントを追加

統計データ:

過去 24時間: 0

過去 7 日: 0

過去 30 日: 0

今までの合計 315