メインコンテンツにスキップ

ASUS TV500BG Bluetooth Controller Disassembly

必要な工具と部品

  1. ASUS TV500BG Bluetooth Controller Disassembly, Remove Batteries: 手順 1、 2の画像 1 ASUS TV500BG Bluetooth Controller Disassembly, Remove Batteries: 手順 1、 2の画像 2
    • Find the battery compartment on the bottom of the controller.

    • Depress the button on the battery compartment. Pull the compartment away from the controller and then slide it out.

  2. ASUS TV500BG Bluetooth Controller Disassembly, Disassemble Case: 手順 2、 1の画像 1
    • Remove seven 7mm T7 screws on the bottom of the controller.

    Not all units use Torx screws. Both of my controllers, purchased as the Nexus Player was being discontinued, use #1 Phillips.

    Matt - 返信

  3. ASUS TV500BG Bluetooth Controller Disassembly: 手順 3、 2の画像 1 ASUS TV500BG Bluetooth Controller Disassembly: 手順 3、 2の画像 2
    • Holding the controller upside-down, carefully pull the case apart starting from the back of the controller.

    • You'll have to push the battery contact springs through the case as you pull the front of the controller apart.

  4. ASUS TV500BG Bluetooth Controller Disassembly, Remove Weights: 手順 4、 1の画像 1
    • Now you can start disassembling the inside! First take the two weights out of their slots at the bottom of the controller (I know, kind of underwhelming, but you gotta start somewhere).

    Has anyone attempted to add vibration motors to this? I have not tested this but I believe that is what J401 and J402 were meant for.

    Matt - 返信

  5. ASUS TV500BG Bluetooth Controller Disassembly, Remove Logic Board: 手順 5、 1の画像 1
    • Remove three 7mm T7 screws that fasten the logic board to the top half of the controller.

  6. ASUS TV500BG Bluetooth Controller Disassembly: 手順 6、 1の画像 1
    この手順で使用する道具:
    Anti-Static Wrist Strap
    $7.95
    購入する
    • Pull the logic board straight out from the top half of the case.

    • To protect sensitive electronic components, always stay grounded when handling circuit boards. It's best to ground yourself with an Anti-Static Wrist Strap.

    • Keep the logic board and the controller case parallel to the table so the buttons don't fall out when you take the board off.

  7. ASUS TV500BG Bluetooth Controller Disassembly, Remove Buttons: 手順 7、 3の画像 1 ASUS TV500BG Bluetooth Controller Disassembly, Remove Buttons: 手順 7、 3の画像 2 ASUS TV500BG Bluetooth Controller Disassembly, Remove Buttons: 手順 7、 3の画像 3
    • First we'll tackle the top half of the controller case. If you enjoyed pulling the weights out, get excited. This is pretty much the same.

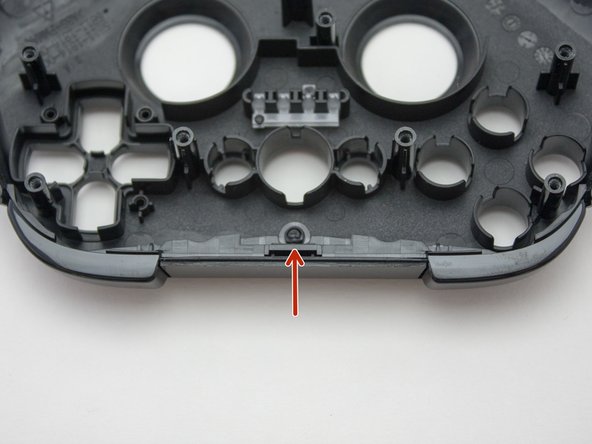
    • There are membrane switches under the plastic buttons. First lift out the membrane switches, then the buttons.

    • If you're careful you can just flip the controller case over and the buttons will fall out.

    • You cannot remove the bumper buttons without breaking the plastic hinge that holds them (shown in the last photo). If you need to replace these buttons I suggest carefully cutting off the top of the hinge to remove the old buttons. Then you can use a dab of hot glue or something similar to hold the new ones on.

    Take note as to the orientation of the red D-pad bridge between the membrane and the button pad itself. It must be replaced in the same direction (do not flip it over when replacing it).

    Matt - 返信

  8. ASUS TV500BG Bluetooth Controller Disassembly, Remove Joysticks: 手順 8、 2の画像 1 ASUS TV500BG Bluetooth Controller Disassembly, Remove Joysticks: 手順 8、 2の画像 2
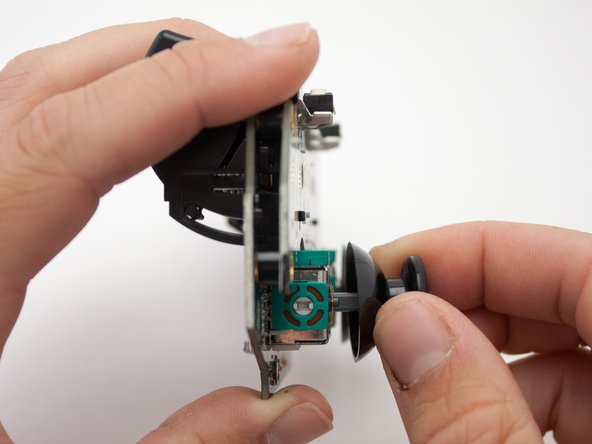
    • Now back to the logic board. Flip the board so the joysticks are facing you. Firmly pull each joystick straight out, away from the board, to remove.

  9. ASUS TV500BG Bluetooth Controller Disassembly, Separate Logic Board Stack: 手順 9、 1の画像 1
    • To separate the two boards, gently pull them apart.

    • There is a 30 pin connector between the boards above the left joystick. Keep the boards parallel when pulling them apart to avoid breaking any of the pins. Take similar care when putting them back together.

  10. ASUS TV500BG Bluetooth Controller Disassembly, Disassembly Complete!: 手順 10、 1の画像 1
    • That's everything you can disassemble without desoldering anything. Well done!

    Putting it back together is twice as much fun. Make absolutely sure the circuit boards are positioned correctly, with the case mount posts correctly aligned within the through-holes of the PCB before attempting to tighten the PCB mounting screws.

    Matt - 返信

終わりに

To reassemble the controller, follow these instructions in reverse order.

作成者

1人の作成者と共同作成されました。

Adam O'Camb

メンバー登録日: 04/11/15

196,194 ポイント

416のガイドは作成済み

コメント 1 件

how to solve battery holder not mounting well “loose”

Engineer Civil - 返信

コメントを追加

統計データ:

過去 24時間: 0

過去 7 日: 5

過去 30 日: 30

今までの合計 2,372