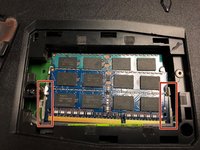
メインコンテンツにスキップ

ASUS ROG G46VW Motherboard Replacement

必要な工具と部品

  1. ASUS ROG G46VW Motherboard Replacement, RAM: 手順 1、 2の画像 1 ASUS ROG G46VW Motherboard Replacement, RAM: 手順 1、 2の画像 2
    • Lift the screw cover and remove the screw using a Phillips #0 screwdriver.

  2. ASUS ROG G46VW Motherboard Replacement: 手順 2、 1の画像 1
    • Remove the RAM cover by lifting the screw cover and pulling away firmly.

  3. ASUS ROG G46VW Motherboard Replacement: 手順 3、 2の画像 1 ASUS ROG G46VW Motherboard Replacement: 手順 3、 2の画像 2
    • Push outwards on the clips to release the RAM stick. The stick should pop up at an angle.

  4. ASUS ROG G46VW Motherboard Replacement: 手順 4、 1の画像 1
    • Pull out the RAM stick carefully.

    • Do not use a prying motion as this will damage the hardware. Be careful not to damage the gold section of the RAM stick.

  5. ASUS ROG G46VW Motherboard Replacement: 手順 5、 1の画像 1
    • Repeat steps 3-4 to remove the second RAM stick.

  6. ASUS ROG G46VW Motherboard Replacement, Speaker Cover: 手順 6、 1の画像 1
    • Gently pry the back hinge cover piece away from the device.

  7. ASUS ROG G46VW Motherboard Replacement: 手順 7、 1の画像 1
    • Disconnect the speaker cable from the motherboard.

  8. ASUS ROG G46VW Motherboard Replacement, Keyboard: 手順 8、 1の画像 1
    • Remove the two screws from underneath the RAM cover.

  9. ASUS ROG G46VW Motherboard Replacement: 手順 9、 1の画像 1
    • Remove all of the screws from the bottom of the case.

    • If replacing the screen, remove the rubber feet to reveal two more screws.

  10. ASUS ROG G46VW Motherboard Replacement: 手順 10、 1の画像 1
    • Turn the laptop over and remove the screws as shown

  11. ASUS ROG G46VW Motherboard Replacement: 手順 11、 1の画像 1
    • Carefully pry the keyboard away using your spudger and the opening tools.

    • Be sure not to damage the clips holding the keyboard to the bottom case.

  12. ASUS ROG G46VW Motherboard Replacement: 手順 12、 2の画像 1 ASUS ROG G46VW Motherboard Replacement: 手順 12、 2の画像 2
    • Detach the ribbon cable by releasing the clip

  13. ASUS ROG G46VW Motherboard Replacement, Screen: 手順 13、 2の画像 1 ASUS ROG G46VW Motherboard Replacement, Screen: 手順 13、 2の画像 2
    • Remove screws from silver braces.

  14. ASUS ROG G46VW Motherboard Replacement: 手順 14、 1の画像 1
    • Use tweezers to remove golden screw caps.

  15. ASUS ROG G46VW Motherboard Replacement: 手順 15、 1の画像 1
    • Remove tape and gently pull up on golden cap connectors to disconnect them.

  16. ASUS ROG G46VW Motherboard Replacement: 手順 16、 1の画像 1
    • Gently pull the white connector until it comes loose.

  17. ASUS ROG G46VW Motherboard Replacement, Indicator Lights: 手順 17、 1の画像 1
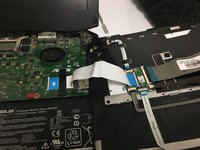
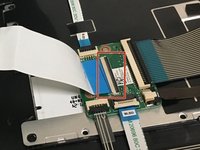
    • With the motherboard exposed, locate the Indicator Lights and their white plastic housing piece.

  18. ASUS ROG G46VW Motherboard Replacement: 手順 18、 1の画像 1
    • Remove all 3 screws from the motherboard connection using the Phillips #0 screwdriver.

    • Pull the plastic white housing piece away from the case.

  19. ASUS ROG G46VW Motherboard Replacement: 手順 19、 1の画像 1
    • Locate the flat LED cable that connects the lights to the motherboard.

    • Flip the black cover upwards before pulling on the cable.

    • Repeat for the other connector piece.

  20. ASUS ROG G46VW Motherboard Replacement, Motherboard: 手順 20、 1の画像 1
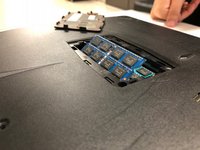
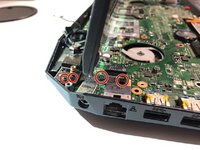
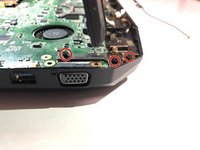
    • Locate and remove the screws.

    • Removing the screws allows you to lift up the motherboard

  21. ASUS ROG G46VW Motherboard Replacement: 手順 21、 1の画像 1
    • After lifting the motherboard up you can replace any component on it, such as the fans.

終わりに

To reassemble your device, follow these instructions in reverse order.

ある他の人がこのガイドを完成しました。

作成者

2人の作成者と共同で作成されました。

Ruben Olivares

メンバー登録日: 09/24/18

135 ポイント

1ガイドが承認済み

チーム

University of North Texas, Team S6-G3, Thompson Fall 2018 University of North Texas, Team S6-G3, Thompson Fall 2018人のメンバー

UNT-THOMPSON-F18S6G3

4 メンバー

7のガイドは作成済み

0 件のコメント

コメントを追加

統計データ:

過去 24時間: 1

過去 7 日: 5

過去 30 日: 21

今までの合計 1,781