メインコンテンツにスキップ

ASUS Q524U Hard Drive Replacement

必要な工具と部品

  1. ASUS Q524U Hard Drive Replacement, Hard Drive: 手順 1、 1の画像 1
    • Turn the laptop on its back, and place it on a flat and smooth surface. Identify the location of the back panels screws.

  2. ASUS Q524U Hard Drive Replacement: 手順 2、 3の画像 1 ASUS Q524U Hard Drive Replacement: 手順 2、 3の画像 2 ASUS Q524U Hard Drive Replacement: 手順 2、 3の画像 3
    • Remove all ten 1.3mm screws on the outer edge of the back panel using the T4 screwdriver.

  3. ASUS Q524U Hard Drive Replacement: 手順 3、 1の画像 1
    • Using the opening tool or spudger, remove the back panel by working your way around the perimeter and pry it open gently.

  4. ASUS Q524U Hard Drive Replacement: 手順 4、 1の画像 1
    • Remove the back panel, exposing the motherboard.

    • Set the panel aside, skin up to avoid scratches.

  5. ASUS Q524U Hard Drive Replacement: 手順 5、 1の画像 1
    • Using the T4 screwdriver, remove the four 1.3 mm screws connecting the hard drive to the motherboard.

    • The hard-drive is located in the bottom left corner of the motherboard.

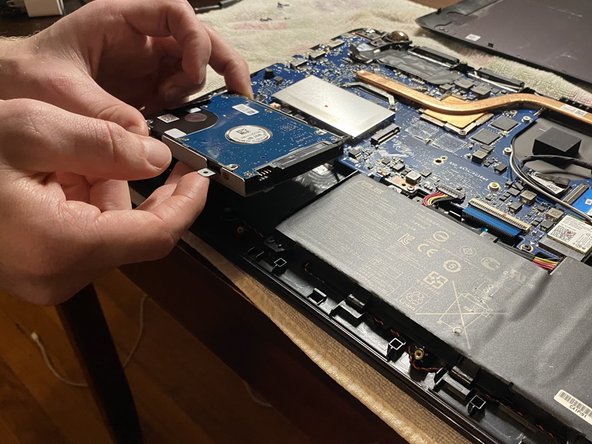
  6. ASUS Q524U Hard Drive Replacement: 手順 6、 2の画像 1 ASUS Q524U Hard Drive Replacement: 手順 6、 2の画像 2
    • Once all the screws are removed from the port, lift the hard drive out of its casing. After, disconnect the hard drive from the motherboard.

ゴール

2 の人々がこのガイドを完成させました。

作成者

2人の作成者と共同で作成されました。

Colton Kirby

メンバー登録日: 09/15/20

181 ポイント

1ガイドが承認済み

チーム

University of Memphis, Team S3-G15, Willis Fall 2020 University of Memphis, Team S3-G15, Willis Fall 2020人のメンバー

UM-WILLIS-F20S3G15

1 メンバー

1のガイドは作成済み

0 件のコメント

コメントを追加

統計データ:

過去 24時間: 3

過去 7 日: 14

過去 30 日: 40

今までの合計 3,208