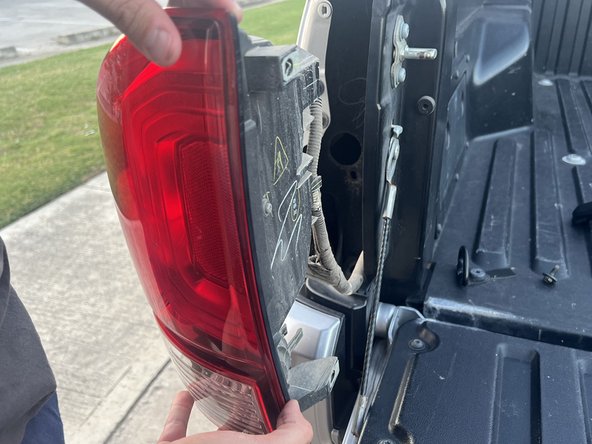
メインコンテンツにスキップ

3rd Generation Toyota Tacoma Tail Light Replacement

必要な工具と部品

  1. 3rd Generation Toyota Tacoma Tail Light Replacement, Tail Light: 手順 1、 1の画像 1
    • Open your tail gate by pulling back upon the latch.

  2. 3rd Generation Toyota Tacoma Tail Light Replacement: 手順 2、 3の画像 1 3rd Generation Toyota Tacoma Tail Light Replacement: 手順 2、 3の画像 2 3rd Generation Toyota Tacoma Tail Light Replacement: 手順 2、 3の画像 3
    • Identify the 4 bolts on the inside of the tailgate.

    • Use a 10mm socket to remove the four bolts that secure the headlight housing to the chassis bracket.

    • All the bolts are identical. Therefore, there is no need to worry about inserting any of the wrong bolts upon reassemble.

  3. 3rd Generation Toyota Tacoma Tail Light Replacement: 手順 3、 2の画像 1 3rd Generation Toyota Tacoma Tail Light Replacement: 手順 3、 2の画像 2
    • Grasp the top and bottom of your taillight.

    • Ensure you are pulling directly back. If this is your first time taking off your taillight it will be tight and require some force to pull off.

    • If this is your first time taking off your taillight it will be tight and require some force to pull off.

  4. 3rd Generation Toyota Tacoma Tail Light Replacement: 手順 4、 3の画像 1 3rd Generation Toyota Tacoma Tail Light Replacement: 手順 4、 3の画像 2 3rd Generation Toyota Tacoma Tail Light Replacement: 手順 4、 3の画像 3
    • The lights are housed in 2 separate sockets. Decide which one needs to be replaced. The disassembly process is the same for both lights.

    • Grasp the gray portion of the light and twist clockwise.

    • The Socket will loosen and disengage still housing the bulb.

  5. 3rd Generation Toyota Tacoma Tail Light Replacement: 手順 5、 2の画像 1 3rd Generation Toyota Tacoma Tail Light Replacement: 手順 5、 2の画像 2
    • Grasp the bulb and pull. The bulb will disengage from the socket with minimal effort.

    • Properly discard the bulb opting for the most environmentally friendly option.

    • Replace the bulb by pushing the new one straight into the bulb's housing using minimal force.

    • The bulbs are made of glass so if dropped they will shatter and be a potential hazard discard with caution.

  6. 3rd Generation Toyota Tacoma Tail Light Replacement: 手順 6、 2の画像 1 3rd Generation Toyota Tacoma Tail Light Replacement: 手順 6、 2の画像 2
    • Insert the whole bulb assembly back into the housing.

    • Grasp the grey portion of the bulb assembly and twist counterclockwise.

    • This process is identical for both taillights.

  7. 3rd Generation Toyota Tacoma Tail Light Replacement: 手順 7、 1の画像 1
    • Grasp the top and bottom of your entire taillight assembly.

    • Insert the assembly by pushing straight forward in a firm fashion.

    • The grey push tabs are made of plastic therefore they can be fragile. Opt for less force as the tabs could be damaged.

  8. 3rd Generation Toyota Tacoma Tail Light Replacement: 手順 8、 2の画像 1 3rd Generation Toyota Tacoma Tail Light Replacement: 手順 8、 2の画像 2
    • Use a 10mm socket to tighten the 4 bolts to secure the headlight housing to the chassis bracket.

    • Ensure you do not over-tighten the 10mm bolts as it will increase the difficulty of future repairs.

終わりに

To reassemble your device, follow these instructions in reverse order.

2 の人々がこのガイドを完成させました。

作成者

1人の作成者と共同作成されました。

Sean Skaugen

メンバー登録日: 07/02/23

211 ポイント

1ガイドが承認済み

チーム

Austin Community College, Team 5-9, Watkins Summer 2023 Austin Community College, Team 5-9, Watkins Summer 2023人のメンバー

AUSTINCC-WATKINS-SU23S5G9

1 メンバー

1のガイドは作成済み

0 件のコメント

コメントを追加

統計データ:

過去 24時間: 3

過去 7 日: 19

過去 30 日: 75

今までの合計 506