メインコンテンツにスキップ

2018 Dodge Charger Headlight Bulb Replacement

必要な工具と部品

  1. 2018 Dodge Charger Headlight Bulb Replacement, Prerequisites: 手順 1、 1の画像 1
    • Before you begin, make sure the vehicle is turned off and placed in park with the parking brake engaged.

  2. 2018 Dodge Charger Headlight Bulb Replacement, Open the hood: 手順 2、 3の画像 1 2018 Dodge Charger Headlight Bulb Replacement, Open the hood: 手順 2、 3の画像 2 2018 Dodge Charger Headlight Bulb Replacement, Open the hood: 手順 2、 3の画像 3
    • Open the hood by pulling the release lever inside the vehicle, located on the driver's side by the parking brake.

    • Once pulled, you will hear the sound of the hood pop open.

  3. 2018 Dodge Charger Headlight Bulb Replacement, Pull the lever, lift the hood: 手順 3、 3の画像 1 2018 Dodge Charger Headlight Bulb Replacement, Pull the lever, lift the hood: 手順 3、 3の画像 2 2018 Dodge Charger Headlight Bulb Replacement, Pull the lever, lift the hood: 手順 3、 3の画像 3
    • Carefully place your hands under the hood, towards the middle of the car.

    • When you feel the lever, push it to the left using your left hand and slowly push the hood up with your right hand.

    • If your Charger has or requires a stand, prop it up.

    • This model of Charger does not require a stand to hold the hood. It will automatically hold on its own.

  4. 2018 Dodge Charger Headlight Bulb Replacement, Unscrew the headlight cap: 手順 4、 3の画像 1 2018 Dodge Charger Headlight Bulb Replacement, Unscrew the headlight cap: 手順 4、 3の画像 2 2018 Dodge Charger Headlight Bulb Replacement, Unscrew the headlight cap: 手順 4、 3の画像 3
    • On the passenger side of the car, unscrew the cap covering the headlight compartment.

    • Remove the cap from the headlight.

    • Use gloves to protect your hands.

  5. 2018 Dodge Charger Headlight Bulb Replacement, Remove the old bulb: 手順 5、 2の画像 1 2018 Dodge Charger Headlight Bulb Replacement, Remove the old bulb: 手順 5、 2の画像 2
    • Once you remove the cap, you will see the current bulb that is installed.

    • Slowly twist the bulb clockwise, and remove it from the compartment.

  6. 2018 Dodge Charger Headlight Bulb Replacement, Detach the bulb and adapter: 手順 6、 3の画像 1 2018 Dodge Charger Headlight Bulb Replacement, Detach the bulb and adapter: 手順 6、 3の画像 2 2018 Dodge Charger Headlight Bulb Replacement, Detach the bulb and adapter: 手順 6、 3の画像 3
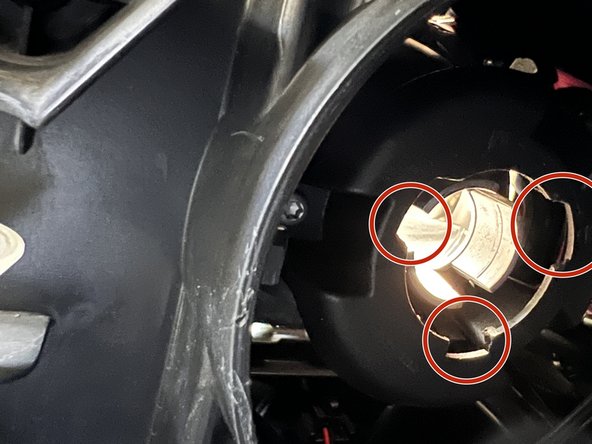
    • Unplug the bulb from the adapter.

    • Lift the lever and carefully detach it.

    • Place the bulb in a safe area away from the vehicle.

  7. 2018 Dodge Charger Headlight Bulb Replacement, Reconnect a new bulb to the adapter: 手順 7、 2の画像 1 2018 Dodge Charger Headlight Bulb Replacement, Reconnect a new bulb to the adapter: 手順 7、 2の画像 2
    • Connect a new light bulb to the adapter.

  8. 2018 Dodge Charger Headlight Bulb Replacement, Lock the bulb and cap in place: 手順 8、 3の画像 1 2018 Dodge Charger Headlight Bulb Replacement, Lock the bulb and cap in place: 手順 8、 3の画像 2 2018 Dodge Charger Headlight Bulb Replacement, Lock the bulb and cap in place: 手順 8、 3の画像 3
    • Align the bulb to the shape of the hole and turn clockwise to safely lock.

    • After installation, you will see cables sticking out. You can manage this by fitting it in the compartment.

    • Place the cap back on the compartment and tightly seal it.

  9. 2018 Dodge Charger Headlight Bulb Replacement, Accessing the driver's side bulb: 手順 9、 2の画像 1 2018 Dodge Charger Headlight Bulb Replacement, Accessing the driver's side bulb: 手順 9、 2の画像 2
    • To access the driver's side lightbulb, you have to remove the air intake from under the hood.

  10. 2018 Dodge Charger Headlight Bulb Replacement, Loosen the intake bolts: 手順 10、 3の画像 1 2018 Dodge Charger Headlight Bulb Replacement, Loosen the intake bolts: 手順 10、 3の画像 2 2018 Dodge Charger Headlight Bulb Replacement, Loosen the intake bolts: 手順 10、 3の画像 3
    • Loosen two bolts using a 1/4 ratchet with a 5/16 inch socket.

    • Gently loosen the bolt. Loosening it too quickly may result in the screw falling into the engine compartment.

  11. 2018 Dodge Charger Headlight Bulb Replacement, Remove the bolts manually: 手順 11、 2の画像 1 2018 Dodge Charger Headlight Bulb Replacement, Remove the bolts manually: 手順 11、 2の画像 2
    • Once the screw is loosened, use your hand to continue the process.

  12. 2018 Dodge Charger Headlight Bulb Replacement, Detach the intake tube: 手順 12、 2の画像 1 2018 Dodge Charger Headlight Bulb Replacement, Detach the intake tube: 手順 12、 2の画像 2
    • Loosen the screw attached to the ring.

    • Detach the tube from the intake.

    • Do not remove the ring from the tube.

  13. 2018 Dodge Charger Headlight Bulb Replacement, Lift the intake out: 手順 13、 3の画像 1 2018 Dodge Charger Headlight Bulb Replacement, Lift the intake out: 手順 13、 3の画像 2 2018 Dodge Charger Headlight Bulb Replacement, Lift the intake out: 手順 13、 3の画像 3
    • Grab the intake with both hands and gently lift upwards.

    • Place the intake safely on top of the main engine block.

  14. 2018 Dodge Charger Headlight Bulb Replacement, Find the headlight compartment: 手順 14、 2の画像 1 2018 Dodge Charger Headlight Bulb Replacement, Find the headlight compartment: 手順 14、 2の画像 2
    • Once the intake is safely removed, you can access the headlight compartment.

  15. 2018 Dodge Charger Headlight Bulb Replacement, Replace the bulb: 手順 15、 3の画像 1 2018 Dodge Charger Headlight Bulb Replacement, Replace the bulb: 手順 15、 3の画像 2 2018 Dodge Charger Headlight Bulb Replacement, Replace the bulb: 手順 15、 3の画像 3
    • Remove the light bulb by lifting on the small lever.

    • Connect the new headlight bulb and firmly align the bulb to the compartment.

    • Double check that the bulb is properly installed and connected. If it is not installed properly, you will have to remove the intake again.

  16. 2018 Dodge Charger Headlight Bulb Replacement, Realign the air intake: 手順 16、 2の画像 1 2018 Dodge Charger Headlight Bulb Replacement, Realign the air intake: 手順 16、 2の画像 2
    • Place the intake back in its original place.

    • Align the bottom of the intake to its original spot as seen in the picture.

  17. 2018 Dodge Charger Headlight Bulb Replacement, Tighten the intake screw: 手順 17、 2の画像 1 2018 Dodge Charger Headlight Bulb Replacement, Tighten the intake screw: 手順 17、 2の画像 2
    • Place the bolt and ring back on the intake.

    • Tighten the screw with your hands and finish securing the screw using the 1/4 ratchet and the 5/16 in socket.

  18. 2018 Dodge Charger Headlight Bulb Replacement, Reattach the intake tube: 手順 18、 3の画像 1 2018 Dodge Charger Headlight Bulb Replacement, Reattach the intake tube: 手順 18、 3の画像 2 2018 Dodge Charger Headlight Bulb Replacement, Reattach the intake tube: 手順 18、 3の画像 3
    • Firmly attach the tube to the intake.

    • Tighten the screw using the 1/4 ratchet with the 5/16 inch socket.

    • Close the hood of the vehicle.

    • Before closing the hood, make sure the engine compartment is clear of obstruction.

  19. 2018 Dodge Charger Headlight Bulb Replacement, Test the new lightbulbs: 手順 19、 1の画像 1
    • Power on the vehicle to ensure the new headlight bulbs are successfully working.

終わりに

Congratulations, you've successfully replaced both lightbulbs!

ある他の人がこのガイドを完成しました。

作成者

2人の作成者と共同で作成されました。

Anthony Does Repairs

メンバー登録日: 03/14/22

313 ポイント

1ガイドが承認済み

チーム

CSU Los Angeles, Team 6-18, Briggs Spring 2022 CSU Los Angeles, Team 6-18, Briggs Spring 2022人のメンバー

CSULA-BRIGGS-S22S6G18

1 メンバー

1のガイドは作成済み

0 件のコメント

コメントを追加

統計データ:

過去 24時間: 13

過去 7 日: 87

過去 30 日: 467

今までの合計 12,888