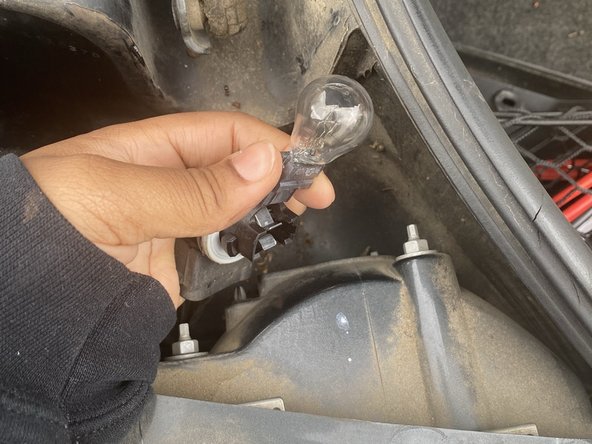
メインコンテンツにスキップ

2013 Chevrolet Camaro Tail-Light Replacement

必要な工具と部品

  1. 2013 Chevrolet Camaro Tail-Light Replacement, Tail Light: 手順 1、 2の画像 1 2013 Chevrolet Camaro Tail-Light Replacement, Tail Light: 手順 1、 2の画像 2
    • Open the trunk by either the button on the driver side door panel or the key fob.

  2. 2013 Chevrolet Camaro Tail-Light Replacement: 手順 2、 2の画像 1 2013 Chevrolet Camaro Tail-Light Replacement: 手順 2、 2の画像 2
    • Use your key fob or press on your brakes to identify which bulb needs to be replaced.

    • Identify which bulbs need to be replaced.

    • In this case my driver side outside bulb was blown so that is the one that is getting replaced today.

  3. 2013 Chevrolet Camaro Tail-Light Replacement: 手順 3、 3の画像 1 2013 Chevrolet Camaro Tail-Light Replacement: 手順 3、 3の画像 2 2013 Chevrolet Camaro Tail-Light Replacement: 手順 3、 3の画像 3
    • Unscrew the rubber screw by turning counter clockwise.

    • Gently pull these caps straight up to remove them.

    • The rubber screw can be removed by hand but it would be easier to use the pliers.

  4. 2013 Chevrolet Camaro Tail-Light Replacement: 手順 4、 3の画像 1 2013 Chevrolet Camaro Tail-Light Replacement: 手順 4、 3の画像 2 2013 Chevrolet Camaro Tail-Light Replacement: 手順 4、 3の画像 3
    • Rotate the entire socket a half turn clockwise. After this is done, gently pull the bulb socket from the taillight housing.

    • Remove and dispose of the blown bulb.

  5. 2013 Chevrolet Camaro Tail-Light Replacement: 手順 5、 2の画像 1 2013 Chevrolet Camaro Tail-Light Replacement: 手順 5、 2の画像 2
    • At this point you can place the new bulb into the plug.

    • When placing the new bulb into the plug be careful to not apply too much pressure. If the plug does not initially snap into place trying turning it and gently push it into place.

  6. 2013 Chevrolet Camaro Tail-Light Replacement: 手順 6、 2の画像 1 2013 Chevrolet Camaro Tail-Light Replacement: 手順 6、 2の画像 2
    • Before placing the plug back into the housing you should test the bulb to make sure it is in working order.

    • You can test the bulb by locking the door with your key fob or have someone press the brakes.

    • Repeat steps until all lights are in working order.

終わりに

To reassemble, follow these steps in reverse order.

ある他の人がこのガイドを完成しました。

作成者

2人の作成者と共同で作成されました。

Jack Hatcher

メンバー登録日: 02/11/21

136 ポイント

1ガイドが承認済み

チーム

University of Memphis, Team S2-G1, Lane Spring 2021 University of Memphis, Team S2-G1, Lane Spring 2021人のメンバー

UM-LANE-S21S2G1

1 メンバー

1のガイドは作成済み

0 件のコメント

コメントを追加

統計データ:

過去 24時間: 0

過去 7 日: 5

過去 30 日: 50

今までの合計 1,252