必要な工具と部品
-
-
If the car has been driven recently, allow to completely cool as the engine will be very hot and there are bolts right against the block/radiator hose. Pop the hood and ensure it is securely held.
-
-
-
Using the 8mm socket, loosen the 8mm nut that holds the battery terminal on to the battery.
-
Be sure to push the cable far enough out of the way so it does not make accidental connection while doing additional steps.
-
-
-
Allow the PCM to drain by letting the vehicle sit for 10-15 minutes after disconnecting the battery before continuing.
-
Note: This is because electronic throttle bodies utilize a ‘sweep’ function that opens and closes the butterfly inside on occasion, and due to the large gear reduction, there is enough force to seriously injure/remove fingers if it were to perform a sweep while a finger was inside of the throttle body.
-
-
-
Locate the clamp that connects the throttle body to the rubber air boot and disconnect the clamp using a flat head screwdriver or the 8mm socket (if applicable). *If you have trouble finding the air boot, it is on the driver side and runs from the large airbox and ends at the throttle body*
-
-
-
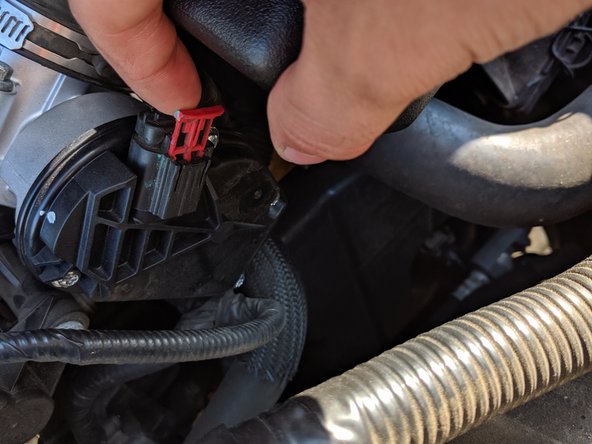
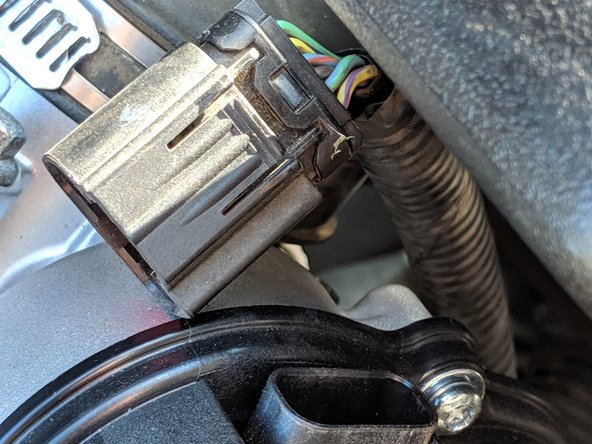
Disconnect the electronic plug on the front of the throttle body.
-
Note: There may be a red safety clip on the plug, it is easily removed by pulling straight upwards on it then the plug can be compressed and removed.
-
-
-
-
Locate the four 8mm bolts that hold the throttle body on and remove them. The rubber air boot is easily manipulated so that each bolt can be accessed without complete removal of the air boot itself.
-
Note: Due to the confined space, it may be best to use a small ¼ inch drive ratchet and 8mm to reach the lower bolt closest to the firewall.(#4 in photo)
-
-
-
While manipulating the air boot, remove the defective throttle body from the engine and place the bolts in a place for safe keeping until reinstallation.
-
-
-
Remove the gasket that remains on the engine, due to the nature of the gasket it must be replaced any time the throttle body is removed.
-
-
-
Reinstall the new throttle body using the 4 bolts that were previously removed in step 7 above.
-
Note: Start by tightening the bolts in a crisscross pattern by hand, and then move in a crisscross pattern with the ratchet. Be careful not to over tighten one before the others as this will cause the other bolts to bind and be difficult to tighten.
-
-
-
Reinstall the air boot, take special care to ensure that the notch in the boot is seated on the tab of the throttle body. This helps ensure it is in the right place. Then tighten the clamp that holds the boot.
-
-
-
Reconnect the electronic plug on the throttle body and insert the red safety clip back into place.
-
-
-
Reinstall the negative battery cable and tighten the 8mm nut that clamps the terminal to the battery post.
-
-
-
Due to the draining of the PCM and replacement of the throttle body, the vehicle will have to be retrained to learn the appropriate idle and shift points. This MUST be done or the vehicle will not run correctly for some time because it will be forced to learn values over a longer period of time.
-
Step 1) Turn off ALL accessories in the car. This includes: automatic headlamps, radio, air conditioning, heated seats, etc. There should be nothing on!
-
Step 2) Turn the key, but DO NOT START! Allow all the gauges to cycle (4-5 seconds) and then start the car.
-
Step 3) Allow the car to idle for 10-15 minutes so that it can get to operating temperature and train the idle accordingly. Failure to follow this step will cause idle hunt to occur.
-
Step 4) After 10-15 minutes have passed, take the car for a 10-15 minute drive to help train the shift points. Be sure to not drive the car overly easy or too hard as this will allow unrealistic shift points. Drive as you normally would.
-


You have now replaced the throttle body and properly re-trained the PCM.
You have now replaced the throttle body and properly re-trained the PCM.
2 の人々がこのガイドを完成させました。
コメント 1 件
My 2012 Fusion really started to act up in a matter of minutes!I started my car and within 90 seconds it was a wrap.It was like the transmission went out with no prior indication.The car would not move and the engine would accelerate to the point where I shut it down.(It reved up to 6 on the RPM GAUGE and would have kept going.Why?