メインコンテンツにスキップ

2009 Subaru Impreza WRX Rear Speaker Replacement

必要な工具と部品

  1. 2009 Subaru Impreza WRX Rear Speaker Replacement, Rear Door Panel: 手順 1、 1の画像 1
    • Pry off the plastic tab inside the rear door handle.

  2. 2009 Subaru Impreza WRX Rear Speaker Replacement: 手順 2、 1の画像 1
    • Use the Phillips screwdriver to unscrew the 8x3/4" Phillips screw inside the door handle.

  3. 2009 Subaru Impreza WRX Rear Speaker Replacement: 手順 3、 1の画像 1
    • Use a flathead screwdriver to pry up the plastic tab inside the rear door armrest.

  4. 2009 Subaru Impreza WRX Rear Speaker Replacement: 手順 4、 1の画像 1
    • Use the Phillips screwdriver to unscrew the 8x3/4" Phillips screw inside the armrest.

  5. 2009 Subaru Impreza WRX Rear Speaker Replacement: 手順 5、 2の画像 1 2009 Subaru Impreza WRX Rear Speaker Replacement: 手順 5、 2の画像 2
    • Use flathead to pry off the upper panel located at the top of the rear door panel.

  6. 2009 Subaru Impreza WRX Rear Speaker Replacement: 手順 6、 2の画像 1 2009 Subaru Impreza WRX Rear Speaker Replacement: 手順 6、 2の画像 2
    • Use the flathead screwdriver to pry off and remove the panel over the door handle.

  7. 2009 Subaru Impreza WRX Rear Speaker Replacement: 手順 7、 1の画像 1
    • Remove the bundle of wires from the panel by pressing the tabs on the sides of the large white plastic connector.

  8. 2009 Subaru Impreza WRX Rear Speaker Replacement: 手順 8、 1の画像 1
    • Use the Phillips screwdriver to unscrew the 8x3/4" screws behind the door handle panel that was just removed.

  9. 2009 Subaru Impreza WRX Rear Speaker Replacement: 手順 9、 1の画像 1
    • Use the flathead screwdriver to pry off the door panel, starting from the outside edge of the door.

  10. 2009 Subaru Impreza WRX Rear Speaker Replacement: 手順 10、 1の画像 1
    • Use your hands to pull off and remove the door panel from the frame.

  11. 2009 Subaru Impreza WRX Rear Speaker Replacement: 手順 11、 1の画像 1
    • Using your hands, remove the two remaining wires connecting the door panel to the frame.

    • The door panel is now completely removed from the frame.

  12. 2009 Subaru Impreza WRX Rear Speaker Replacement, Rear Speaker: 手順 12、 2の画像 1 2009 Subaru Impreza WRX Rear Speaker Replacement, Rear Speaker: 手順 12、 2の画像 2
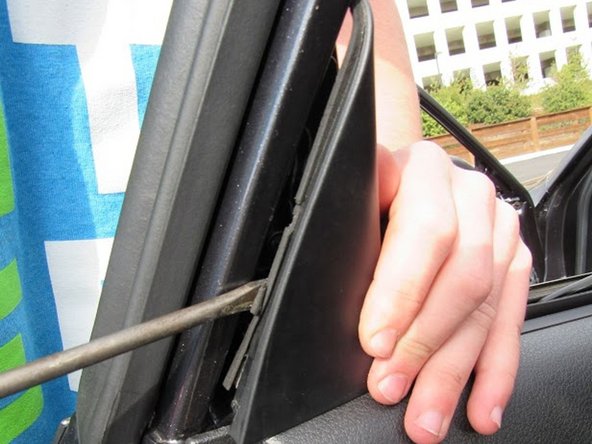
    • Locate and remove all three Phillips 8x3/4" screws. There's one on top and two on the sides where the arrows are pointing.

  13. 2009 Subaru Impreza WRX Rear Speaker Replacement: 手順 13、 1の画像 1
    • Once the screws are removed, the speaker will easily pop out of the door revealing two wires attached to the speaker with a white clip. Remove this white clip by simply squeezing one of the tabs that lock it in place.

  14. 2009 Subaru Impreza WRX Rear Speaker Replacement: 手順 14、 1の画像 1
    • Once the clip is removed from the speaker, you will want to then cut the wires from the white clip using a wire cutters.

  15. 2009 Subaru Impreza WRX Rear Speaker Replacement: 手順 15、 2の画像 1 2009 Subaru Impreza WRX Rear Speaker Replacement: 手順 15、 2の画像 2
    • Once the white clip is removed from the wires, you will then want to strip about 0.5" of plastic from the wire revealing bare copper wire.

  16. 2009 Subaru Impreza WRX Rear Speaker Replacement: 手順 16、 1の画像 1
    • Once the wires are cut, you will then want to add separate clips on the end of the wires by placing the clips on the wires, and then using a pliers, squeeze the plastic to crimp the clip securely on the wire.

  17. 2009 Subaru Impreza WRX Rear Speaker Replacement: 手順 17、 1の画像 1
    • Once the new clips are now on the separate wires, place these clips into the back of your new speaker.

  18. 2009 Subaru Impreza WRX Rear Speaker Replacement: 手順 18、 1の画像 1
    • Insert your new speaker where the old speaker once was.

    • Use the same three screws that you removed in the first step to secure your new speaker in the door.

    • If you're having problems with your new speaker, refer to the troubleshooting guide here.

    • Congratulations! You are now done!

終わりに

To reassemble your device, follow these instructions in reverse order.

作成者

5人の作成者と共同で作成されました。

Eve Wassenaar

メンバー登録日: 04/20/15

101 ポイント

1ガイドが承認済み

チーム

Cal Poly, Team 8-3, Regan Spring 2015 Cal Poly, Team 8-3, Regan Spring 2015人のメンバー

CPSU-REGAN-S15S8G3

5 メンバー

5のガイドは作成済み

コメント 1 件

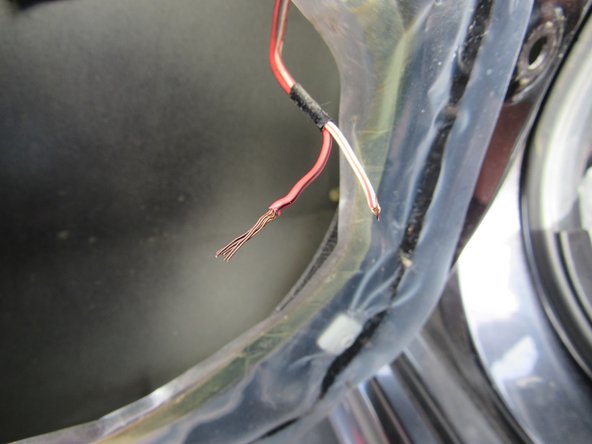
This would be A LOT MORE HELPFUL, if OP wrote which wires were positive and which were negative..

undefinedevolution - 返信

コメントを追加

統計データ:

過去 24時間: 0

過去 7 日: 3

過去 30 日: 8

今までの合計 1,425