メインコンテンツにスキップ

1999-2002 Suzuki SV650 Carb removal.

必要な工具と部品

  1. 1999-2002 Suzuki SV650 Carb removal., Seat: 手順 1、 2の画像 1 1999-2002 Suzuki SV650 Carb removal., Seat: 手順 1、 2の画像 2
    • If you have frame covers below your seat, remove them by removing the 4 mm allen bolts holding them on. Use a 4 mm allen wrench to turn the screws counter-clockwise until they come off.

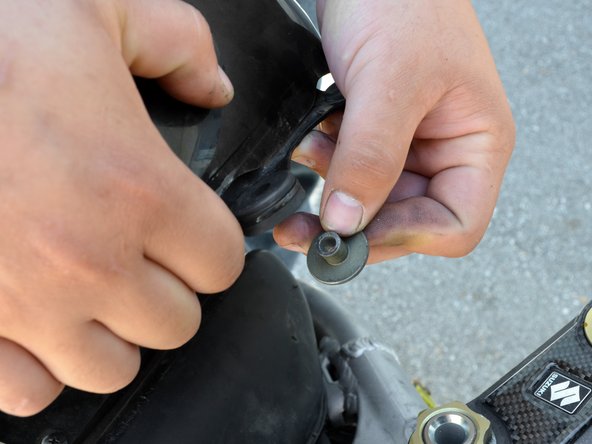
    • Once the frame covers are off, remove the 4 mm allen seat bolts on both sides of the seat. Use the 4 mm allen wrench to turn the screws counter-clockwise until they come off.

    • The bolt in the picture is not stock.

    • Lift the front of the seat, then pull it off the frame.

  2. 1999-2002 Suzuki SV650 Carb removal., Tank: 手順 2、 3の画像 1 1999-2002 Suzuki SV650 Carb removal., Tank: 手順 2、 3の画像 2 1999-2002 Suzuki SV650 Carb removal., Tank: 手順 2、 3の画像 3
    • Turn the two 4mm allen bolts in the front tank mounts counter-clockwise with an allen wrench until they come out.

    • The bolts shown in the picture are not stock.

    • Turn the two 12mm hex bolts in the tank's hinge base counter-clockwise with a socket wrench or box end wrench until they come out.

  3. 1999-2002 Suzuki SV650 Carb removal.: 手順 3、 3の画像 1 1999-2002 Suzuki SV650 Carb removal.: 手順 3、 3の画像 2 1999-2002 Suzuki SV650 Carb removal.: 手順 3、 3の画像 3
    • Disconnect the fuel level sensor connector, located near the tank hinge base. It will be a three wire connector and one side of the wire will be traceable to the underside of the tank.

    • Carefully lift the front of the tank to gain access to the hoses attached to the tank.

    • Do not lift the tank too much, or you risk damaging fuel lines, vacuum lines and spilling fuel.

    • There are small metal inserts that go into the front tank mounts. Make sure these do not fall out and get lost while working with the tank.

  4. 1999-2002 Suzuki SV650 Carb removal.: 手順 4、 3の画像 1 1999-2002 Suzuki SV650 Carb removal.: 手順 4、 3の画像 2 1999-2002 Suzuki SV650 Carb removal.: 手順 4、 3の画像 3
    • Locate the petcock on the left underside of the tank. It hill have 2 hoses attached to it and will be next to the fuel level sensor.

    • Disconnect the vacuum hose from the petcock.

    • It is advisable to always remove this hose first to reduce the amount of fuel spilled.

    • Disconnect the fuel hose from the petcock

    • Disconnect the tank breather hose from the base of the tank.

  5. 1999-2002 Suzuki SV650 Carb removal.: 手順 5、 2の画像 1 1999-2002 Suzuki SV650 Carb removal.: 手順 5、 2の画像 2
    • Carefully lift the tank up and off the frame of the bike, being sure that the fuel level sensor wire does not get caught in the frame.

    • When you set your tank aside, be mindful of the petcock hose fittings, especially the vacuum fitting on the bottom. These fittings can easily be broken by the weight of the tank and are costly to replace.

  6. 1999-2002 Suzuki SV650 Carb removal., Remove the Air box: 手順 6、 1の画像 1
    • There will be two hoses connected on the rear left side of the air box. There will be two clips that will hold these hoses to the air box. These will allow all the excess oil to collect in a small spong-like section. After this is disconnected slowly pull the air box from the carburator

    • I removed the clips from my motorcycle so I do not have pictures of it but beware that yours probably does.

  7. 1999-2002 Suzuki SV650 Carb removal., Disconnect the fuel hose: 手順 7、 1の画像 1
    • Slowly pull this out, this allows the vacuum to pull the necessary amount of gas from the tank into the carbs. As we will completely remove the carburetor from the motorcycle.

    • Do not pull mindlessly as you can damage the hose, pull at an angle and it should be easily removable.

    • This will be located at the right side of the bike.

  8. 1999-2002 Suzuki SV650 Carb removal., Loosen the clamps from the carbs on the Head Cylinder: 手順 8、 1の画像 1
    • Before pulling the carbs off loosen the clamps on both the front and rear. Use your JIP-4 Screwdriver

  9. 1999-2002 Suzuki SV650 Carb removal., Loosen the carb from the Motorcycle: 手順 9、 1の画像 1
    • From this point on we will disconnect the carb from the head. This will make it so we can perform the next step easier

    • Slowly pull from the top "gold" handle towards you. Do this from the opposite side of where you are pulling. You will need to use some strength but not a lot. This should easily disconnect the carb from the head

    • Do not pull the carburetor off and away from the bike as of yet. There are still the throttle cables and choke cables that need to be removed. Otherwise, you could break these.

  10. 1999-2002 Suzuki SV650 Carb removal., Removing the Choke Cables.: 手順 10、 2の画像 1 1999-2002 Suzuki SV650 Carb removal., Removing the Choke Cables.: 手順 10、 2の画像 2
    • Start by grabbing your JIP-4 screwdriver and slowly removing the screws. If they have never been touched before they can be hard to remove. Try your best not to strip these. After you are done with the first slowly pull the cable out of the carburator "body". Repeat the same caution for the second choke cable

    • The first picture is of the rear carb, the second picture is of the front

  11. 1999-2002 Suzuki SV650 Carb removal., Loosen the Throttle cables: 手順 11、 2の画像 1 1999-2002 Suzuki SV650 Carb removal., Loosen the Throttle cables: 手順 11、 2の画像 2
    • These will be found on the front right side of the carbs. It is also unnecessary to completely remove the nut. Just loosen them enough until they are able to be removed

    • Loosen the throttle cable nuts until they can be removed completely

    • Afterwards pull the cables out, you may need to use the screwdriver to push them out completely

  12. 1999-2002 Suzuki SV650 Carb removal., Disconnect the TPS Sensor: 手順 12、 1の画像 1
    • Be careful not to forget to remove this. This will be located at the right of the rear carb

    • Carefully push in the clip and disconnect the cable.

  13. 1999-2002 Suzuki SV650 Carb removal., Remove the carb completely: 手順 13、 1の画像 1
    • Congratulations. You can now take out the carb completely of the motorcycle!

    • The carb has an idle adjustment screw that is in a bracket. Mine was not in such a bracket so I could not show you but be careful when pulling the carb out that you do not damage said bracket

終わりに

To reassemble your device, follow these instructions in reverse order.

ある他の人がこのガイドを完成しました。

作成者

1人の作成者と共同作成されました。

David Koster

メンバー登録日: 11/20/22

403 ポイント

3のガイドは作成済み

0 件のコメント

コメントを追加

統計データ:

過去 24時間: 0

過去 7 日: 18

過去 30 日: 67

今までの合計 355