メインコンテンツにスキップ

1995-2001 Honda CRV Oil Change

必要な工具と部品

  1. 1995-2001 Honda CRV Oil Change, Lifting the Car.: 手順 1、 2の画像 1 1995-2001 Honda CRV Oil Change, Lifting the Car.: 手順 1、 2の画像 2
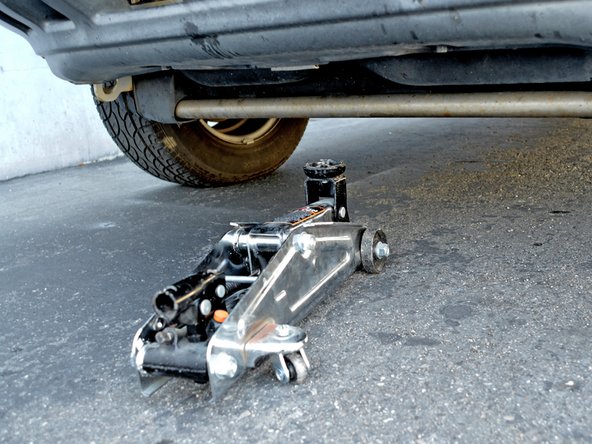
    • Begin by locating the lifting and stand points.

    • The lifting point is at the front and center of the car, just below the bumper.

    • The stand point is below the rocker panel on the driver's side of the car, just behind the front wheel

  2. 1995-2001 Honda CRV Oil Change: 手順 2、 2の画像 1 1995-2001 Honda CRV Oil Change: 手順 2、 2の画像 2
    • Place the jack under the lifting point and raise the front of the car until you can fit underneath it.

    • Place a jack stand under the stand point.

    • Slowly lower the jack until the jack stand is supporting the car and the jack isn't. Remove the jack.

    • Many hydraulic jacks are lowered by placing the open end of the handle over a knob and turning it counter-clockwise. Consult your owners manual for your jack if you don't know how to lower it.

    • It is helpful, but not necessary, to jack up both sides of the car. Since the oil drain plug is on the driver's side of the car, lifting just the driver's side should be sufficient.

    • Never work underneath a car that is only supported by a jack. The jack may slip or fail, resulting in serious injury or death.

  3. 1995-2001 Honda CRV Oil Change, Draining the Oil: 手順 3、 2の画像 1 1995-2001 Honda CRV Oil Change, Draining the Oil: 手順 3、 2の画像 2
    • Locate the 17 mm hex oil drain plug. It is on the driver's side of the car facing backwards.

    • Place the oil drain pan under the oil drain plug.

    • Be sure to position the drain pan so that it will catch the oil when it is streaming out of the pan.

  4. 1995-2001 Honda CRV Oil Change: 手順 4、 2の画像 1 1995-2001 Honda CRV Oil Change: 手順 4、 2の画像 2
    • Always wear protective gloves and eyewear when working with motor oil. Be careful if your car has been running recently as the engine, transmission and exhaust may be very hot. Keep rags or towels nearby to wipe up any spills.

    • Use a 17 mm socket, or box end wrench, to loosen the oil drain plug by turning it counter-clockwise until you can turn it by hand.

    • Finish removing the oil drain plug by hand.

    • Watch the draining oil for shiny specks. The shiny specks may be metal flakes and could mean that there is a serious problem with your engine internals.

  5. 1995-2001 Honda CRV Oil Change: 手順 5、 3の画像 1 1995-2001 Honda CRV Oil Change: 手順 5、 3の画像 2 1995-2001 Honda CRV Oil Change: 手順 5、 3の画像 3
    • Once the draining oil has slowed to a drip, replace the oil drain plug and wipe up the area around the plug.

    • Screw in the oil drain plug by hand, turning it clockwise as far as possible. Finish tightening the drain plug by using a 17 mm socket or box end wrench.

    • Tighten the drain plug to 44Nm (33lbf/ft) as stated in the owners manual. Do not over-tighten the oil drain plug, as this can strip the threads or crack the oil pan.

  6. 1995-2001 Honda CRV Oil Change, Replacing the Oil Filter: 手順 6、 2の画像 1 1995-2001 Honda CRV Oil Change, Replacing the Oil Filter: 手順 6、 2の画像 2
    • Locate the oil filter. It is on the back side of the engine, near the engine's center line and adjacent to the rear engine brace.

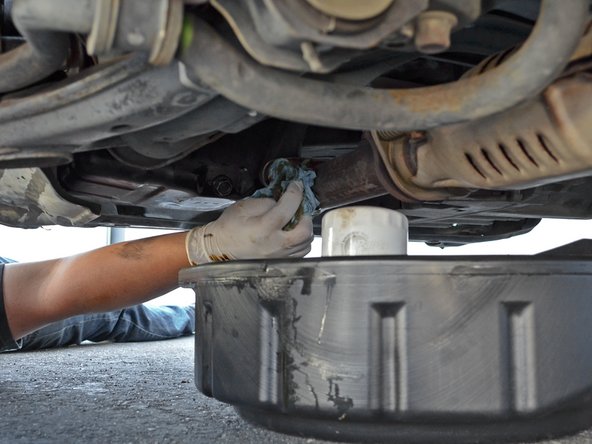
    • Move the oil drain pan so it will catch any oil that spills when you remove the oil filter.

  7. 1995-2001 Honda CRV Oil Change: 手順 7、 3の画像 1 1995-2001 Honda CRV Oil Change: 手順 7、 3の画像 2 1995-2001 Honda CRV Oil Change: 手順 7、 3の画像 3
    • To reach the oil filter, guide your hand around the back side of the drive axle and up toward the top of the engine.

    • Be careful if the engine has been running recently. The engine and exhaust components may be very hot.

    • Twist the oil filter counter-clockwise with your hand until it comes off the threads on the engine block.

    • If the filter is too tight to loosen by hand, use an oil filter wrench. A wrench that fits over the top of the oil filter is necessary, as there is very little space on the sides of the oil filter.

    • Lower the oil filter out of the engine bay with the threads facing up, then place it in the oil drain pan with the threads facing down.

    • Wipe off as much spilled oil as possible.

  8. 1995-2001 Honda CRV Oil Change: 手順 8、 2の画像 1 1995-2001 Honda CRV Oil Change: 手順 8、 2の画像 2
    • Put on a clean glove and dip your finger in a new bottle of oil.

    • Spread clean oil around the entire seal of the new oil filter.

    • Wipe off any excess oil from your hands/fingers when you are done as the oil may make handling the filter or tools difficult.

  9. 1995-2001 Honda CRV Oil Change: 手順 9、 3の画像 1 1995-2001 Honda CRV Oil Change: 手順 9、 3の画像 2 1995-2001 Honda CRV Oil Change: 手順 9、 3の画像 3
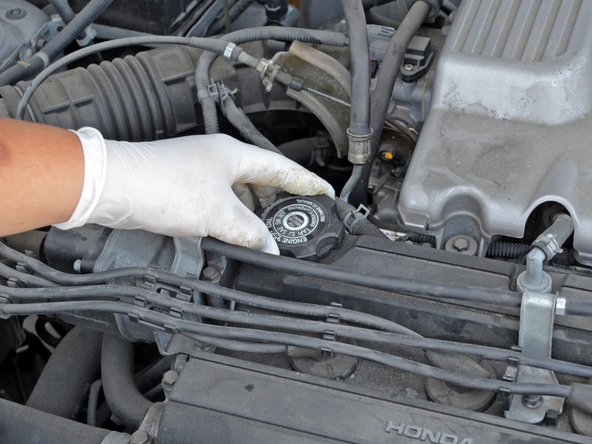
    • Guide the new filter back up and around the drive shaft, being careful not to get dirt or debris on the seal of the oil filter.

    • Place the threaded end of the oil filter onto the engine's oil filter threads and turn the filter clockwise by hand until it is snug. Tightening the filter should require a moderate amount of your strength, but not all of it.

    • If the filter is difficult to turn at the beginning of its threads, stop! You may be cross threading the oil filter. Re-align the oil filter and try again.

    • Do not over-tighten your oil filter by using a wrench. Doing so may cause the oil filter seal to leak and will make removing the oil filter very difficult in the future.

    • Remove the oil drain pan from under the car.

  10. 1995-2001 Honda CRV Oil Change, Replacing the Oil: 手順 10、 3の画像 1 1995-2001 Honda CRV Oil Change, Replacing the Oil: 手順 10、 3の画像 2 1995-2001 Honda CRV Oil Change, Replacing the Oil: 手順 10、 3の画像 3
    • Locate the hood release lever. It is below the left side of the driver console, just under the trunk release lever.

    • Pull the lever until you hear the hood click.

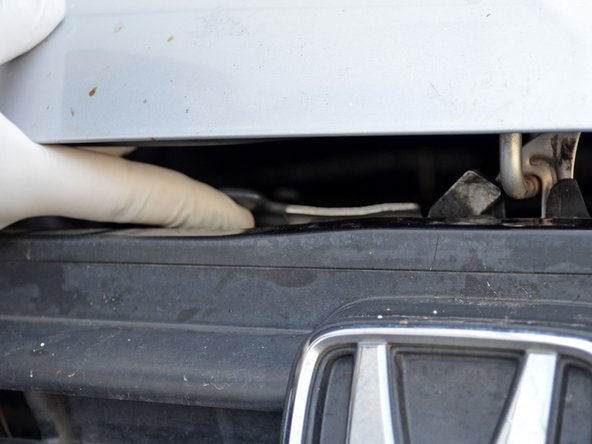
    • Go to the front of the car and locate the hood release latch. It is under the hood and slightly towards the passenger side of the car.

    • Lift up on the hood release latch and lift the hood open.

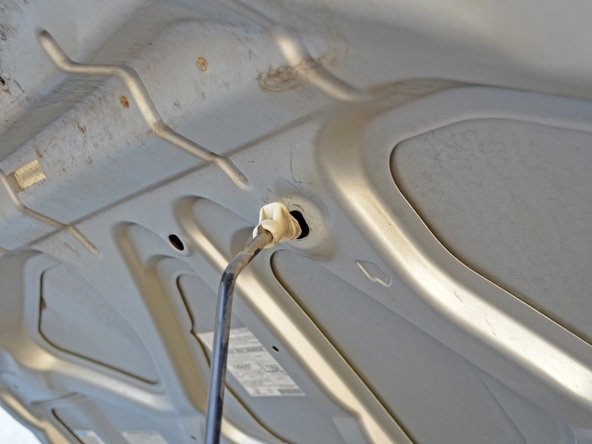
    • Place the end of the hood prop rod into the hole on the driver side of the hood marked by an arrow.

  11. 1995-2001 Honda CRV Oil Change: 手順 11、 2の画像 1 1995-2001 Honda CRV Oil Change: 手順 11、 2の画像 2
    • Locate the oil filler cap. It is on the passenger side of the valve cover, towards the rear.

    • Twist the oil filler cap counter-clockwise and remove it.

  12. 1995-2001 Honda CRV Oil Change: 手順 12、 3の画像 1 1995-2001 Honda CRV Oil Change: 手順 12、 3の画像 2 1995-2001 Honda CRV Oil Change: 手順 12、 3の画像 3
    • Place a funnel into the oil filler hole.

    • Pour 4 quarts of 5W-30 oil into the funnel. Use one hand to stabilize the funnel as you pour the oil to help prevent spills.

    • Consult your owner's manual if you think your operating conditions call for a different oil viscosity.

    • Replace the oil filler cap and twist it clockwise until it is snug.

  13. 1995-2001 Honda CRV Oil Change: 手順 13、 2の画像 1 1995-2001 Honda CRV Oil Change: 手順 13、 2の画像 2
    • Locate the oil dipstick. It is at the front of the engine along its center line.

    • Pull out the oil dipstick, wipe it off, place it all the way back into its hole and remove again.

    • Observe the oil level on the end of the dipstick. It should be between the two holes or slightly above the top one.

    • This is not your actual oil level, but a pre-check to make sure the engine will not run dry when you first start it. The oil level will drop slightly after the first run when oil fills the new oil filter.

    • Add oil if the oil level is below the bottom hole of the dipstick. Place the oil dipstick all the way back in it's hole.

  14. 1995-2001 Honda CRV Oil Change, Wrapping Up: 手順 14、 2の画像 1 1995-2001 Honda CRV Oil Change, Wrapping Up: 手順 14、 2の画像 2
    • Support the hood with one hand and use your other hand to place the hood prop rod back into its holder.

    • Make sure the hood prop rod is secured in its holder to prevent damage.

    • Gently lower the hood until it clicks into the secondary latch.

    • Press firmly on the edge of the hood until you hear the primary latch engage.

  15. 1995-2001 Honda CRV Oil Change: 手順 15、 3の画像 1 1995-2001 Honda CRV Oil Change: 手順 15、 3の画像 2 1995-2001 Honda CRV Oil Change: 手順 15、 3の画像 3
    • Make sure there is no one under the car before removing the jack stand and lowering the car!

    • Place the jack back under the lifting point. Lift the car until the jack stand is no longer supporting the car. Remove the jack stand.

    • Slowly lower the jack until it is no longer supporting the car. Remove the jack.

  16. 1995-2001 Honda CRV Oil Change: 手順 16、 2の画像 1 1995-2001 Honda CRV Oil Change: 手順 16、 2の画像 2
    • Locate the "maintenance required" key hole located on the driver console.

    • Use your car key to press the button and reset the "maintenance required" odometer.

    • Do not skip this step even if you do not have a "maintenance required" light currently on. If you do not press the button, the light will come on before it is time for your next oil change.

  17. 1995-2001 Honda CRV Oil Change: 手順 17、 2の画像 1 1995-2001 Honda CRV Oil Change: 手順 17、 2の画像 2
    • Start the car and look for leaks under the car. If there are leaks, shut the car off and determine if the drain plug or filter need to be tightened, or if a part has been damaged.

    • After running the engine for a few minutes, let it cool down for at least an hour and re-check the oil level. If the oil level is more than a 1/2" above the top hole of the dipstick you will need to drain oil. If the oil level is below the bottom hole of the dipstick you will need to add oil.

    • Allow 12-24 hours for all the oil to drain out of your old oil filter.

    • Take your old oil and filter to a recycling facility. Most auto parts stores and repair shops accept these at no charge. In addition, some cities and/or counties have a service where they will collect used oil and filters from your home. For more information, see the American Petroleum Institute's web page on used motor oil collection and recycling.

ゴール

30 の人々がこのガイドを完成させました。

作成者

4人の作成者と共同で作成されました。

Phillip Takahashi

メンバー登録日: 08/22/11

86,617 ポイント

87のガイドは作成済み

13 件のコメント

The filter is easier and not as messy to replace if you replace it from above. This also keeps debris from getting on the filter gasket.

There is even a small hole in the intake manifold so you can see what the filter threads onto.

montanatglenn - 返信

if the engine reducing oil whats the cause is there any problem, kindly guide me

mashkoor77 - 返信

Check crank shaft seal (front/rear) and Head cylinder seal areas. Apart from that visit the dealership. Something as minor as an oil pressure sensor could also do that. Again your best bet is to go to a trust worthy auto shop by reviews or a well established and rated dealership. Any place else you'll increase your chances to be cheated.

Numair Aidroos -

What do you do if the oil filter was cross threaded on before I bought it? Is the oil filter threads connected to the block or is it something I can replace?

Rachel - 返信

Remove, and install a new filter, along with a clean gasket plug.

Numair Aidroos - 返信

コメントを追加

統計データ:

過去 24時間: 16

過去 7 日: 89

過去 30 日: 477

今までの合計 229,032