メインコンテンツにスキップ

パタゴニアのウェーダーの穴の修理方法

必要な工具と部品

  1. パタゴニアのウェーダーの穴の修理方法, パタゴニアのウェーダーの水漏れを確認する方法: 手順 1、 3の画像 1 パタゴニアのウェーダーの穴の修理方法, パタゴニアのウェーダーの水漏れを確認する方法: 手順 1、 3の画像 2 パタゴニアのウェーダーの穴の修理方法, パタゴニアのウェーダーの水漏れを確認する方法: 手順 1、 3の画像 3
    • 濡れてもいい平らな場所にはしごを置きます。

    • ウェーダーを裏返します。

    • はしごにウェーダーを留めます。

  2. パタゴニアのウェーダーの穴の修理方法: 手順 2、 3の画像 1 パタゴニアのウェーダーの穴の修理方法: 手順 2、 3の画像 2 パタゴニアのウェーダーの穴の修理方法: 手順 2、 3の画像 3
    • ウェーダーにホースを入れます。

    • ウェーダーの片脚にホースを入れます。

  3. パタゴニアのウェーダーの穴の修理方法: 手順 3、 2の画像 1 パタゴニアのウェーダーの穴の修理方法: 手順 3、 2の画像 2
    • ホースでウェーダーに水を入れます。

    • 水の重みではしごが倒れないように注意してください。必要であればはしごの反対側に重みを加えます。

  4. パタゴニアのウェーダーの穴の修理方法: 手順 4、 3の画像 1 パタゴニアのウェーダーの穴の修理方法: 手順 4、 3の画像 2 パタゴニアのウェーダーの穴の修理方法: 手順 4、 3の画像 3
    • 漏れを調べます。漏れている箇所が見つかったら油性のペンで印を付けます。

    • もう片側の脚も同様に調べ、すべての漏れに印を付けます。

    • ウェーダーから水を抜き、完全に乾かします。

  5. パタゴニアのウェーダーの穴の修理方法, パタゴニアのウェーダーの穴の修理方法: 手順 5、 3の画像 1 パタゴニアのウェーダーの穴の修理方法, パタゴニアのウェーダーの穴の修理方法: 手順 5、 3の画像 2 パタゴニアのウェーダーの穴の修理方法, パタゴニアのウェーダーの穴の修理方法: 手順 5、 3の画像 3
    • 印を付けた箇所をアルコールを含ませたシートや布できれいに拭きます。

    • 拭いた箇所を完全に乾かします。

  6. パタゴニアのウェーダーの穴の修理方法: 手順 6、 1の画像 1
    • 印を付けた箇所にシームグリップを1滴垂らします。

    • 3センチ四方を薄く覆うシームグリップが必要です。

  7. パタゴニアのウェーダーの穴の修理方法: 手順 7、 2の画像 1 パタゴニアのウェーダーの穴の修理方法: 手順 7、 2の画像 2
    • 絵筆を使ってシームグリップを薄く均一に広げます。

  8. パタゴニアのウェーダーの穴の修理方法: 手順 8、 2の画像 1 パタゴニアのウェーダーの穴の修理方法: 手順 8、 2の画像 2
    • 絵筆を90度回転させて接着剤を均一に広げます。

  9. パタゴニアのウェーダーの穴の修理方法: 手順 9、 3の画像 1 パタゴニアのウェーダーの穴の修理方法: 手順 9、 3の画像 2 パタゴニアのウェーダーの穴の修理方法: 手順 9、 3の画像 3
    • ウェーダー・リペアキットに入っている薄いフィルムをシームグリップの上に置きます。

    • 指で押して空気を抜きながらフィルムを滑らかに貼付けます。

    • そのまま12時間放置します。

  10. パタゴニアのウェーダーの穴の修理方法: 手順 10、 3の画像 1 パタゴニアのウェーダーの穴の修理方法: 手順 10、 3の画像 2 パタゴニアのウェーダーの穴の修理方法: 手順 10、 3の画像 3
    • ウェーダーから薄いフィルムを剥がします。

終わりに

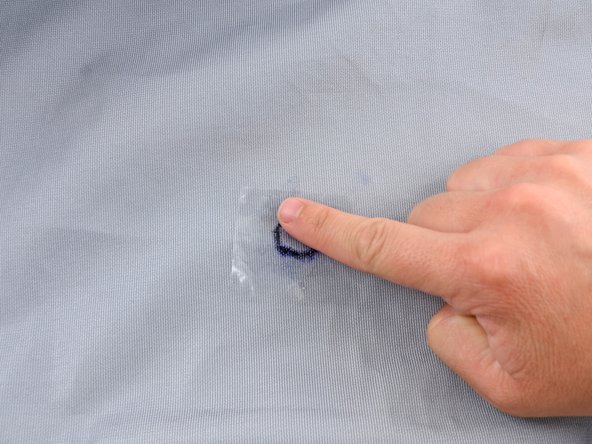
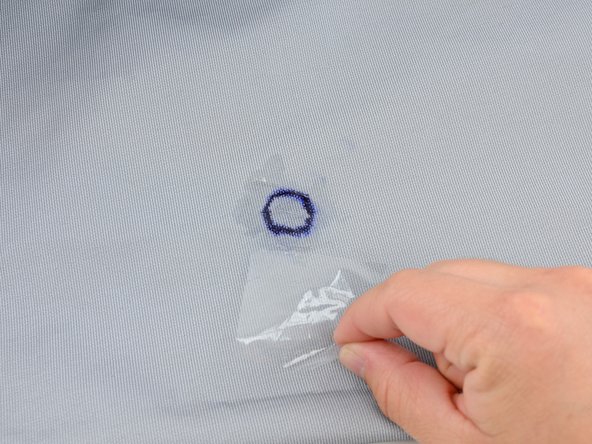
水の浸入を防ぐ透明のあて布を施しました。その他の漏れも同様に修理してください。

8 の人々がこのガイドを完成させました。

以下の翻訳者の皆さんにお礼を申し上げます:

en jp

100%

これらの翻訳者の方々は世界を修理する私たちのサポートをしてくれています。 あなたも貢献してみませんか?
翻訳を始める ›

作成者

4人の作成者と共同で作成されました。

Brittany McCrigler

メンバー登録日: 03/05/12

89,011 ポイント

131のガイドは作成済み

チーム

iFixit iFixit人のメンバー

Staff

135 メンバー

16,732のガイドは作成済み

6 件のコメント

Ho riparato i wader seguendo le indicazioni, ed e stato un trionfo, lavoro perfettamente riuscito. Ora devo provare la tenuta andando a pescare.

Unico problema e il pennarello, che bagnandosi con l’acqua sbava e tende a cancellarsi pur essendo indelebile…. Quando si i Wader si asciugano si rischia di non vedere bene i buchi da riparare se sono di piccola entità.

loris vitali - 返信

Ciao Loris, puoi utilizzare un Markal B Paint Stick per contrassegnare le perdite. Puoi acquistarli su Amazon.

Marty Chapman -

My waders have a nice, round hole about 1/4" in diameter, an inch above the top of the gravel guard. Since Seam Grip can't be applied where there isn't any fabric, a patch is evidently needed, but what to use? LDPE? Tenacious Tape? Other? This is a recent pair of Swiftcurrent waders.

AMG - 返信

Hi AMG, you can actually fix a hole using Seam Grip by either using LDPE on one side or a TPU patch before applying Seam Grip. Because of the location it would be easier to use a TPU patch, the adhesive would keep it in place while applying Seam Grip. Next apply seam grip to the other side liberally, extending past the hole by a 1/2" in all directions. Cover that with either another TPU patch or LDPE film with a flat weighted object to flatten out the repair while it cures. I hope that helps with future DIY endeavors.

Marty Chapman -

How about the seam in the crotch of the waders?

Steve Kyle - 返信

コメントを追加

統計データ:

過去 24時間: 20

過去 7 日: 88

過去 30 日: 378

今までの合計 19,202