はじめに
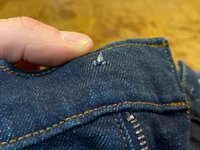
ジーンズのボタン(鋲とも呼ばれる)は、ジーンズのウエストをしっかりと留めるためのものです。
このガイドでは、新しいジーンズのボタンの取り付け方を説明します。
修理を始める前にガイド全体を読み、必要な道具と材料を集めてください。Patagonia専用の交換部品が理想的ですが、必須ではありません。 Patagoniaの交換部品は、パタゴニアのカスタマーサービスに電話やメールで連絡していただくことでお求めいただけます。
または、パタゴニア製品をお近くの直営店にお持ち込みいただき、修理評価を受けるか、郵送修理サービスを通じてパタゴニアにお送りください。
さあ修理を始めましょう!
警告! 小さな部品です。 パタゴニアでは、3歳以下のお子様を対象とした衣類の修理は推奨しておりません。 代わりに、専門の修理サービスに依頼をするため製品をお預けください。
関連チュートリアル: ワークパンツのリベット交換
Patagoniaのケア & リペアホームページへ戻ります。
必要な工具と部品
-
-
-
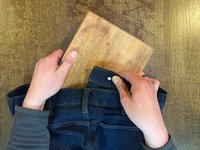
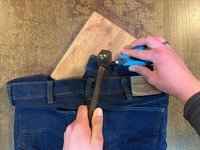
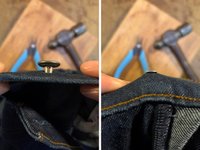
ジーンズを裏返し、ボタンの真下に柔らかい木片や革のような柔らかい平らな作業面を置きます。
-
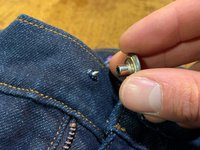
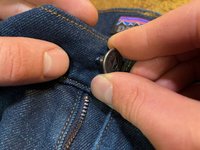
ニードルノーズプライヤーで鋲を固定し、鋲とボタンの位置が合っていることを確認します。
-
鋲をまっすぐ下向きに打ちます。
-


48 の人々がこのガイドを完成させました。
以下の翻訳者の皆さんにお礼を申し上げます:
100%

これらの翻訳者の方々は世界を修理する私たちのサポートをしてくれています。 あなたも貢献してみませんか?
翻訳を始める ›


10件のガイドコメント
Nice, but let's consider how this situation occurs. The tack comes out of its hole, just simply replacing it is not realistic, unless the new tack is significantly bigger. So how do you "repair" the hole such that it will hold a tack again?
As noted in step 2, you can move the tack over to where the denim isn't damaged. If that will cause the jeans not to fit properly, you can sew a folded piece of denim behind the hole (sew around the edges on the inside of the jeans) and punch the tack through the new piece.
I didn´t have a new button and was in a pinch. Just ripped the old button off completely, jammed it in the tail end of a hammer and yanked it apart with som pliers. Then i followed the instructions in this fix. Worked like a charm, so far...
Thanks I’m gonna try this first!
The best thing to do is patch the hole. I simply use fabric glue and some pieces of blue jeans that you probably have hanging around. Trim off the extra threads and then apply fabric glue to the back of the waist band covering the hole made by the old button. Do the same on the front and then let dry. about 30 minutes or so, if you have a machine I always stitch back and for on the edges. Trim any edges or use additional glue to tack them down. Now because you have strengthened the hole carefully push the back of the button through where you can see the end, add the front to the nail end and turning the garment face down on a protected hard surface hammer about 3 times and check to see if it is sturdy, continue to hammer until you have reached the objective. Now you have got many more years with that button.