
Broken Xbox Series X power ribbon clip!
Hello does anyone happen to know where i can get a replacement clip for the power ribbon for my series x or even a solid duct tape fix for now? Long story short, we live in the middle of nowhere in a 150 year old house regular cleaning is essential, so I wasn't listening to someone when I should have, so to get my attention she hooks the ribbon with her pinkie and POP!. But as far as I can tell there is no damage to the bridge board. Just a couple of the pins on the ribbon connector are scrunched back a little and the grey piece you press to release the cable has a half a centimeter gap that is broken out. I'm about 98.2% sure that the ribbon cable not seating in is the issue. So if anyone has a fix or link to where I could find this little part it would be greatly appreciated.
Update (10/04/2021)
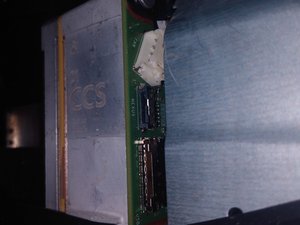
Here is this pic drew, its a little worse than i thought
この質問は役に立ちましたか?

8 件のコメント
Can you take a picture of the damaged ribbon connector? iFixitでの質問に画像を追加する方法
Andrew S さんによる
@andrewsawesome Sorry it took so long to reply back. It has been chaos the last few days work being busy, the weather being crap for this time of year, and having my niece and nephew over, who just go full blast from 6am -10pm. I managed to snap a couple pics with my phone camera and this was the only that looks like I haven't drank 14 cups of coffee. Thats the only thing that is broken, and it worse than when i put it up. There was just a small piece on the top left gone, I watched the rest fall off when i sat it down to take a picture, but i don't really see a way other than finding that connector, and desolder that one and fitting a new one. But I'm up for suggestions. Sorry about the slow reply and getting off topic back there. Thanks for your time!
Adam Riffle さんによる
If you still need this part I have a link I ordered mine from a guy in Arizona it's a 1.50
Kent Hylok さんによる
Would you send me that link please? I ordered two from a electronic salvage company 2.25 a piece and they weren't the right one's, they was top contact 10 pin but they wouldn't line up with the board. And the company that makes them i-pex, a salesman e-mailed me the next day and asked if it was commercial or retail, i told him neither i just want some to repair myseries x, and didn't hear another word from them. Well my impression is, the don't want anything to do with a person that isn't going to make a several thousand dollar order. I would greatly appreciate that link if you would post it to me, THANKS
Adam Riffle さんによる
@adzholey_o hello, did you ever manage to get that fixed? I'm in the exact same predicament at the moment. I just saw the link the other person posted and ordered a few. Was just curious how the replacement process is.
NISMOJukeRich さんによる
3件以上のコメントを表示