
iPhone 6 U2 missing solder pads. Where to run the jumper wire/s?
Hello all,
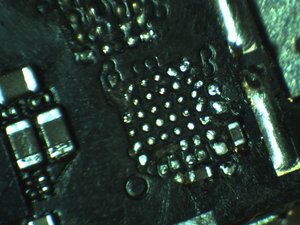
Looking for the micro soldering community's help. As you can see in the picture the U2 area is missing 4 pads. No, I did not create this mess myself, this was brought in to me from the customer who had this done at the repairshop he previously brought it to.
Now my questions are the following -
How bad is the situation?
I know some pads are not actually required (as per Jessa's youtube video). Are any of these 4 happen to be one that is not required?
I seen on a previous iFixit post that a user recommended a adhesive made by MG chemicals that I can apply and let dry to replace the solder pads, or any of you aware of this and what are the pro's and cons compared to running a jumper wire?
I know I need to expose the surface to either apply the adhesive or wire too, are there any tips/tricks or things I should be careful of when trying to expose it?
If I was to go the wire/soldering route where exactly would I run my wire from/too?
Any other advice or help you can offer me is greatly appreciated
.
Thanks!
この質問は役に立ちましたか?


2 件のコメント
If my answer to your question helped you, please mark it as chosen solution and follow up with what worked for you to repair your issue to help others in the community :) Best of luck with your repair
The Microsoldering Shop さんによる
Sure thing! Will follow up once I try it tommorow. Thanks!
Cort さんによる